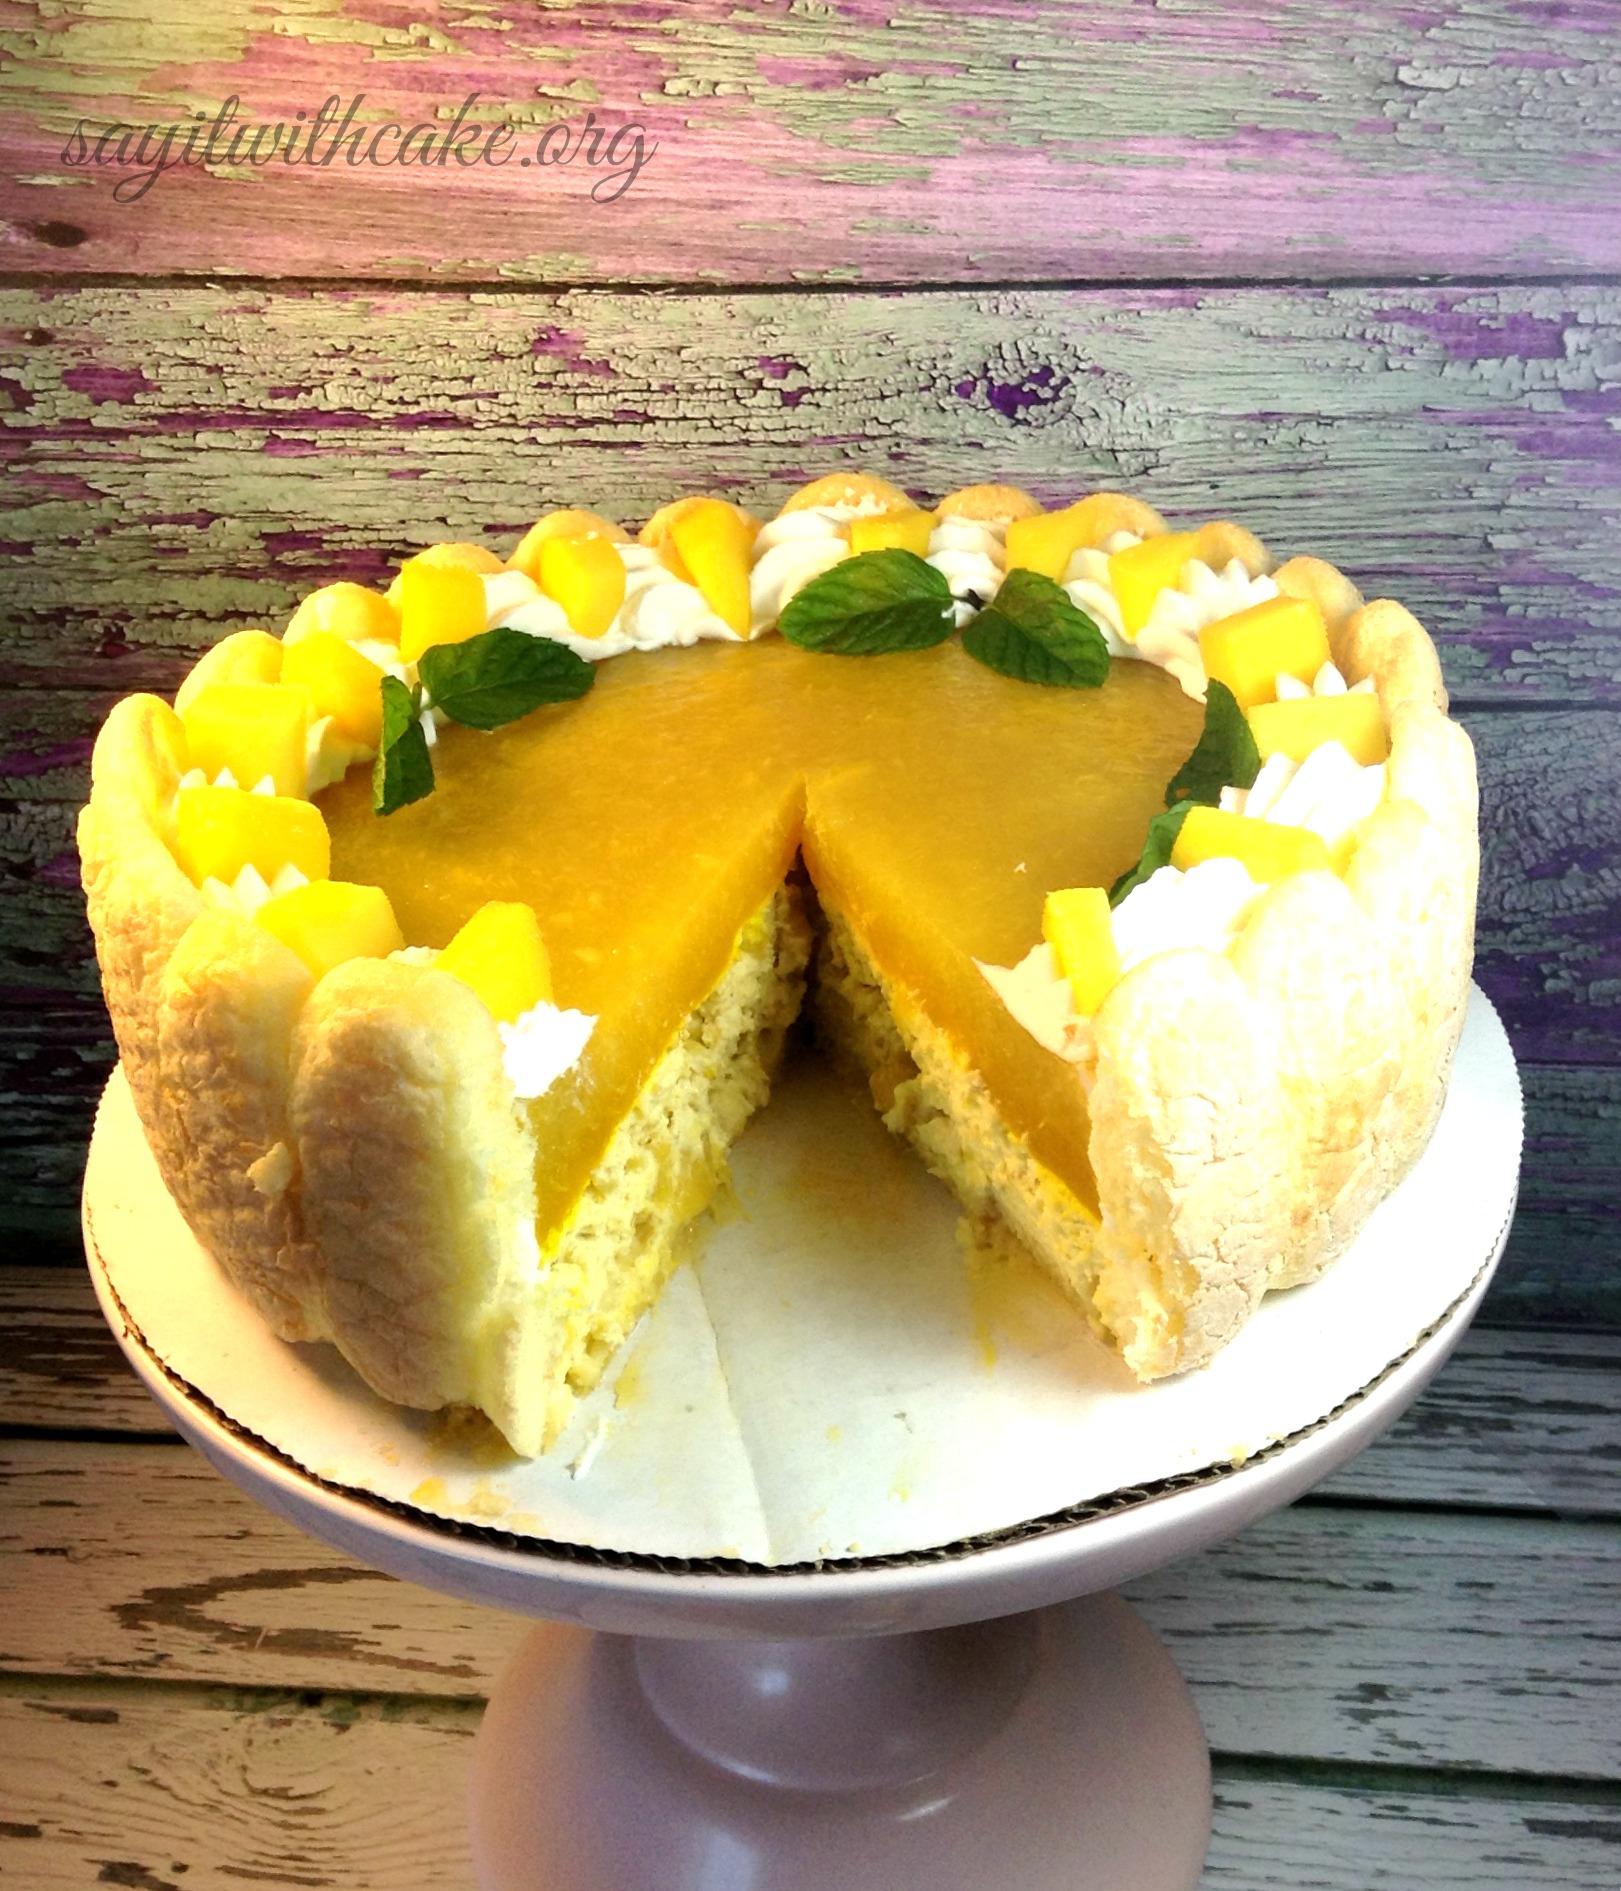
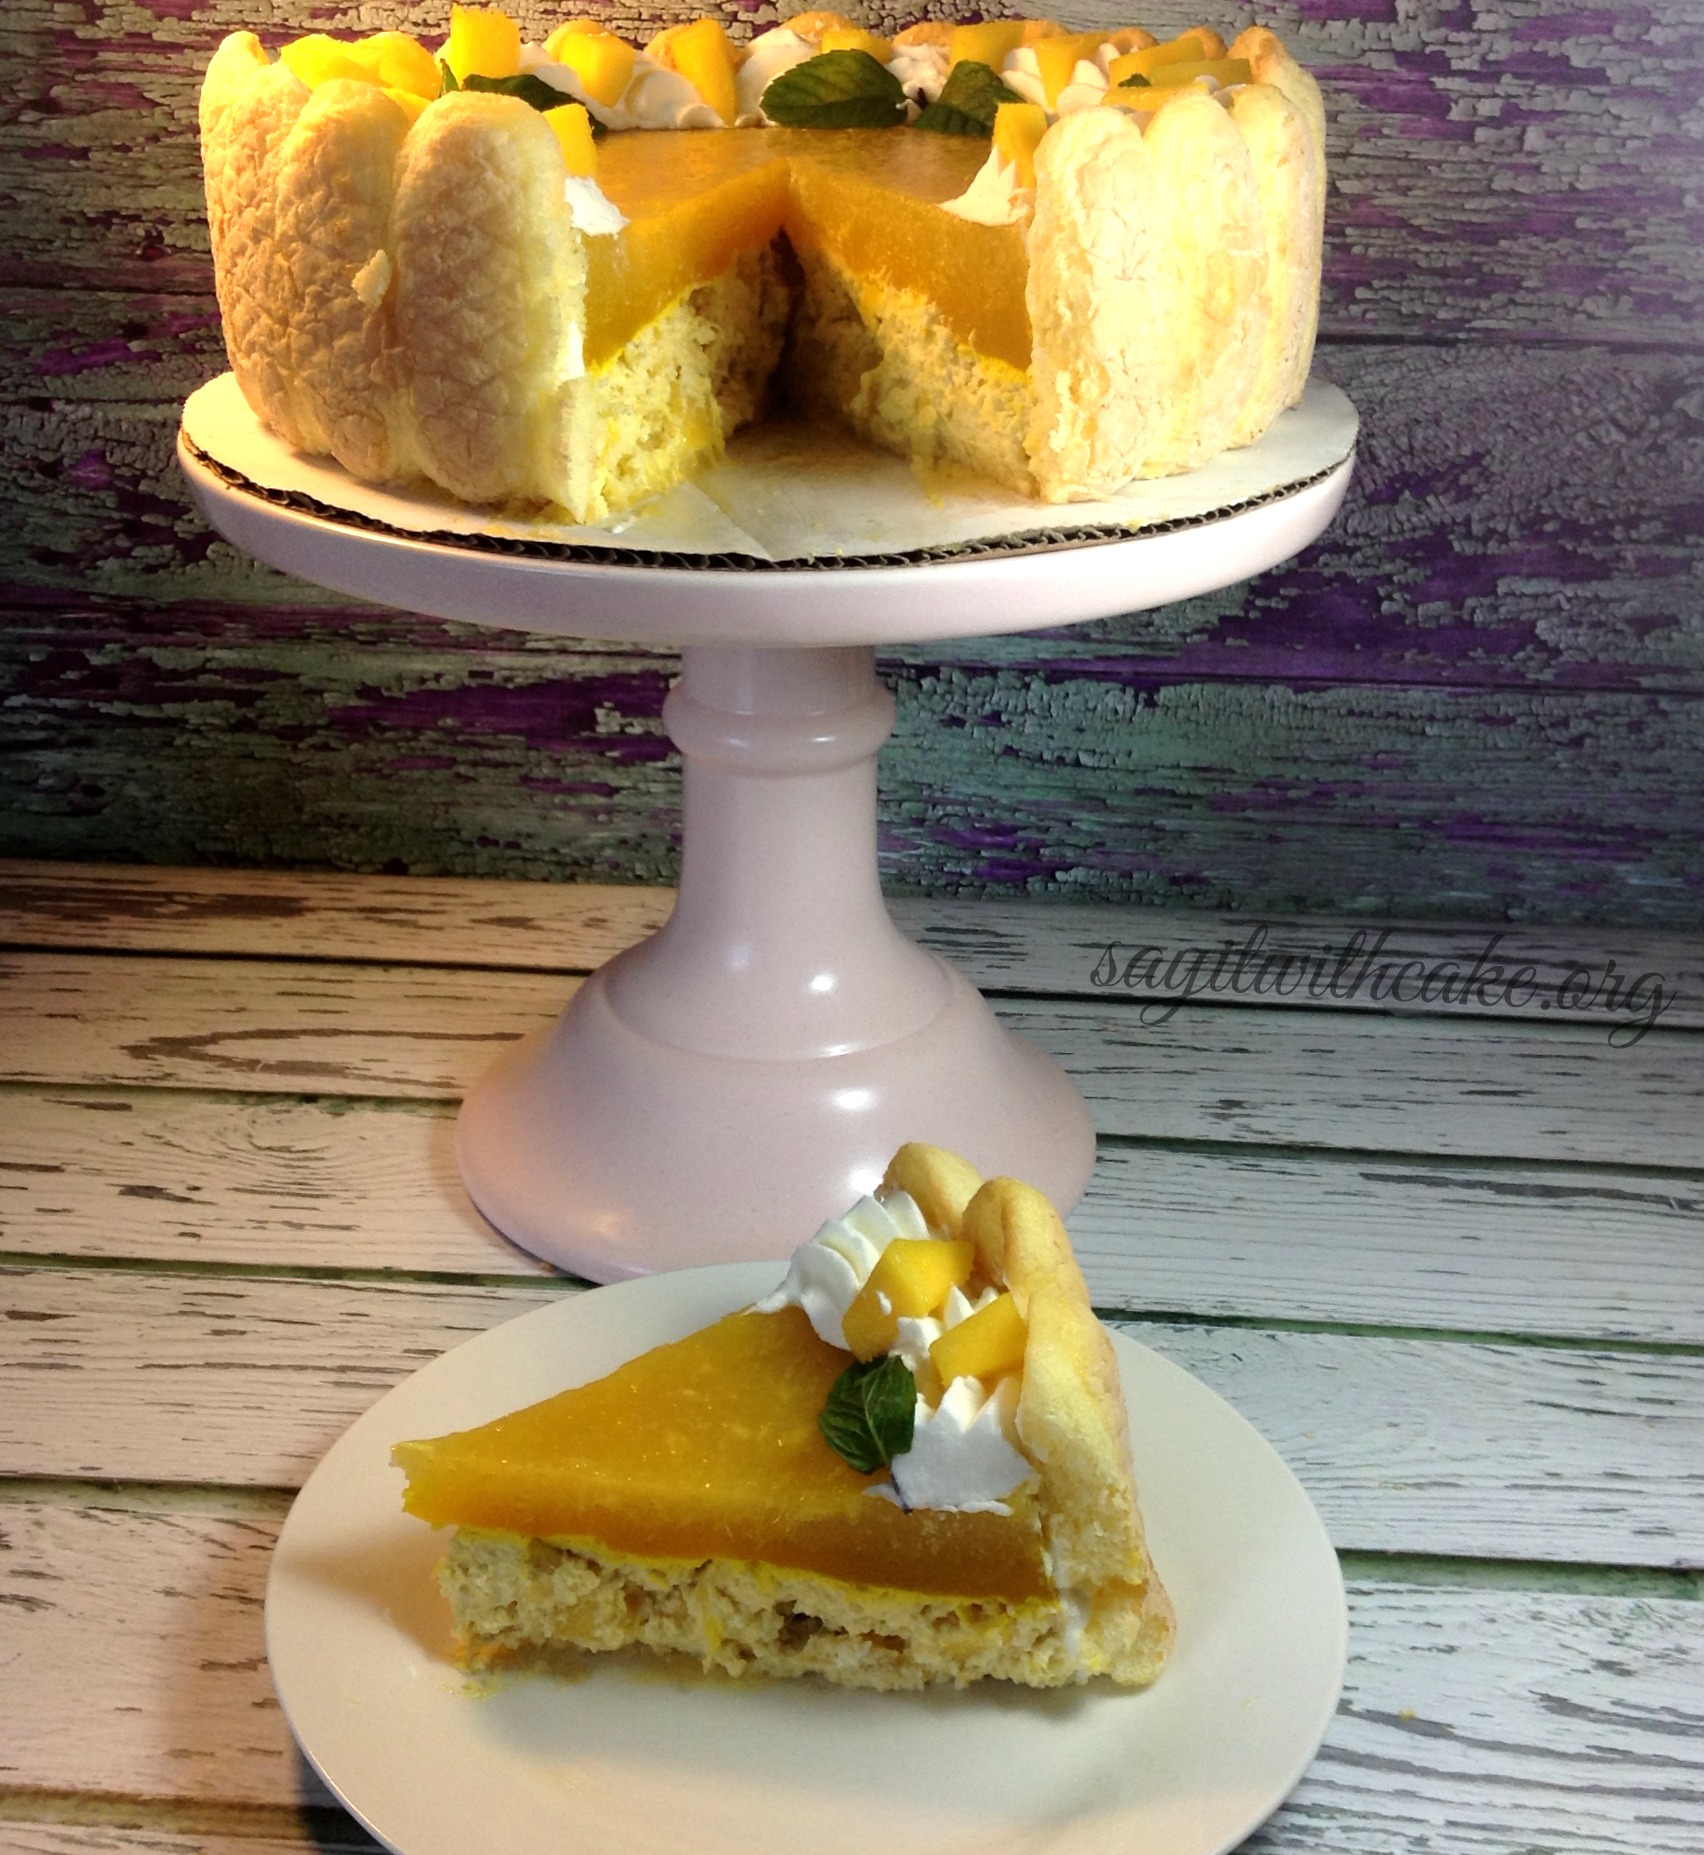
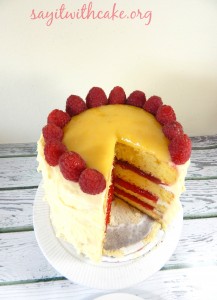
 Mango’s are in season now and I am so happy because I love Mango’s! I have always wanted to try making a mango cake, so here is my attempt! A light fluffy vanilla sponge cake topped with a creamy mango mousse, and a mango mirror glaze on top, surrounded with lady fingers and garnished with fresh whipping cream, mango’s and mint leaves.

This is what the cake looked like without the lady fingers. I used a pastry ring and acetate paper to make the cake keep its shape.

I made homemade mango puree and you can see little pieces of mango inside the glaze on top. Next time I would blend the puree longer so there would be np pieces inside. It is supposed to have a mirror like surface when it is done right.

Each bite is filled with Mango, so fruity and delicious. Perfect for summer.

I found the lady fingers at Vons. They were really hard to find, and I thought about making my own lady fingers. I will have to save that for next time.
Ingredients
- 5 eggs
- 3/4 Cup sugar
- 1 cup plus 2 1/2 tsp flour
- 1/2 cup mango puree
- 3 tsp gelatin
- 2 cups whipping cream
- 2 egg whites
- 1/2 cup sugar
- 1/3 cup water
- 1 1/8 mango puree
- 1/4 cup sugar
- 1 1/2 tsp gelatin
- whipping cream
- mango pieces
- mint leaves
Instructions
- preheat oven to 350
- beat eggs and sugar until frothy
- gently add the sifted flour and mix well
- pour the mixture on a baking sheet covered with parchment paper.
- place in oven and bake 13 min.
- remove and let cool
- cup the sponge cake to the size of the round frame used. ( I used an 8 inch pastry ring)
- line the frame with lady fingers soaked in simple sugar or mango juice, or you can wait and put the lady fingers on the outside after the cake is done.
- bloom gelatin in water
- in a saucepan, heat the mango puree then put in the softened gelatin and mix well. let cool
- in a bowl beat the egg whites
- in a saucepan, heat the water with the sugar until it reaches 110 C to obtain a syrup
- Drizzle the syrup with beaten egg whites mixing in mixer at low speed
- Increase speed to the maximum and continue beating for 5 minutes to obtain an Italian meringue
- gently add whipped cream with mango and meringue
- bloom gelatin in water
- in a saucepan, heat 1/2 mango puree with sugar, when the mixture starts to boil, put the gelatin and mix
- then add the remaining puree stir, and let cool 15 minutes at room temperature
- pour the mirror on the mango mousse and refrigerate for 5 hours
- decorate top with mango, whipping cream and mint leaves
Enjoy!

Here are some other fruit filled cakes you might like
Tres Leches Cake with Peaches
lemon raspberry cake
fraisier
]]>
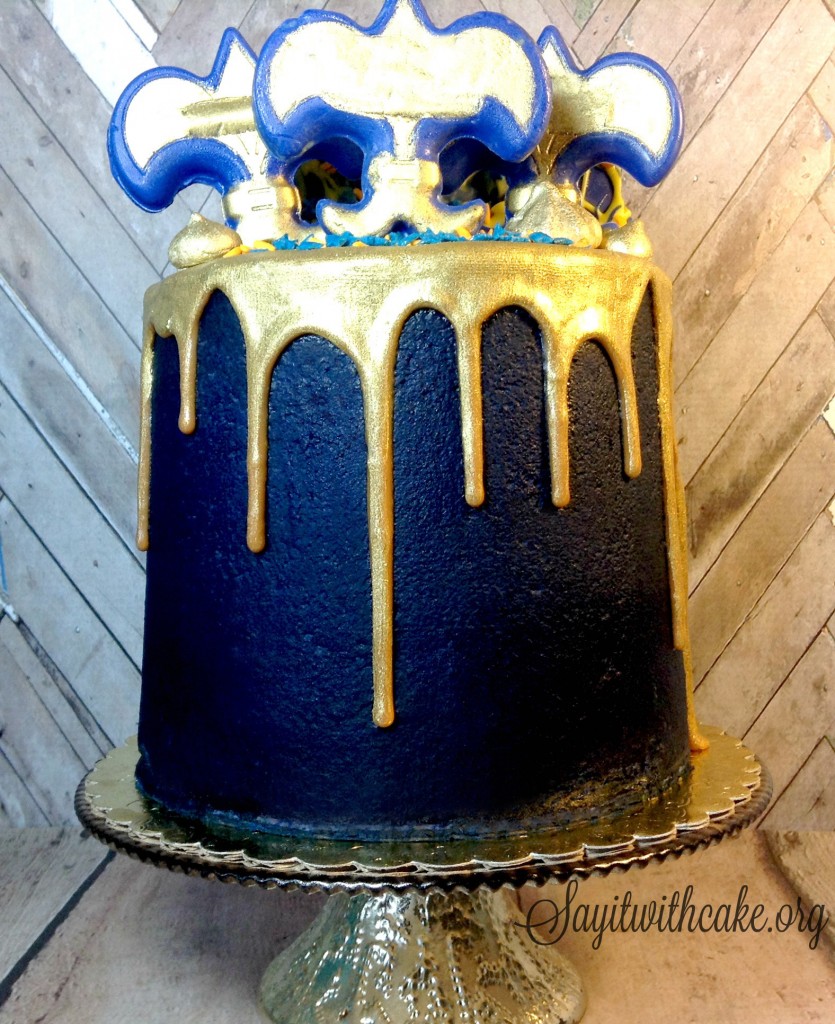
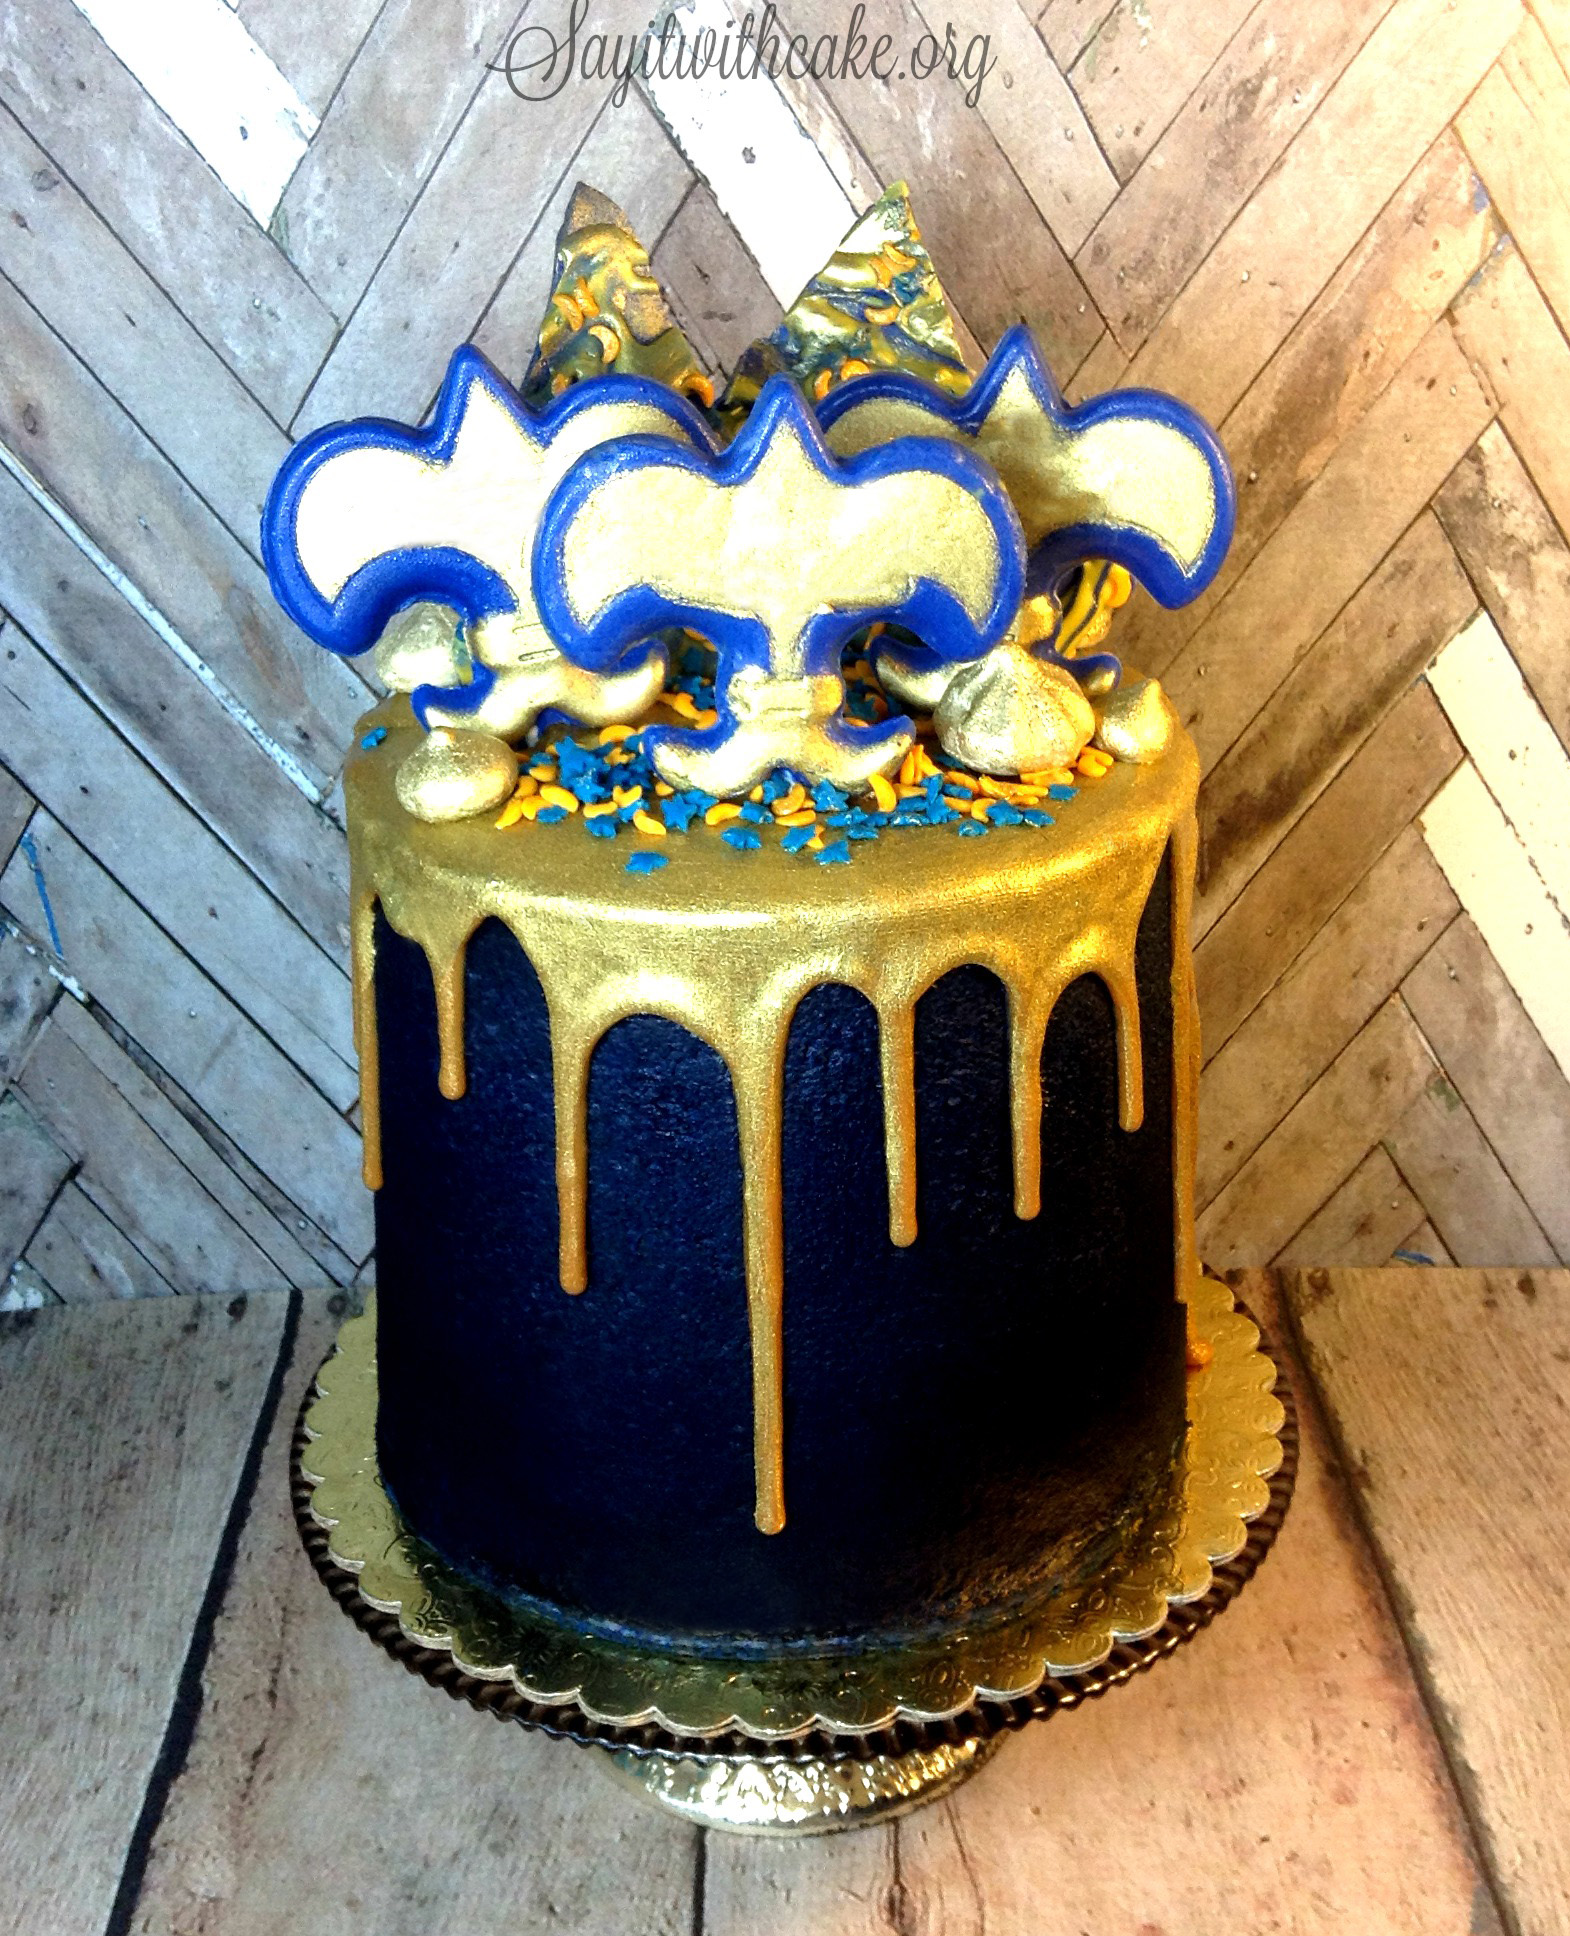 I made this cake for the Cub Scouts Blue and Gold banquet. My favorite part was the dripping gold ganache. This cake has midnight blue buttercream, gold ganache, chocolate boy scout logo toppers, blue and gold moon and stars sprinkles, gold meringue cookies, and blue and gold bark!
Many components of this cake can be made ahead of time like the toppers, meringues, bark, ganache, and frosting. You can find my recipes on the links.
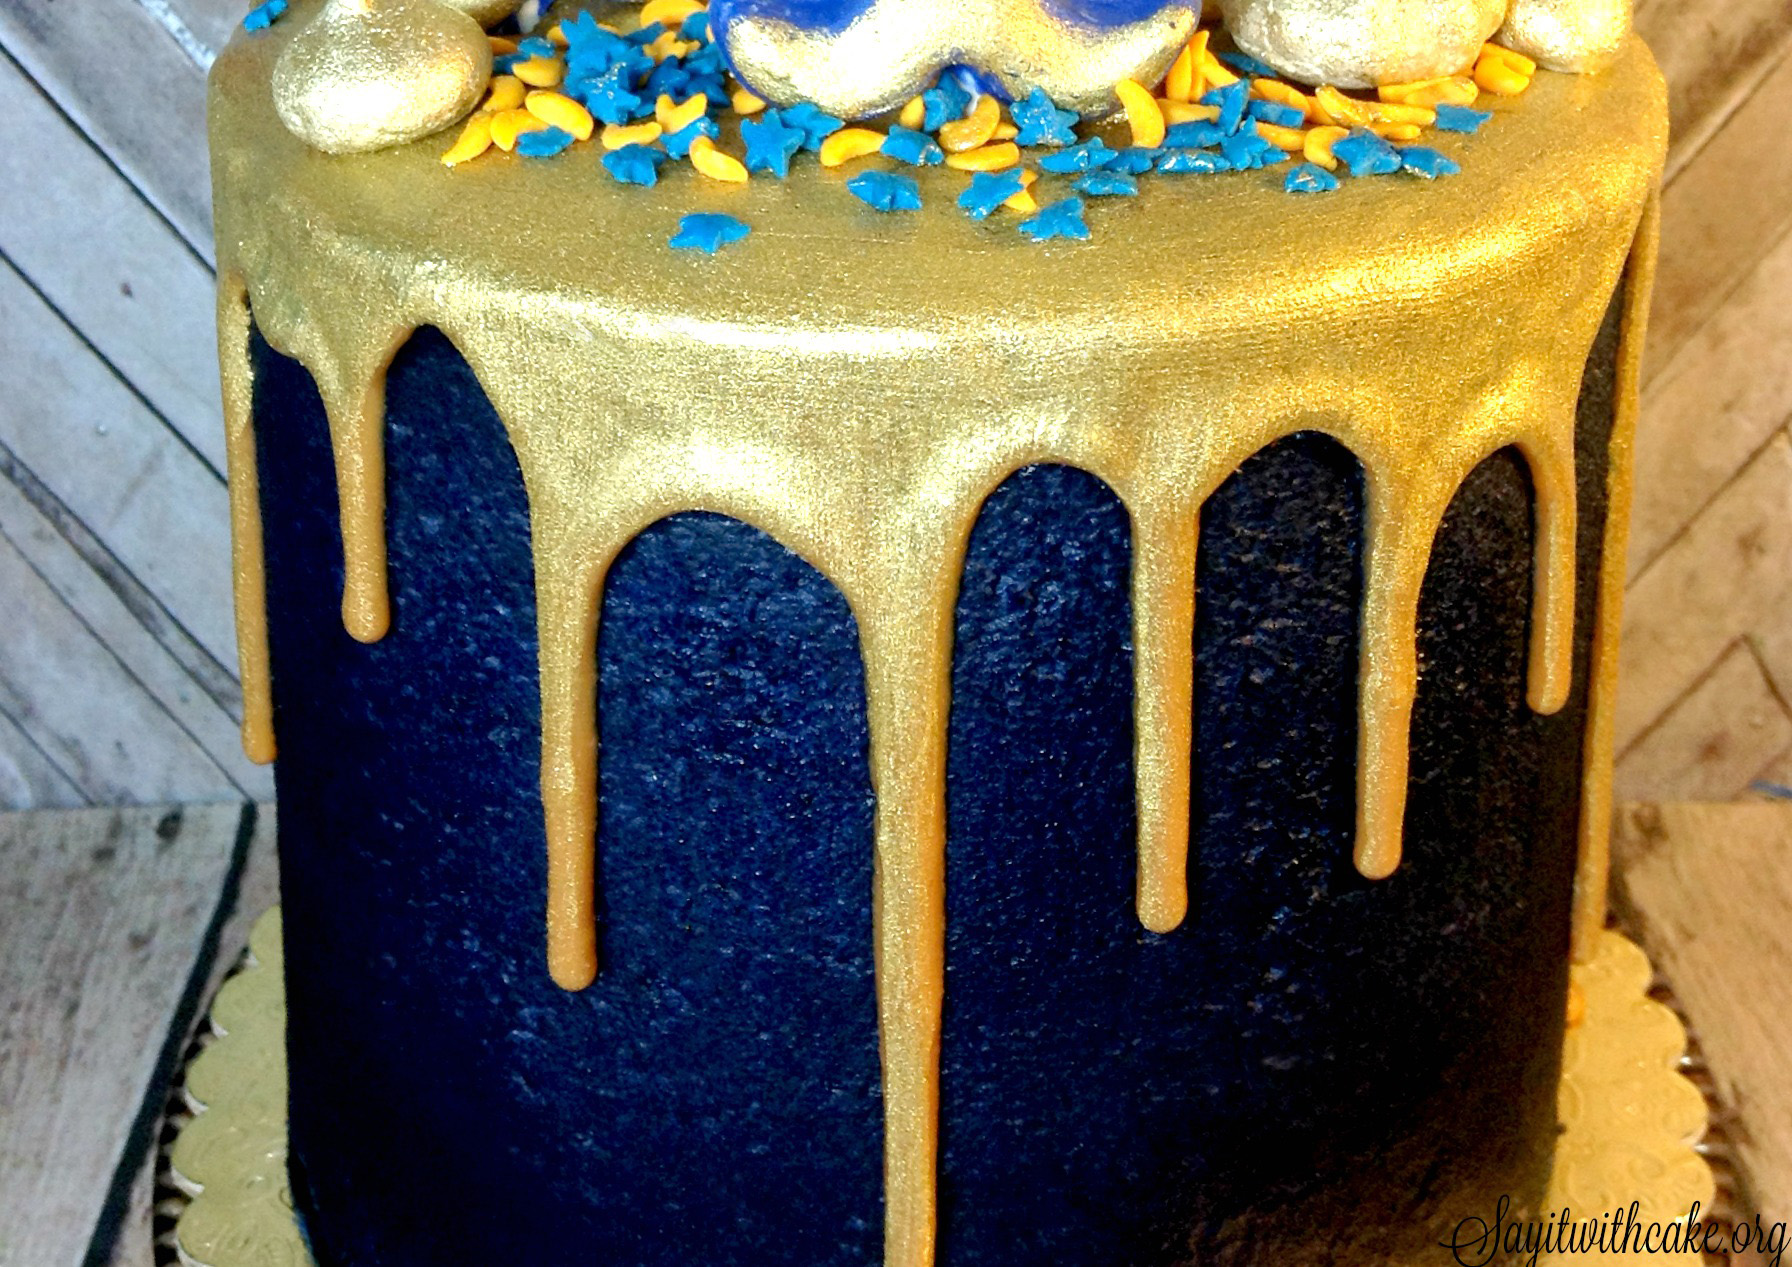
The trick to making the gold ganache is to start with a yellow ganache. Add yellow food coloring to the cream while it is heating up. You can check out my post on how to make colored ganache here.
Yellow chocolate ganache
- 12 ounces of yellow candy melts
- 1/3 cup heavy whipping cream
- yellow food coloring
After you make the ganache and drip it down the cake, paint it with gold luster dust. You can also check out my tutorial on how to make perfect ganache drips here. Add a tiny bit of vodka or extract to a small bowl, then add the luster dust and mix it up till it is a thick paste. Then paint it on top of the ganache! I think it looks so beautiful!
Enjoy!
Other cakes with dripping ganache you might enjoy!
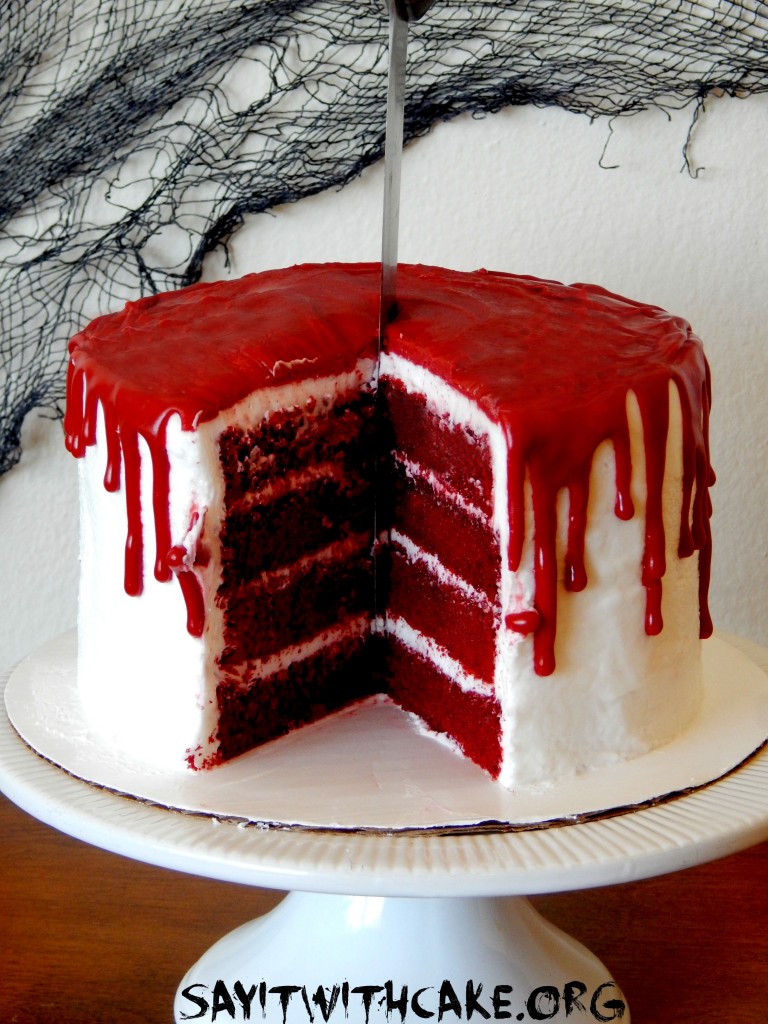
Halloween Cake
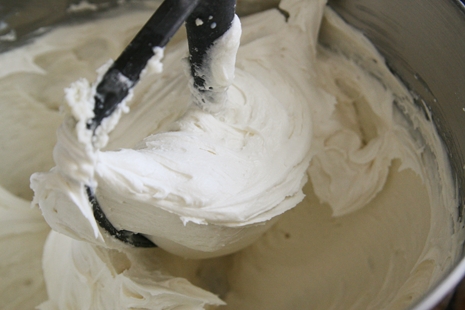 This recipe for Buttercream Frosting I got from my teacher at a cake decorating class. It is so easy and yummy!
Here is the easy and delicious recipe!
Ingredients
- 1 1/2 cup sweetex or crisco
- 1/4 teaspoon salt
- 1 teaspoon meringue powder
- 2 pounds powdered sugar
- 1/2 cup milk or water
- 1 tsp vanilla
Instructions
- mix the sweetex, salt, and meringue powder with electric mixer to blend aobut 30 seconds
- Add the milk and vanilla in the bowl, then add the sugar and blend by hand with a spatula until the sugar is absorbed into the liquid
- .put bowl back on the mixer and beat on medium speed for 2-5 minutes until smooth and a little fluffy.
- if mixture is too stiff, you can add more liquid. if it is too runny add more powdered sugar
Enjoy!
Cakes I have made with Buttercream frosting

Halloween Cake
Easter Layer Cake

lemon blueberry layer cake
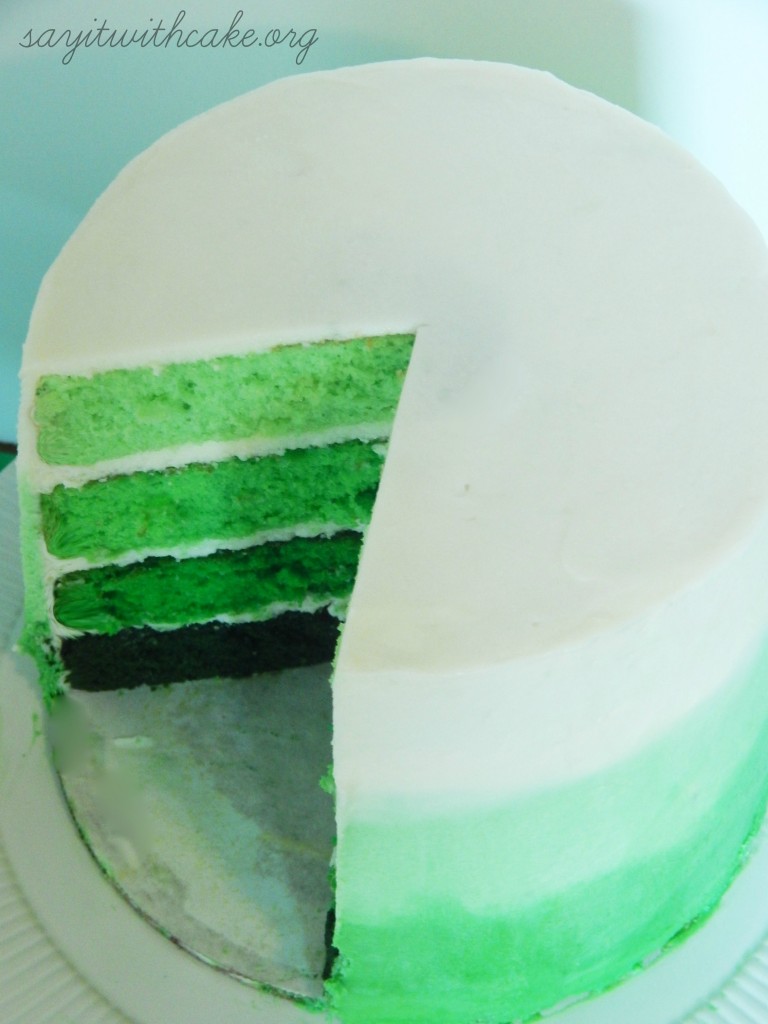
green ombre layer cake
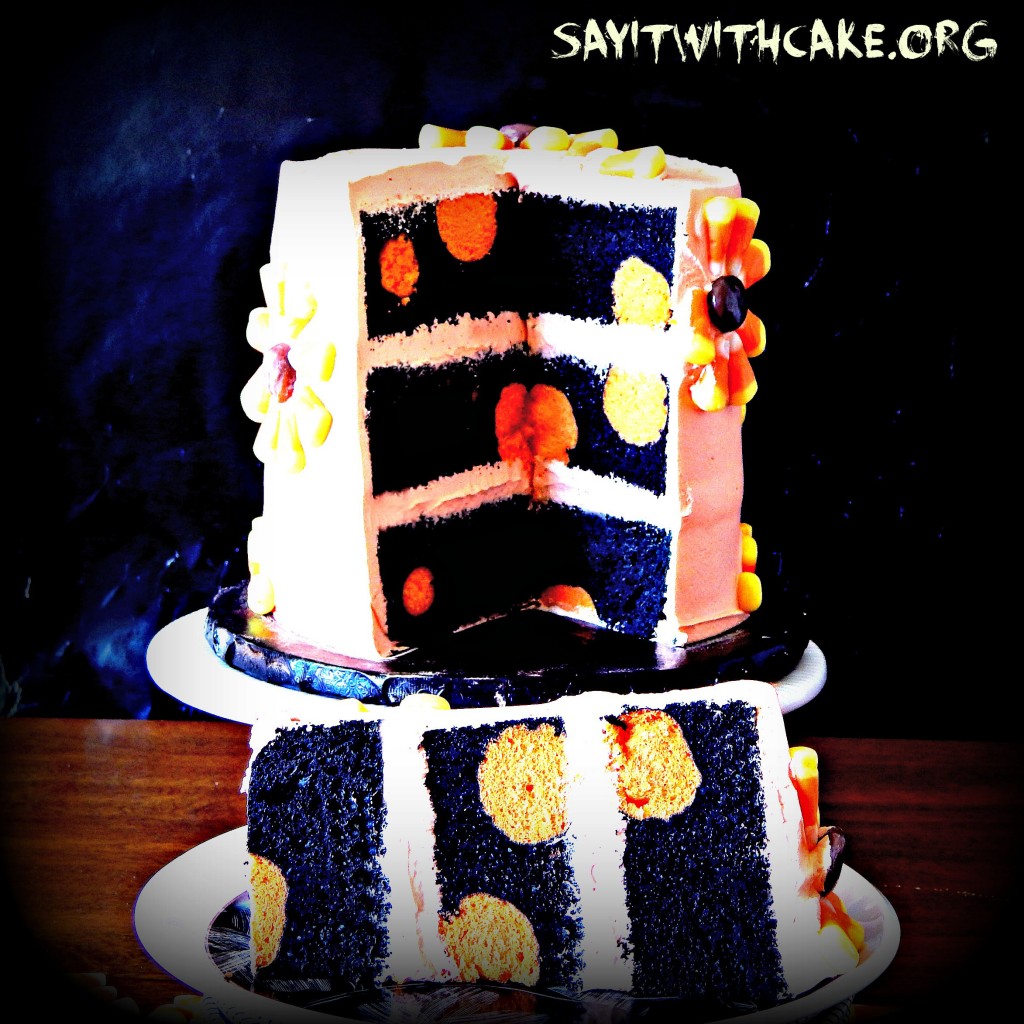
Polka Dot Cake
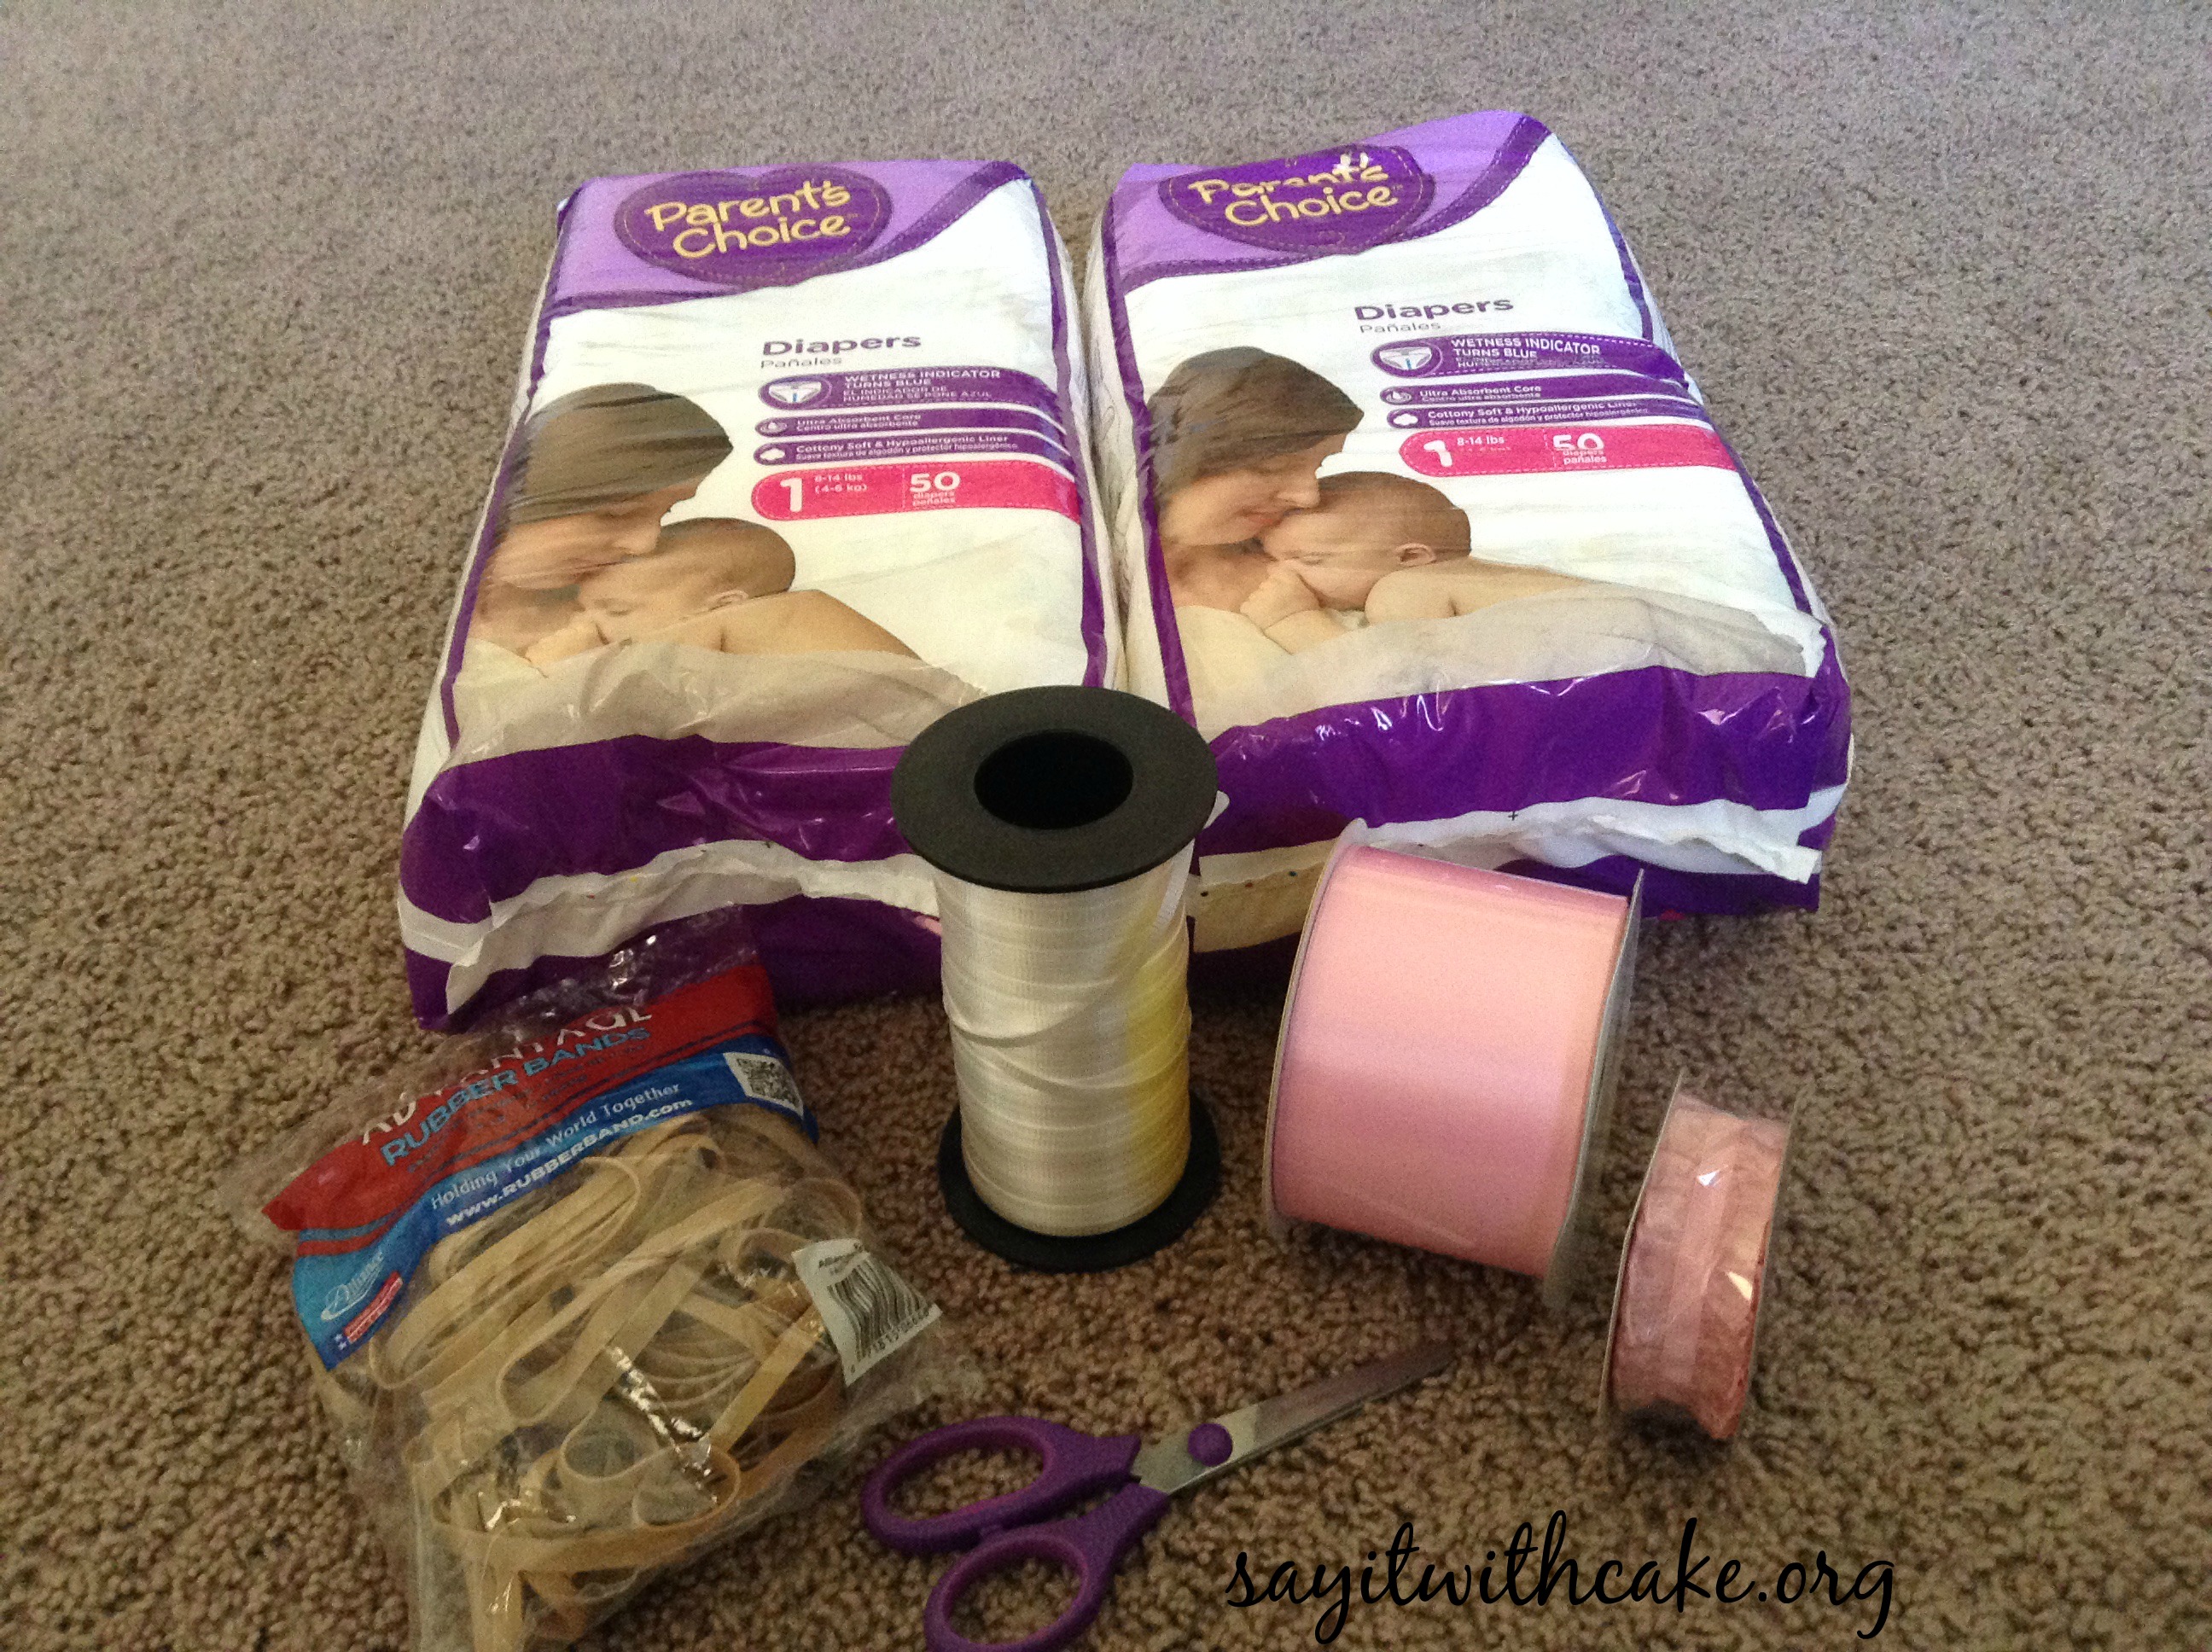
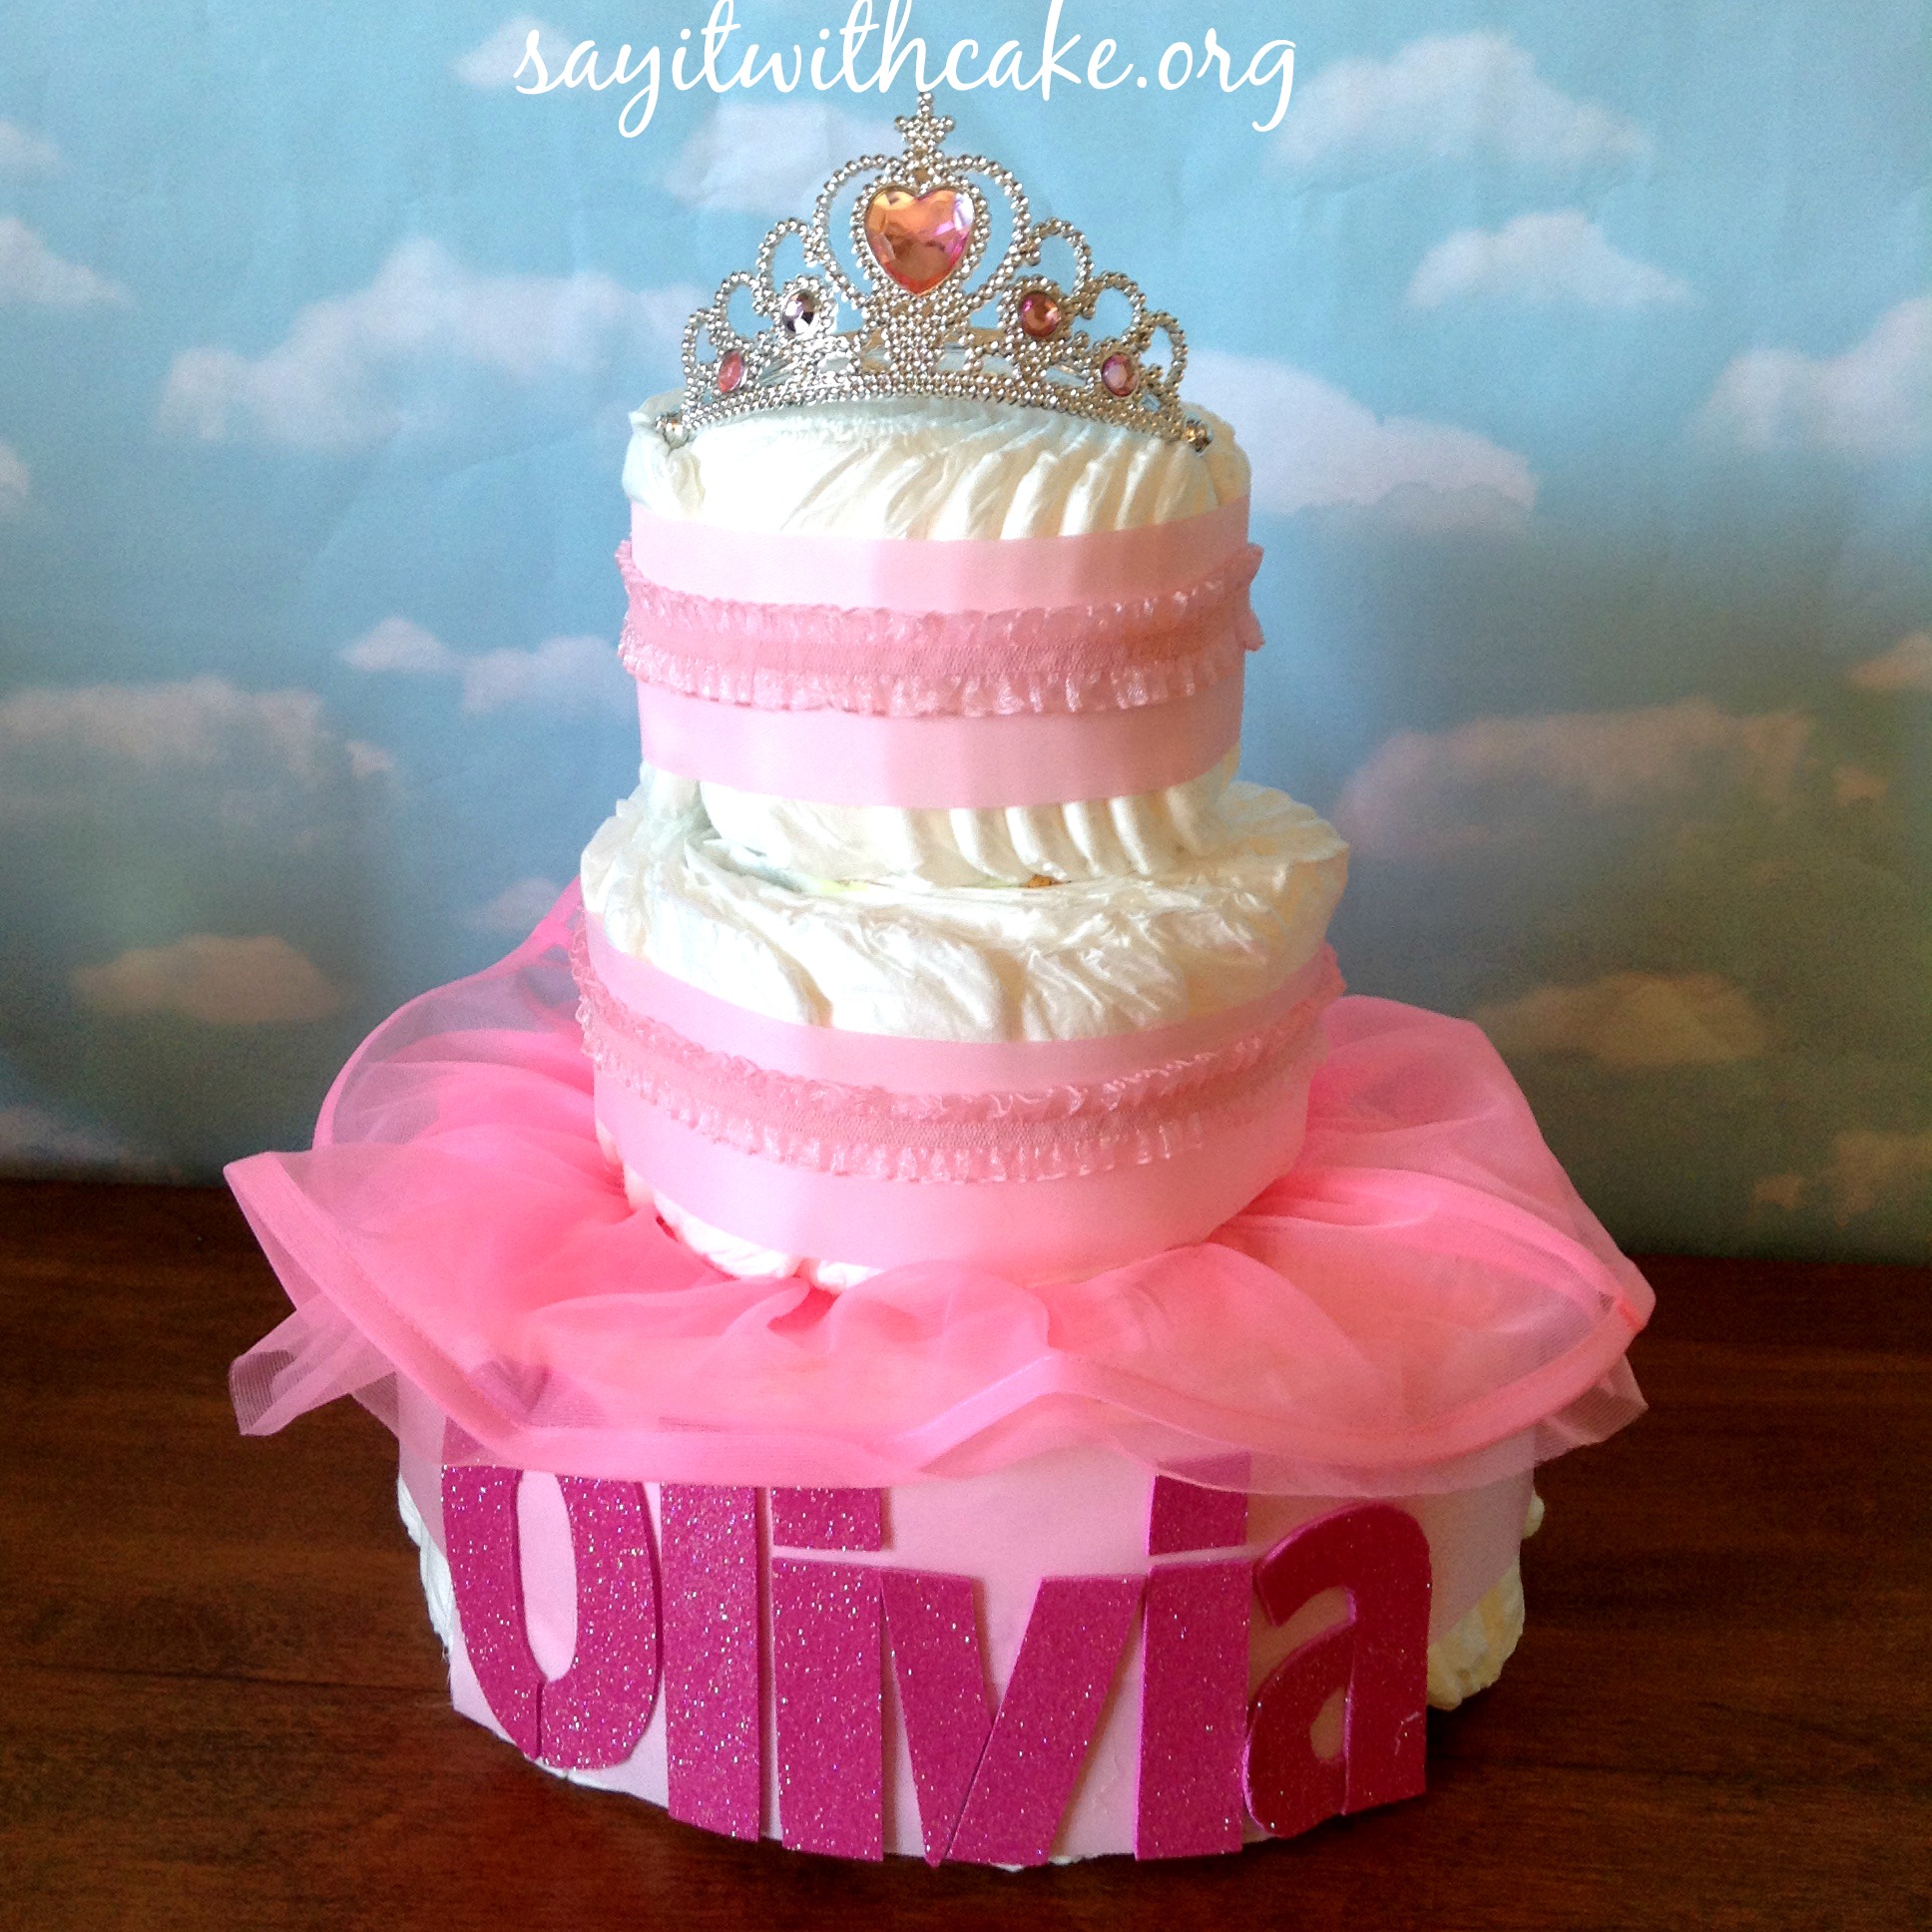
 Since my blog is mostly about cake, I thought it would be fun to share a different kind of cake I made recently….a diaper cake! I was invited to a baby shower for my very good friend Jamie who after having three boys is finally having a girl!
One of the things she mentioned that she needs was diapers, so I thought I would get creative with the diapers instead of just giving her a big box of diapers.
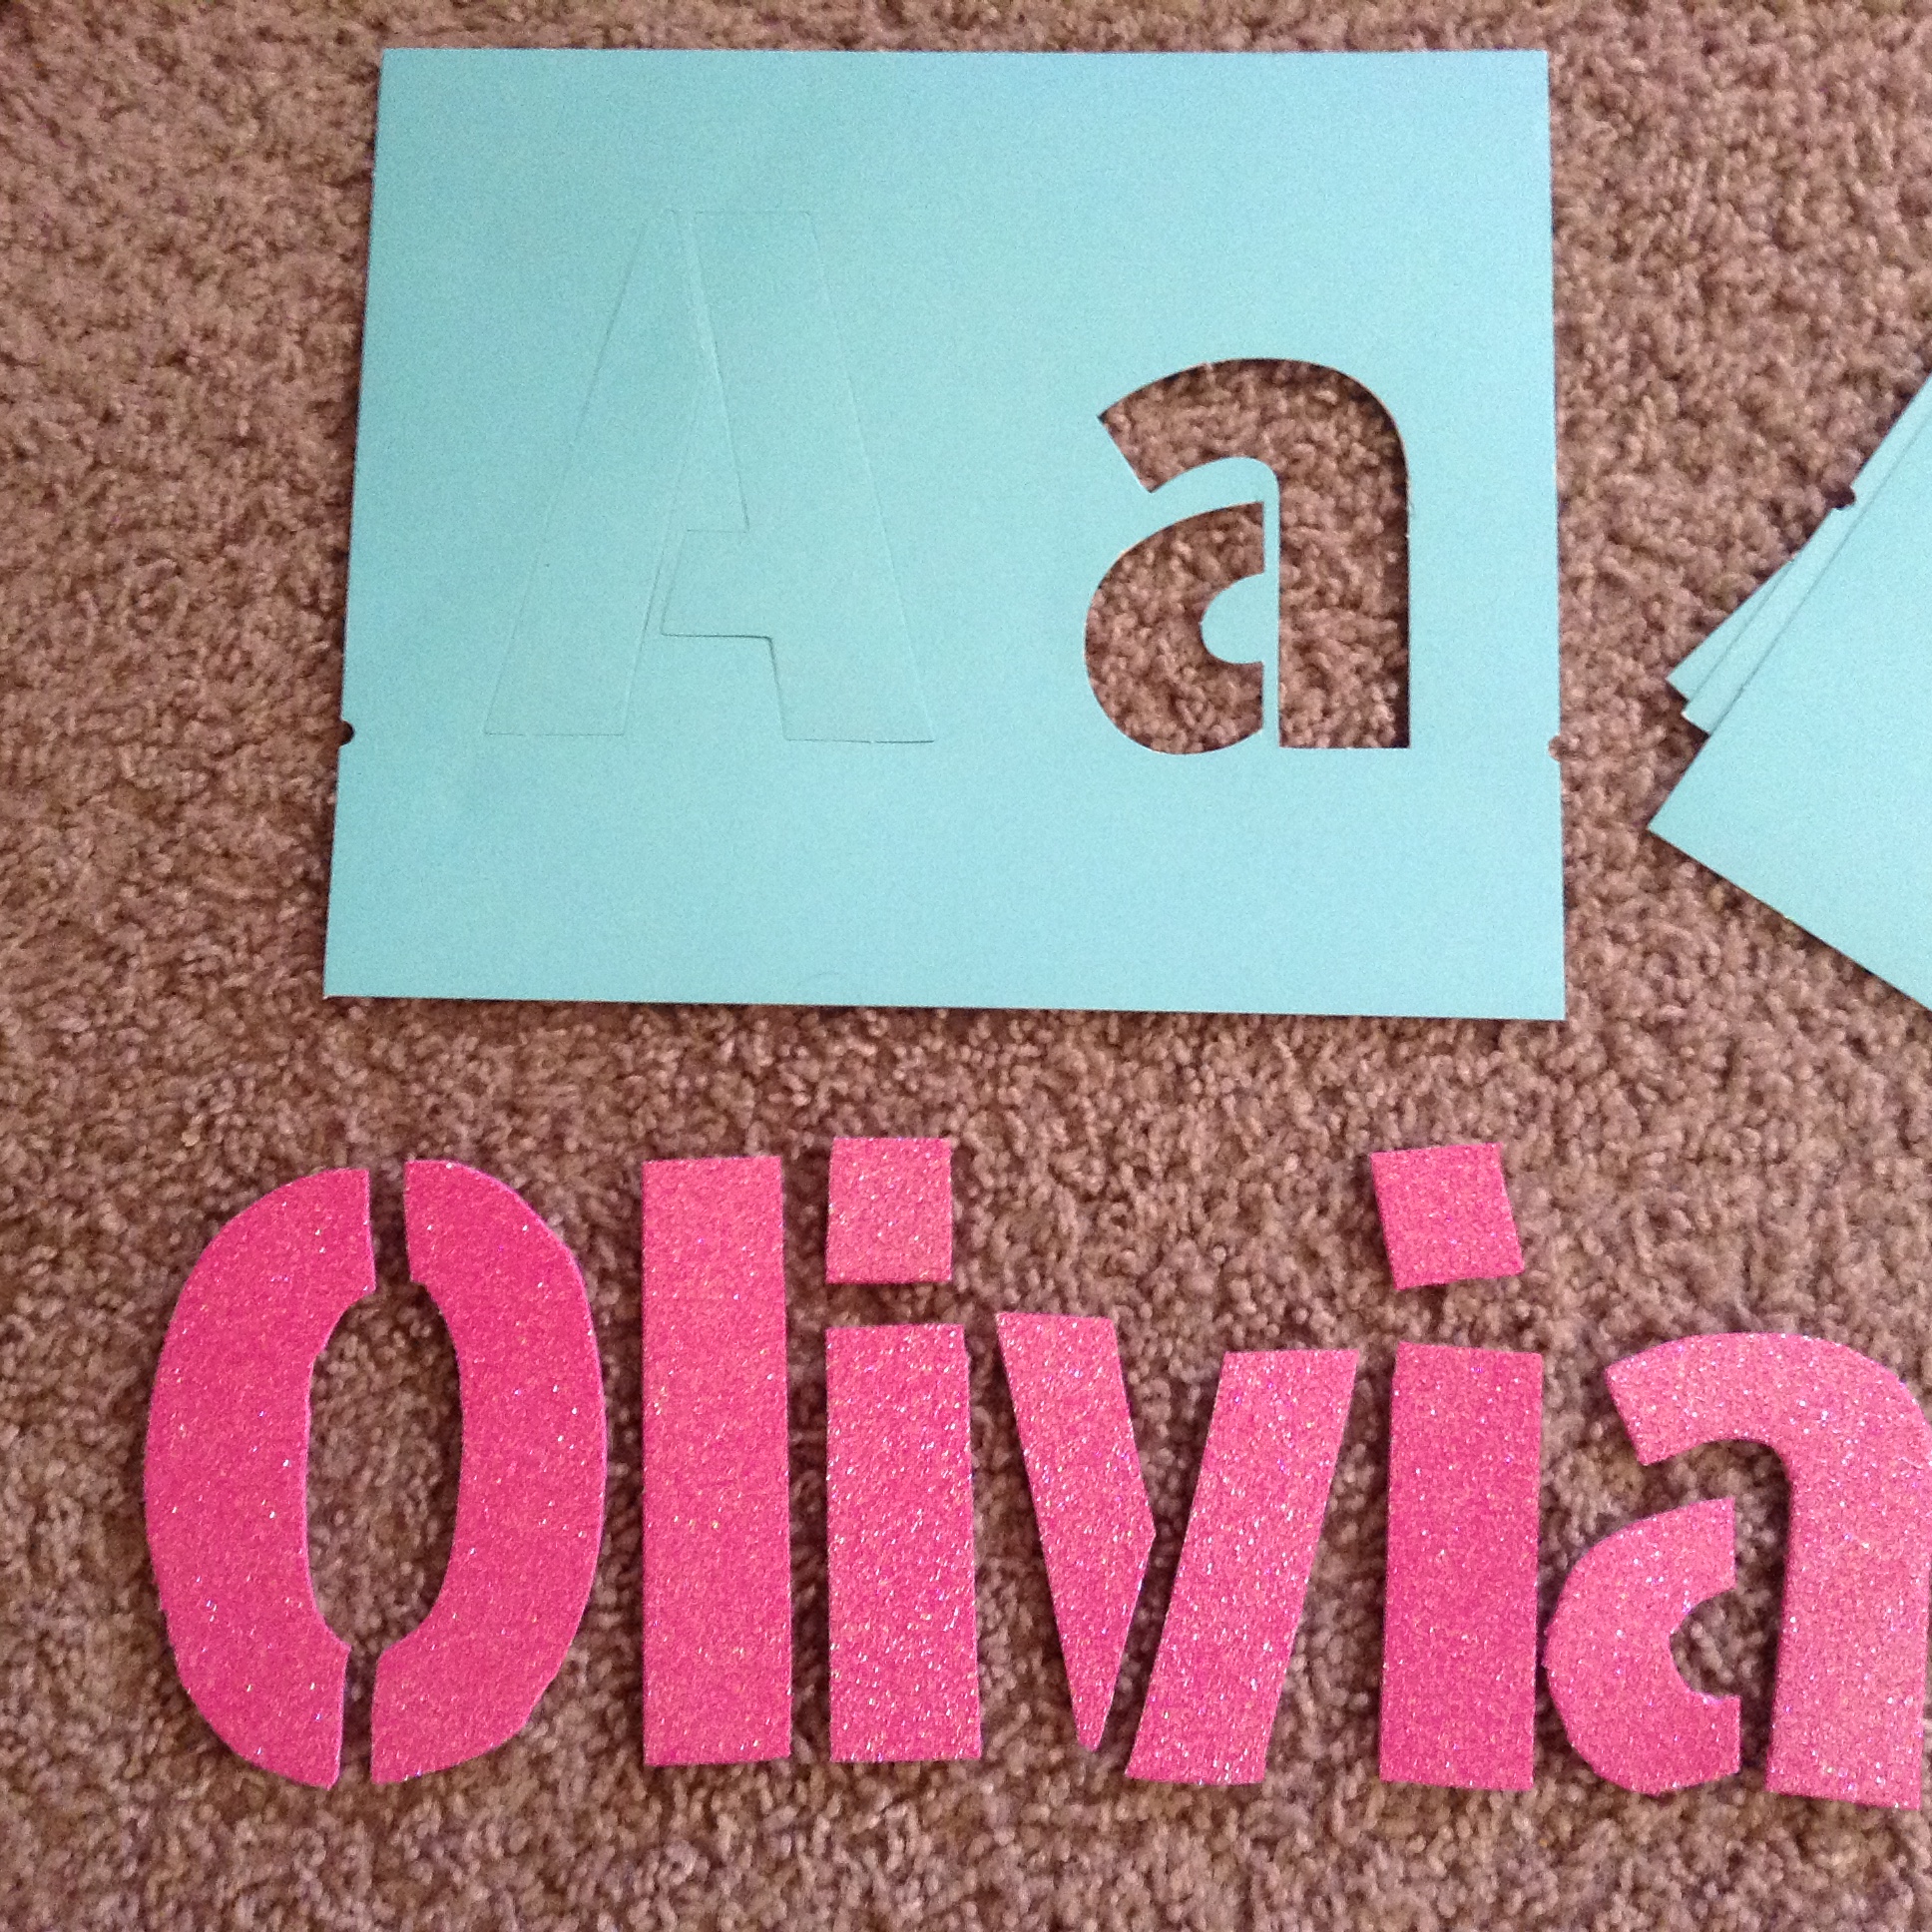
The things you will need are diapers of course (I used 100 diapers in mine), rubberbands or string, ribbon for decoration, scissors, safety pins, hot glue gun (optional), cake pans in size 6, 8 and ten (optional) and other things for decoration (I used a baby tutu, glittery foam paper, and a baby crown).
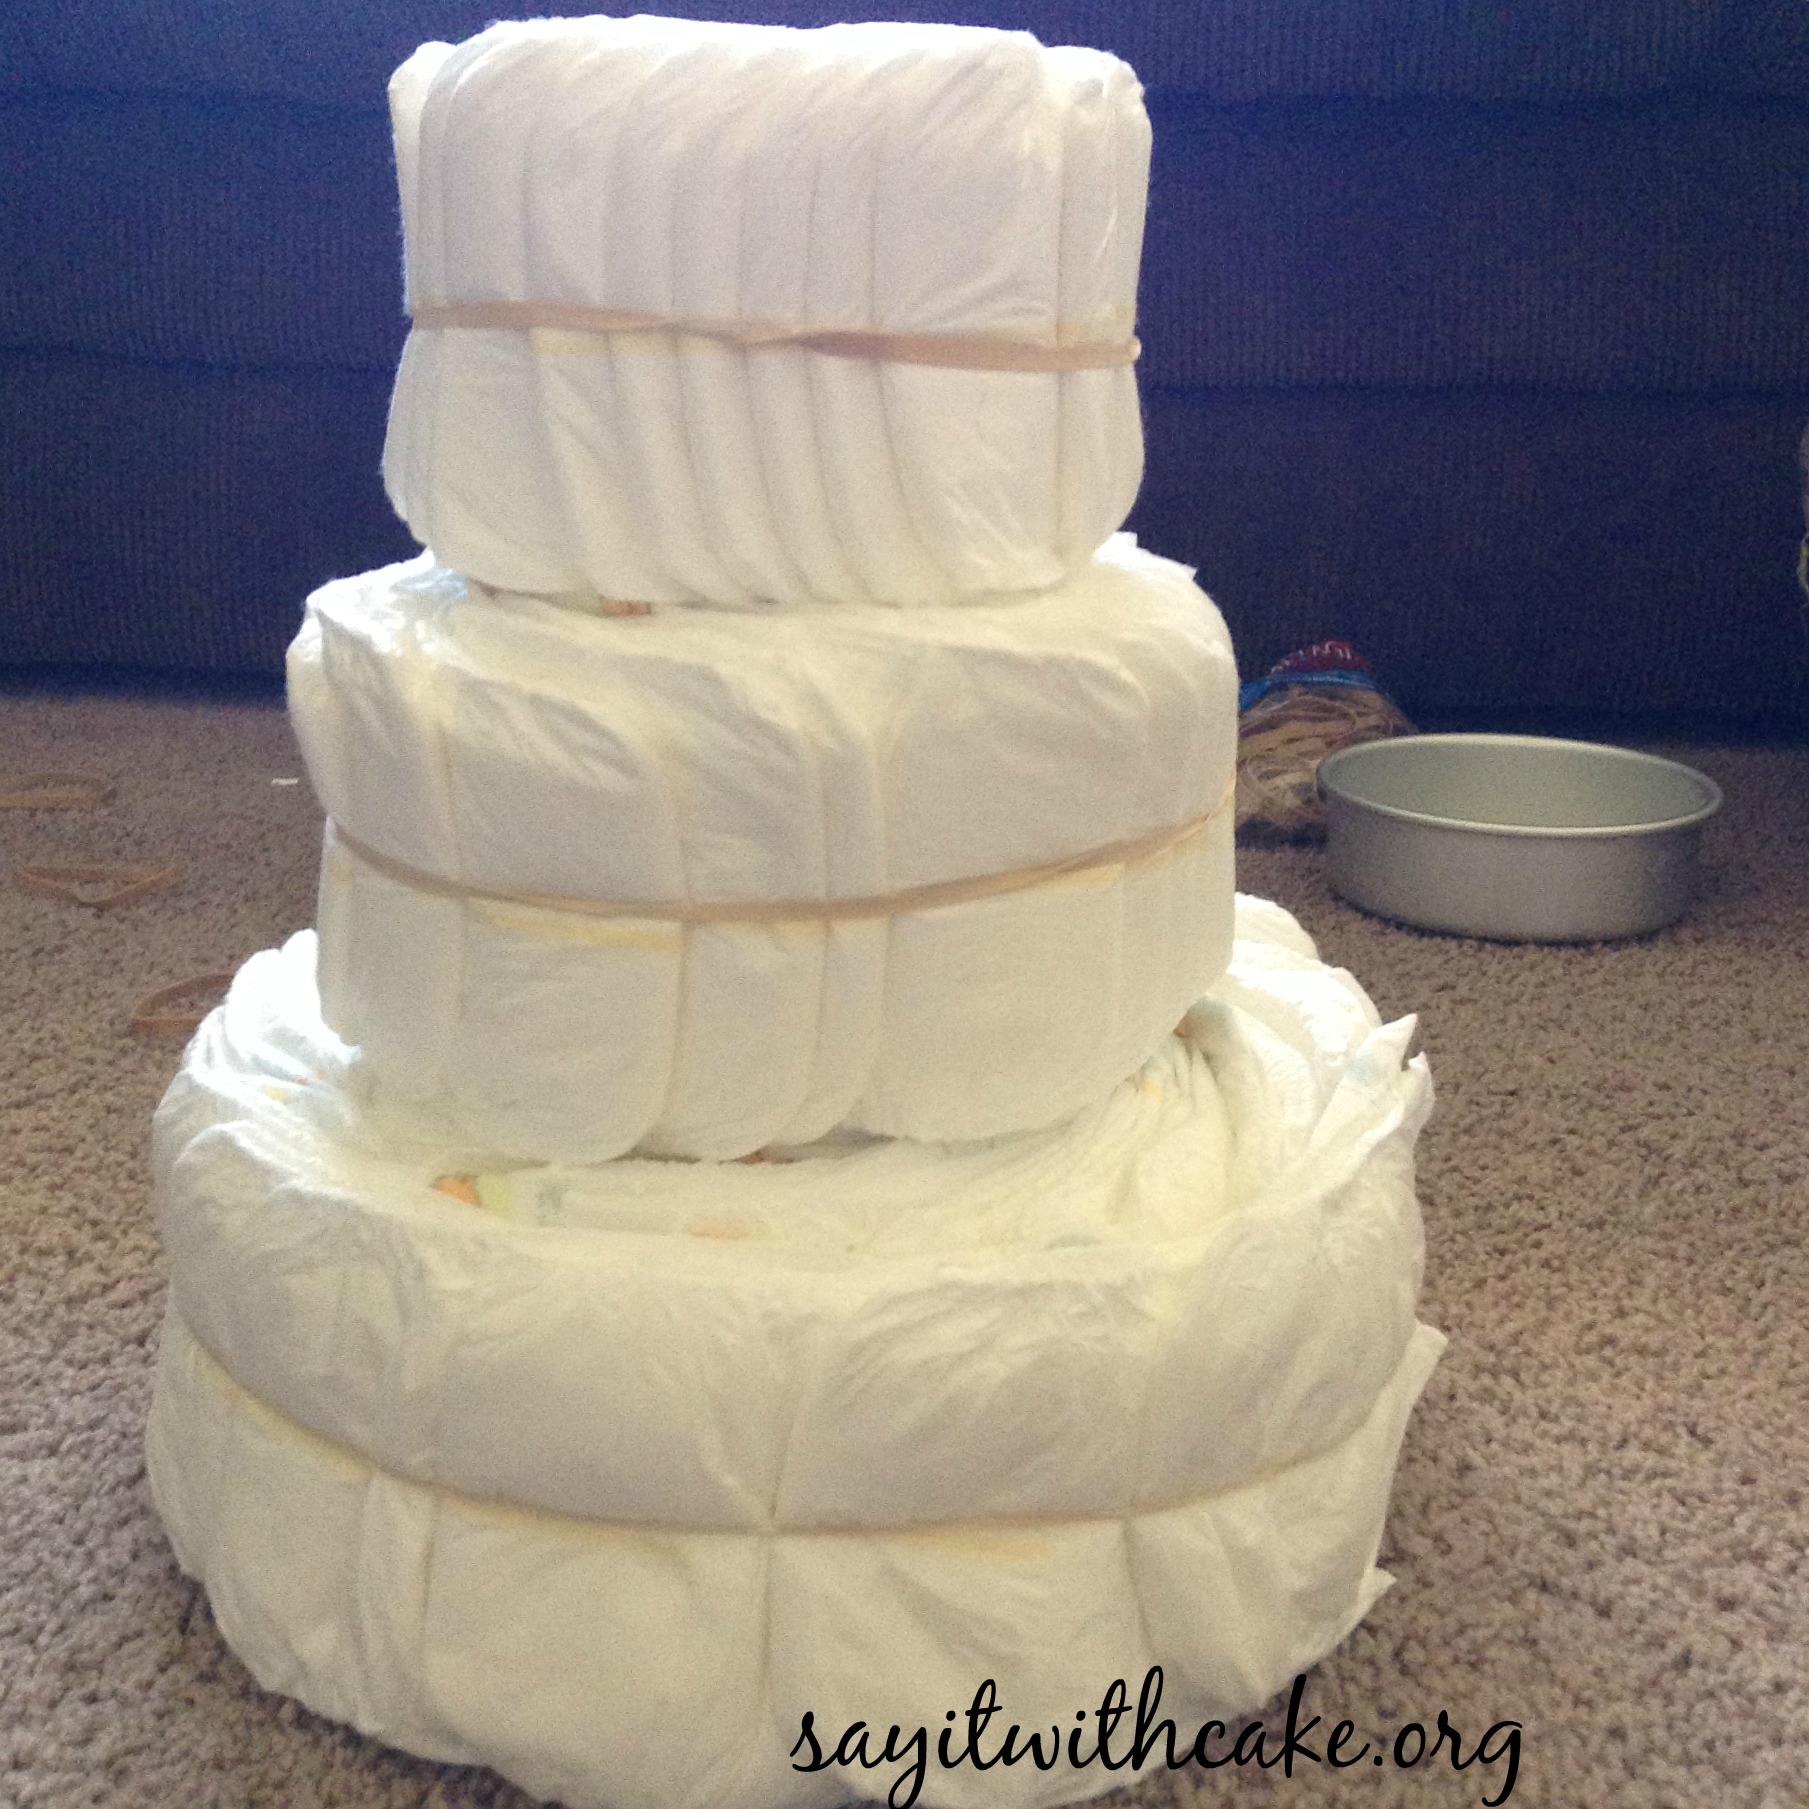
The diaper cakes I have seen online usually are individually wrapped up and secured with rubberbands. I didn’t want to make my diaper cake like that because I didn’t want my friend Jamie to have to take the rubberbands off of each diaper, I imagine it would be very frustrating for her with a newborn trying to change the diaper and having to take a rubberband off first! So I used a different technique and spiraled the diapers. I used cake pans to put the diapers in to help measure the size I wanted each tier of diaper cake. You don’t have to use cake pans if you don’t want to, eyeballing it would work just fine!
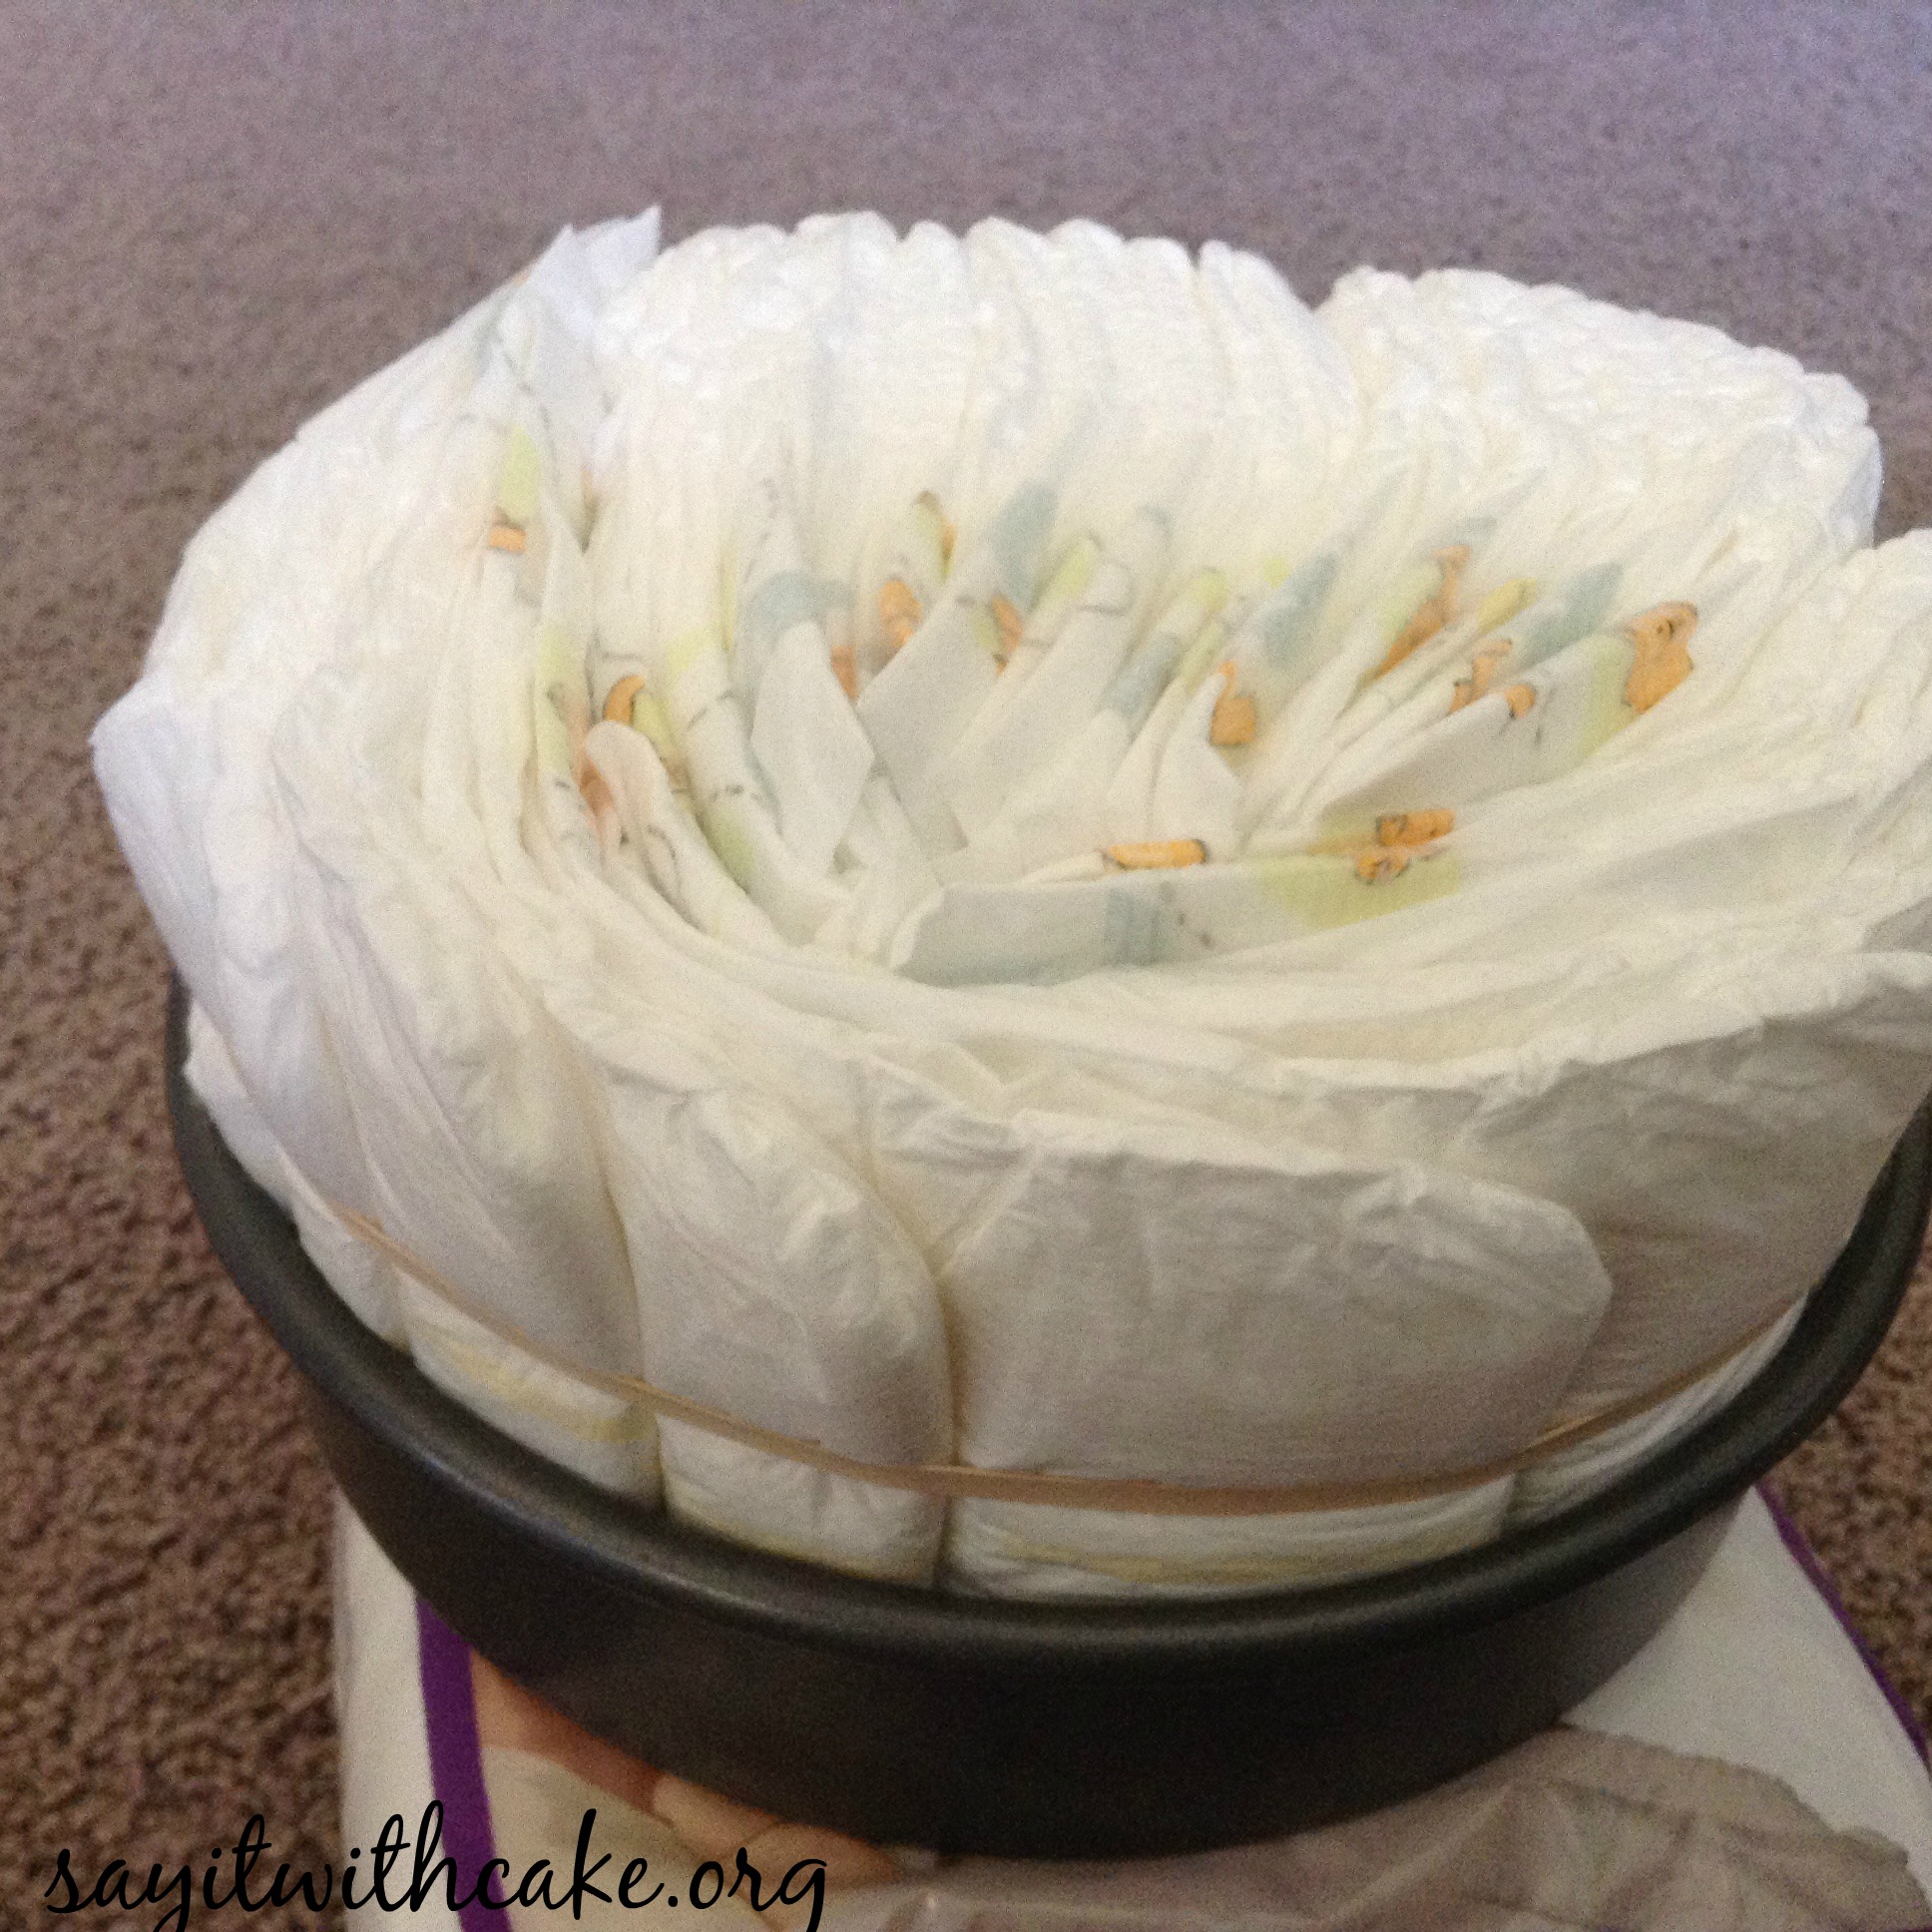
After you spiral the diapers inside the pan, secure them with a rubber band or two. You can also use string instead. Then you can take the diapers out of the pan. Do this for each tier.
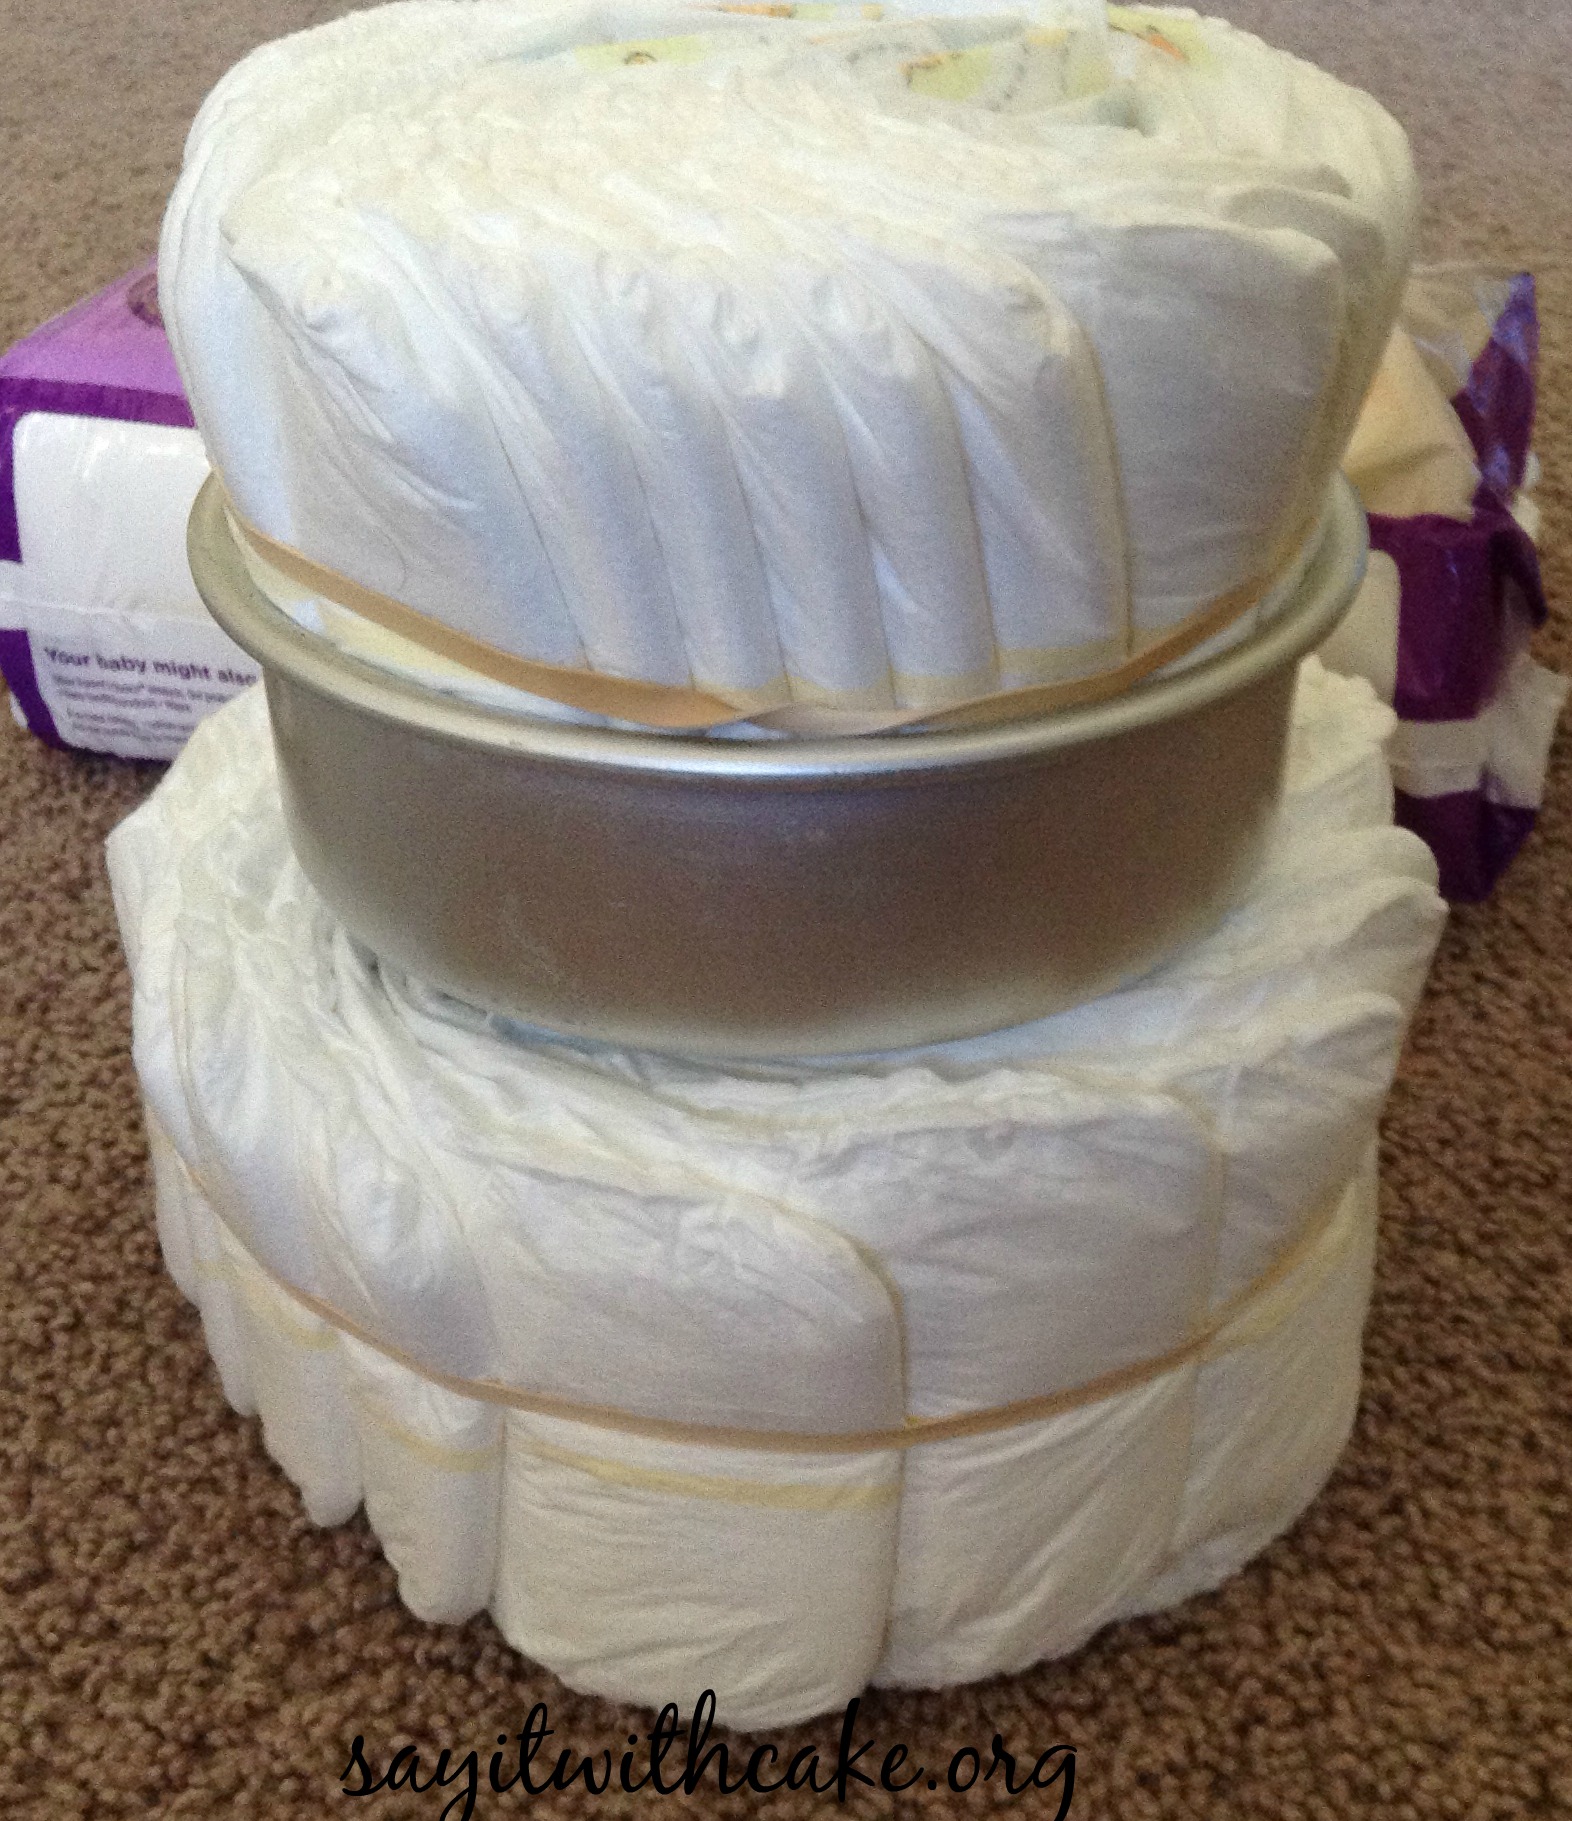
Stack each tier of diapers and then you can stick a wooden dowel in through the middle for support if you want to.
 You can start decorating any way you like. I put ribbon around each tier, and cut out letters from foam paper to say the baby’s name. I decorated with a tutu and a crown on top. You can also use things like receiving blankets, washcloths, or stuffed animals.
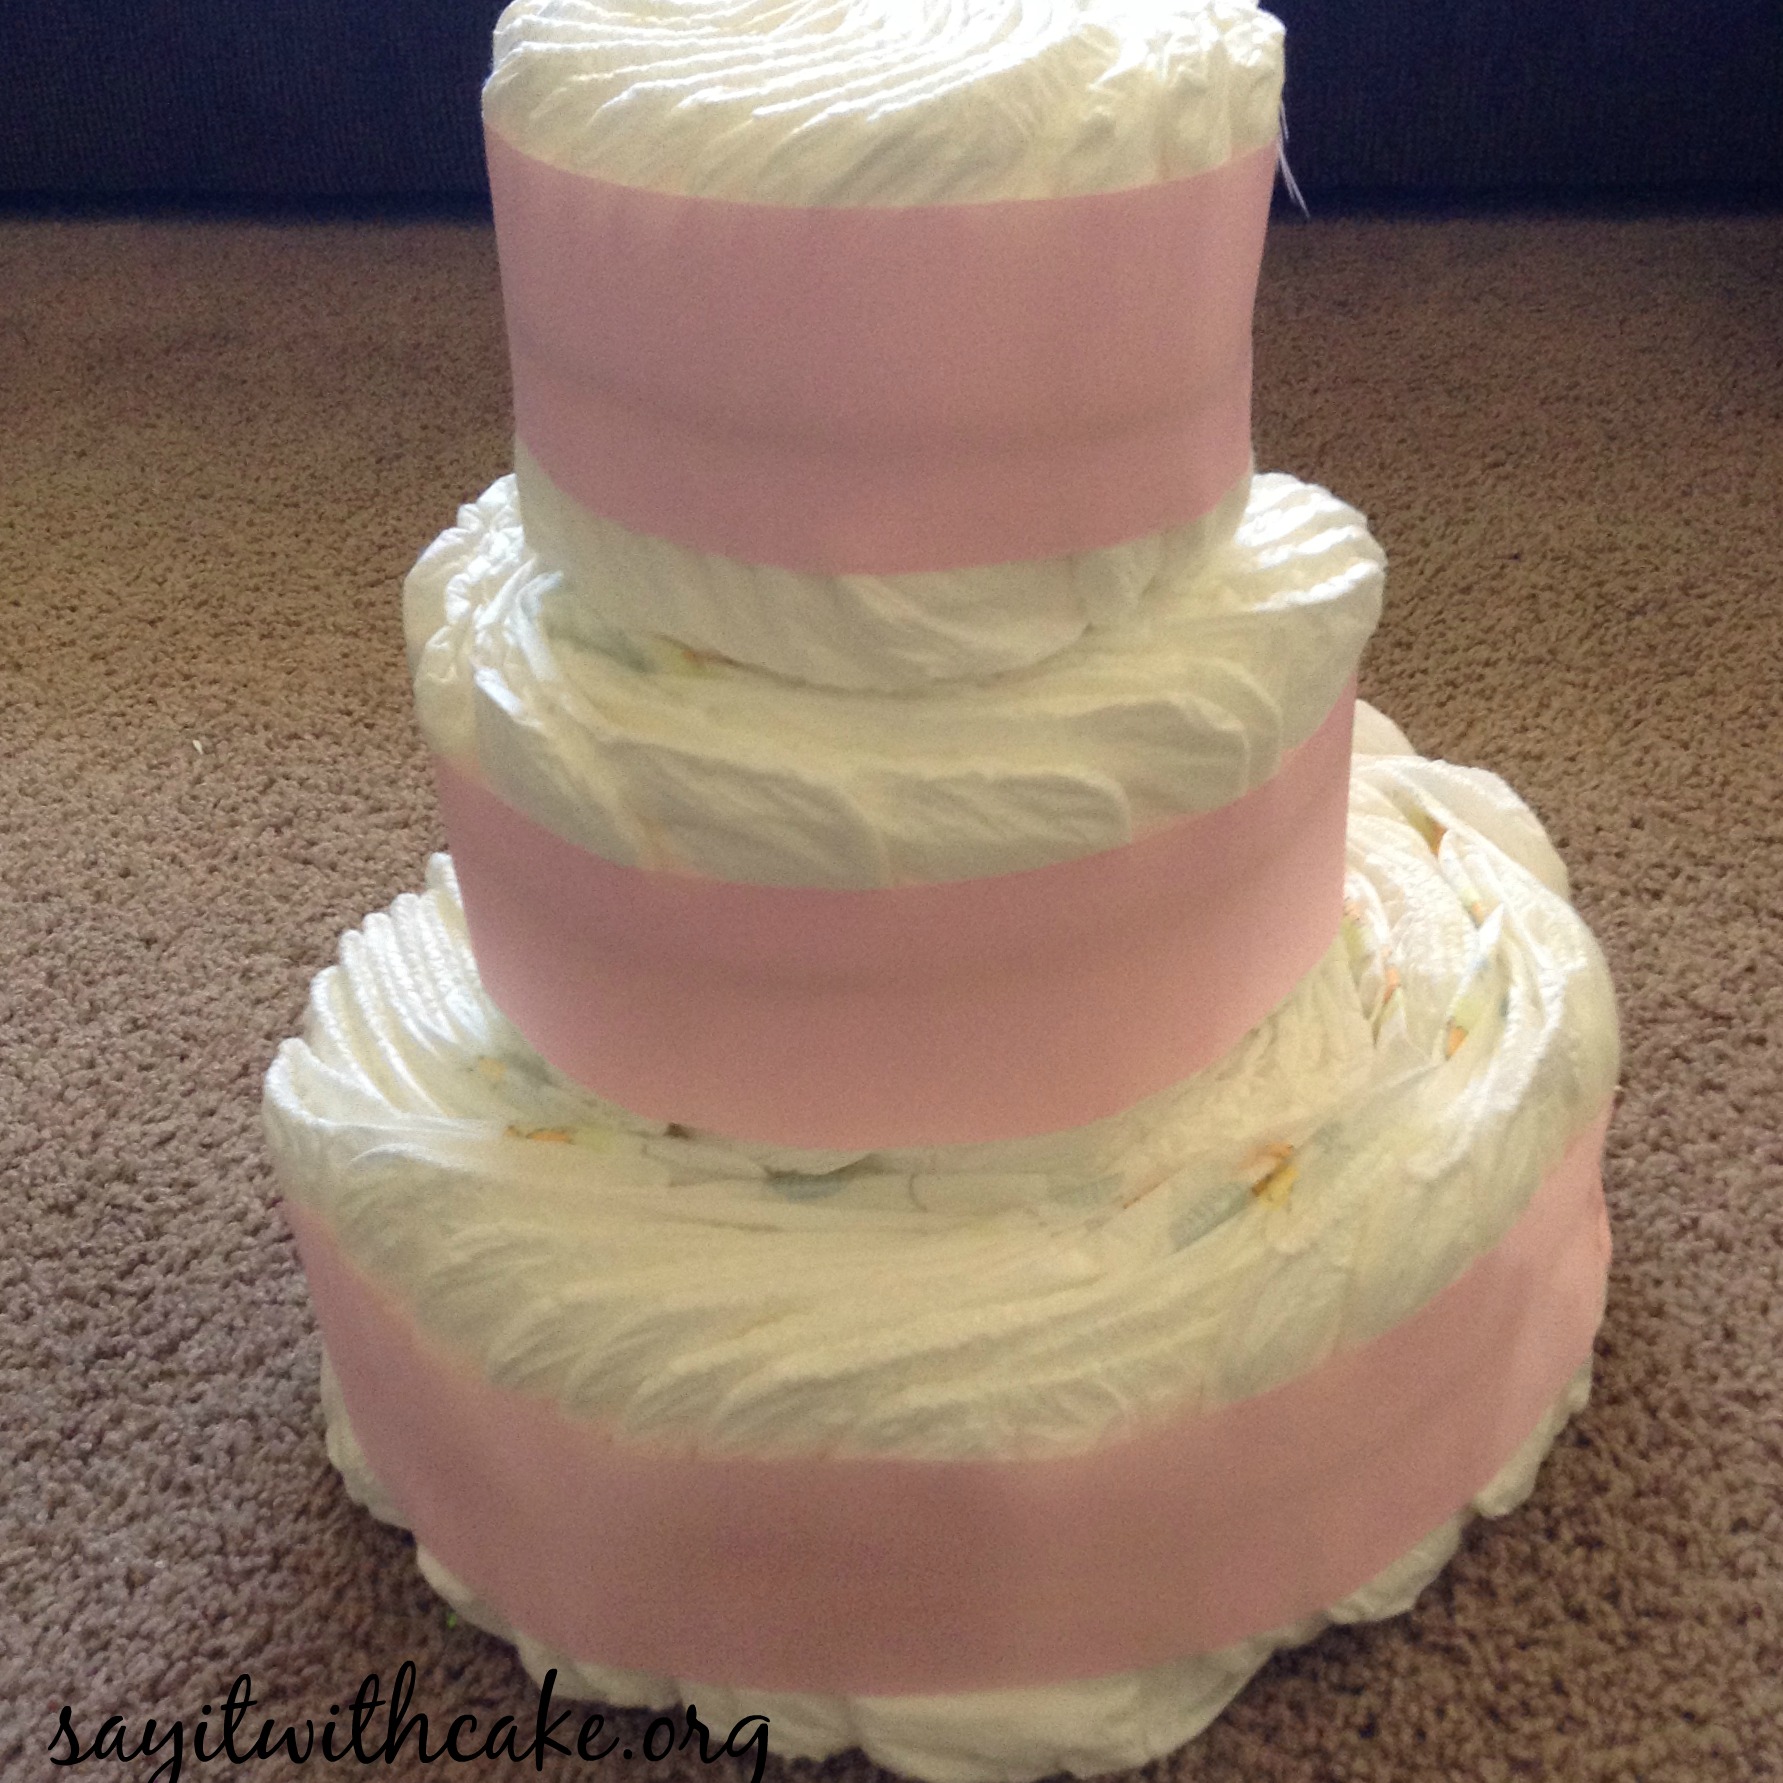
Here is the finished product! If you have any questions or comments, feel free to leave a comment below!
Enjoy!
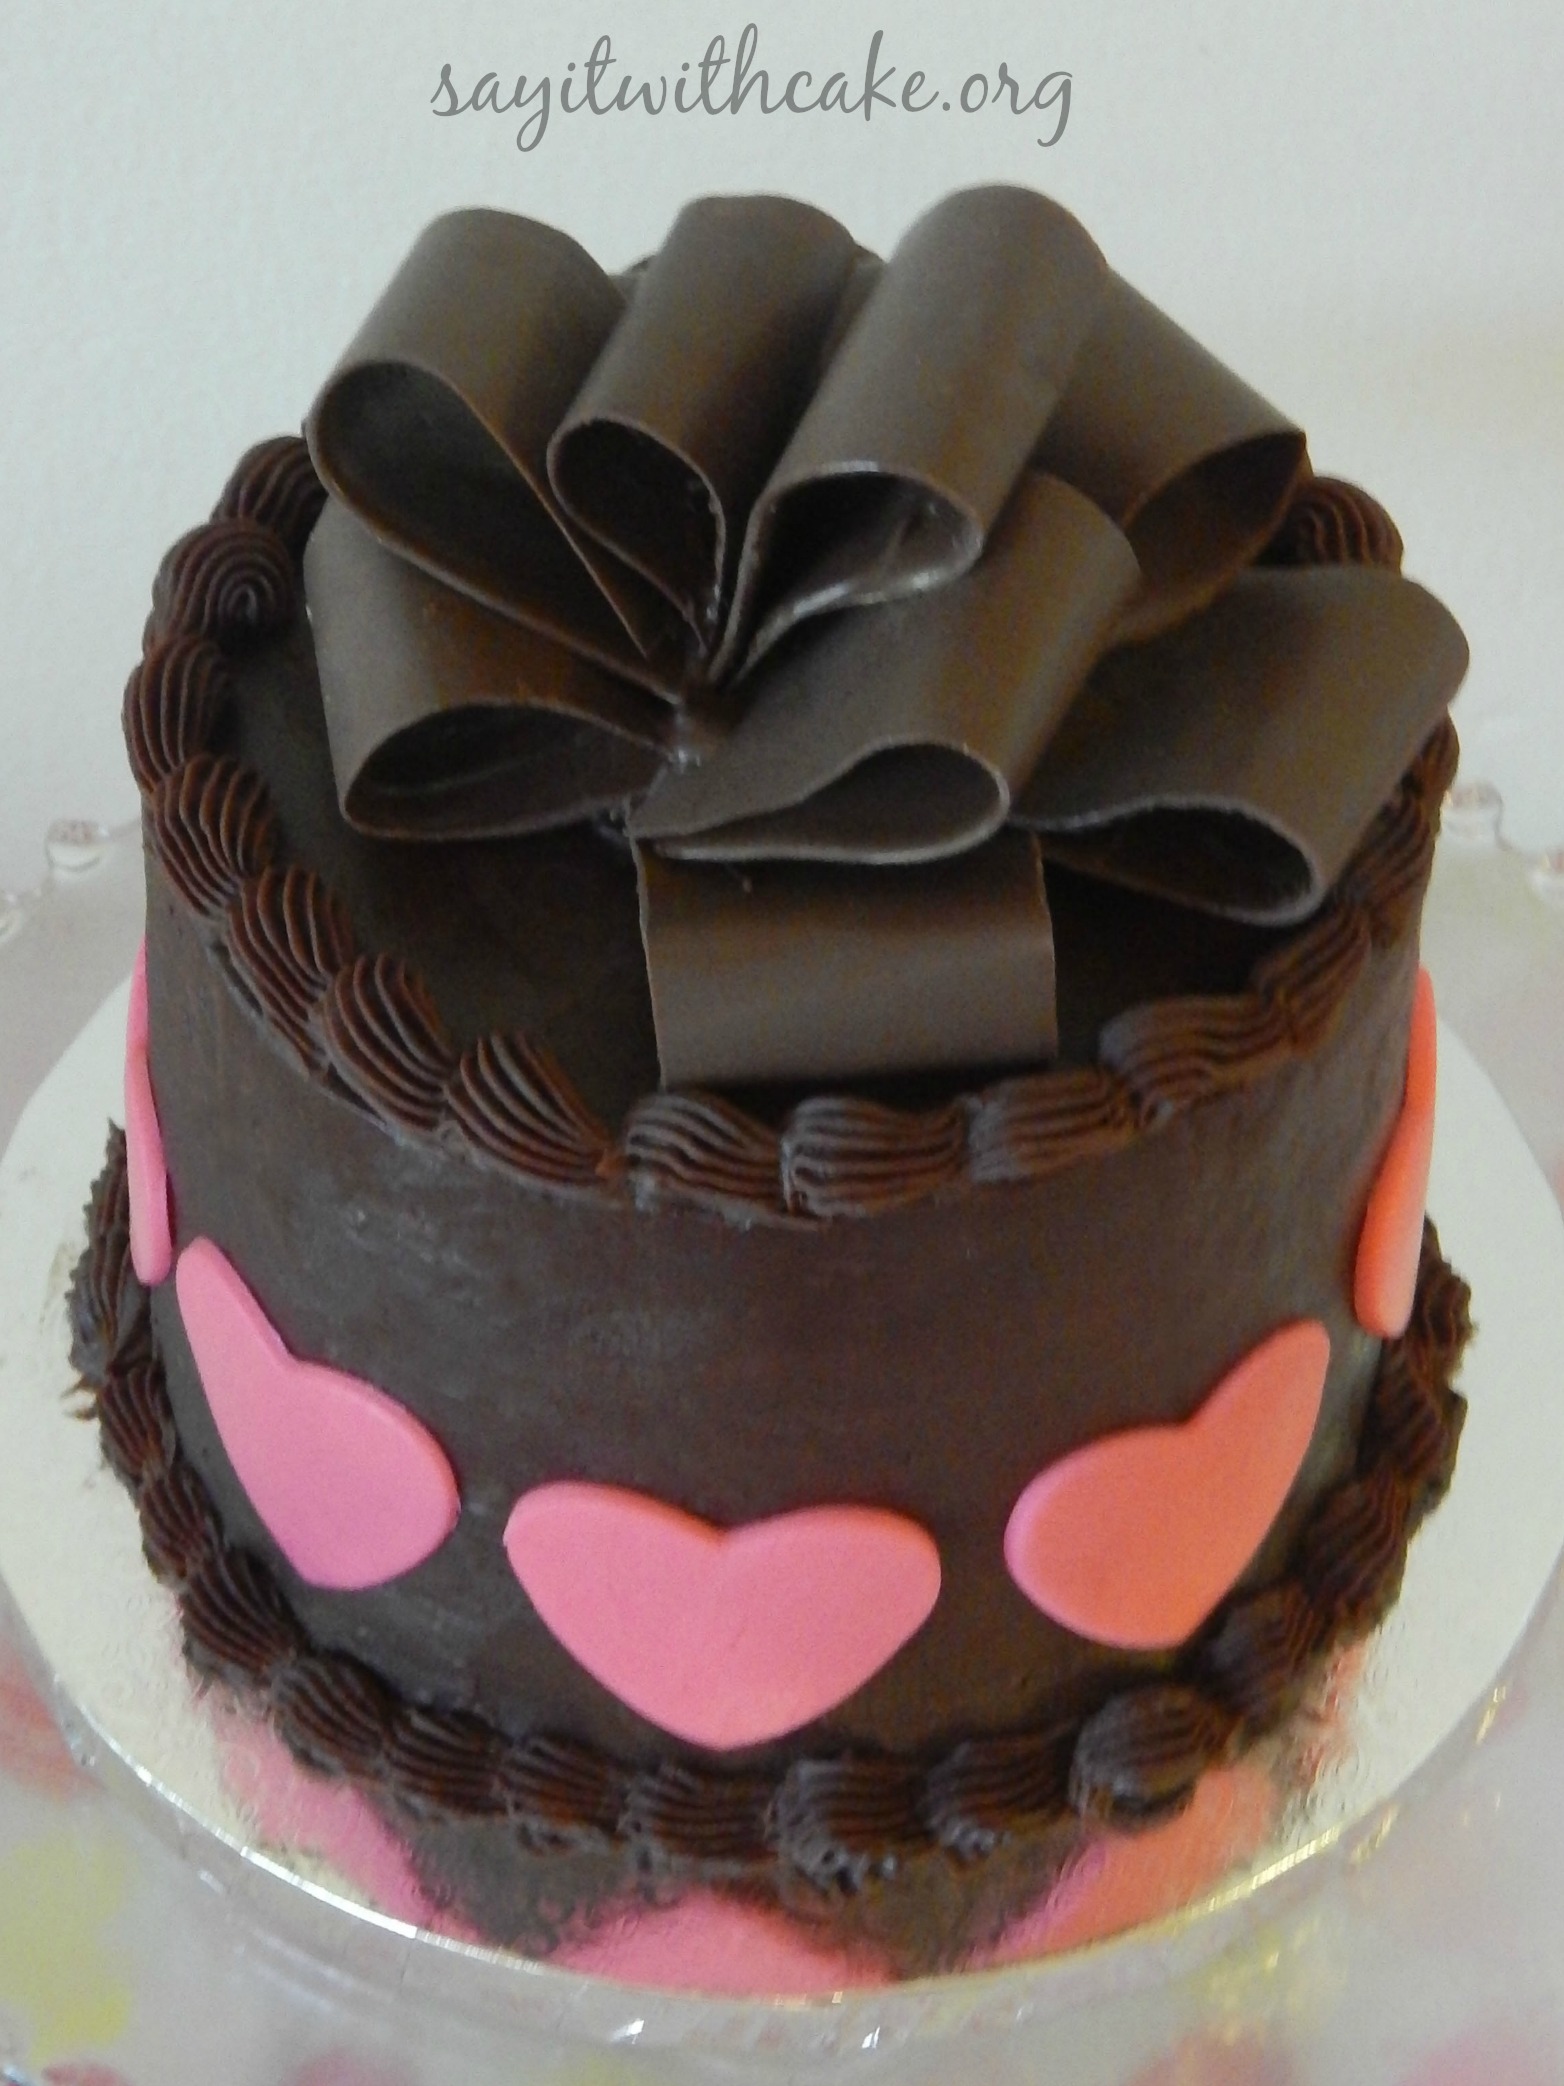
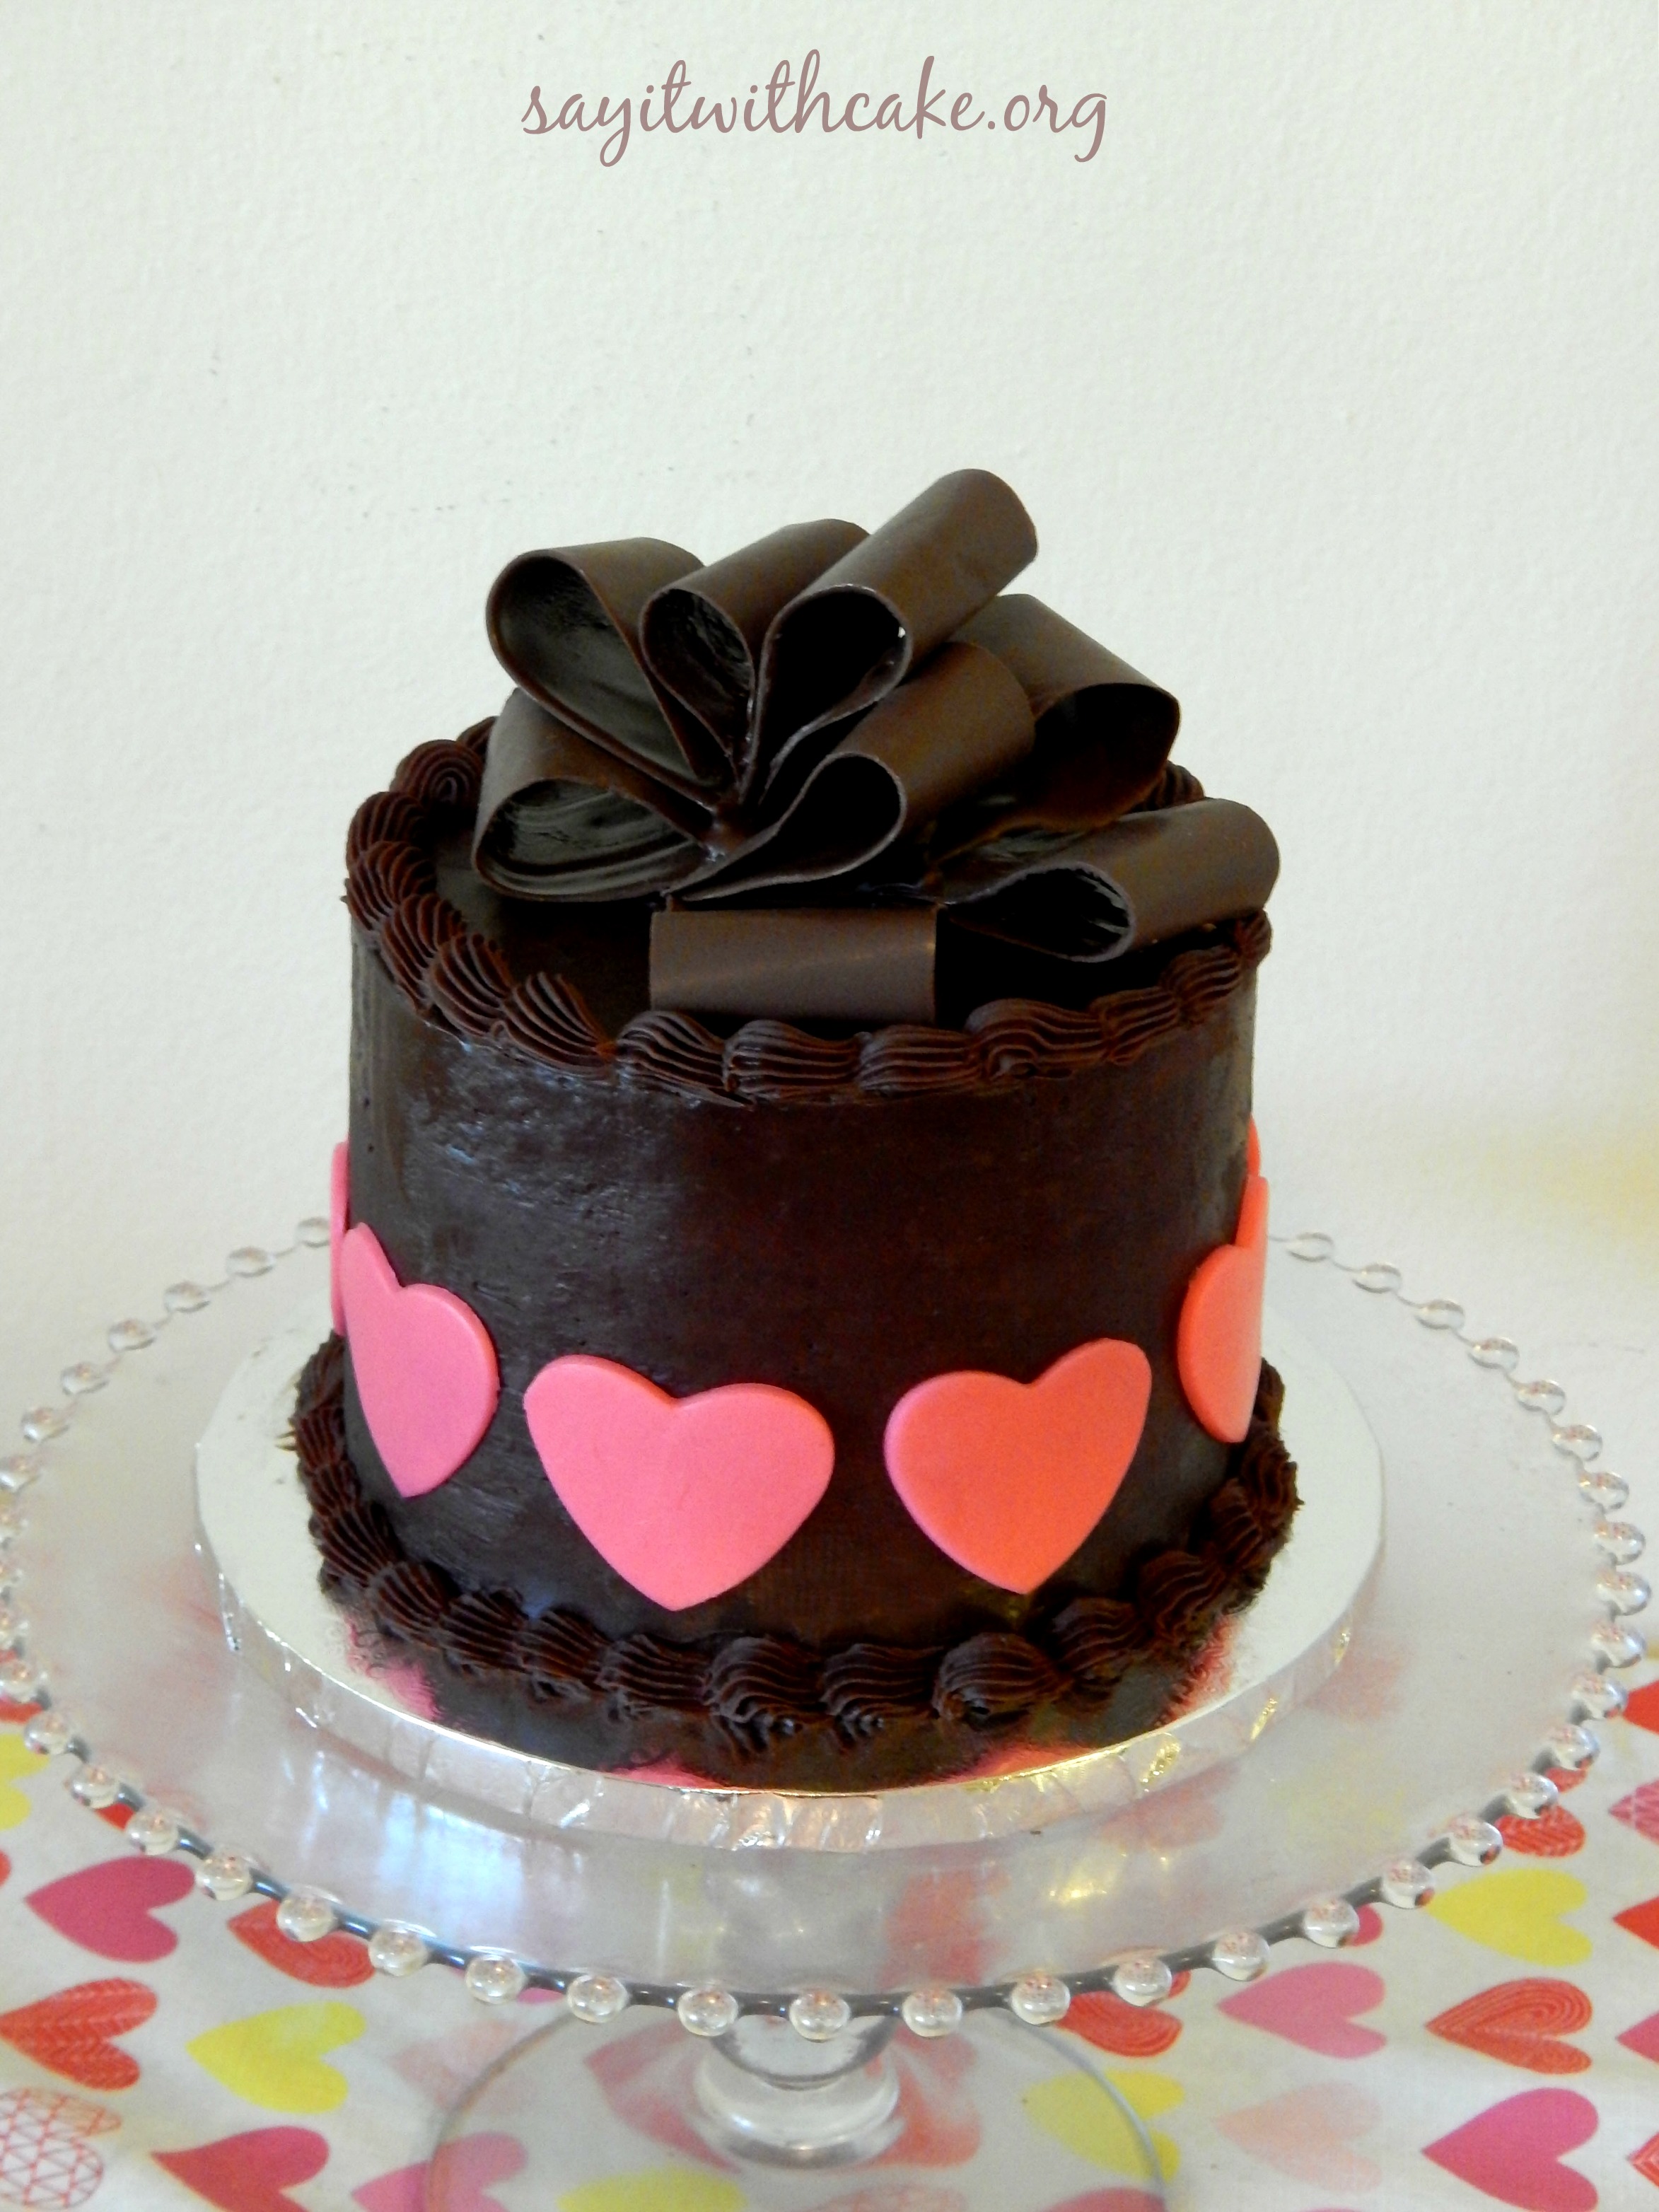 For me, Valentines Day is all about chocolate! I love all kinds of chocolate, dark chocolate, milk chocolate, white chocolate….and I love getting chocolate for Valentines Day. The great thing about this cake is that it is pure chocolate, including the bow! This cake is a rich dark chocolate cake, with chocolate mousse filling, and a chocolate ganache frosting….a dream for a chocoholic like me!
I tried to make a replica of a beautiful cake I found here at Sweet Dreams, and she has an awesome tutorial on how to make chocolate bows! I will definitely try this bow again and hope it turns out more like hers!
The bow can be made ahead of time and stored in a dry, cool place until you are ready to place it on your cake. Don’t store it in the refrigerator, though, or condensation could form on it and ruin it.
The only supplies you will really need for this project are freezer paper ( I actually used wax paper because I couldn’t find freezer paper and it worked fine), one and a half bags of candy melts
(I prefer to use Candyquick, it melts perfectly in the microwave), an offset spatula
and wax paper
.
Making the chocolate bow (From Sweetdreamscakeapp.com)
Step 1: Determine Size
You need to first figure out how big you want your bow. I wanted to place mine on an 8-inch cake and wanted it slightly smaller than the cake so I chose to go with a 7-inch bow.
Step 2: Cut Out Freezer Paper Strips
You will need around 10-12 strips that are 1 1/4” wide and the same length as your desired bow. In my case, these were 7” strips. You will also need around 5 or 6 strips that are also 1 1/4” wide but one inch shorter than your other strips. In my case these were 6” long. I always make a few extra strips of both sizes because I usually have some break.
Take a sheet of freezer paper and use a ruler to draw out the measured strips on the paper side. Don’t worry, the chocolate will be placed on the waxed side so it won’t touch any of your ink.
Cut out all of your strips.
Step 3: Melt Chocolate
There are several ways to melt chocolate. My favorite is in a melting pot. I like melting pots because they melt it slowly and evenly and then allow you to keep it warm while using. If you don’t have a melting pot then I would recommend melting it in a double boiler
or in a bowl placed over a pot of simmering water that has been removed from the heat. You can also melt it in a microwave but I don’t personally like this method because I always seem to overheat chocolate and ruin it when I do it that way. Whichever way you choose, be sure to stir it as it melts to keep it melting evenly.
While the chocolate is melting, prepare a baking sheet by placing a piece of wax paper on it and keeping it near your work area.
Step 4: Cover Strip in Chocolate
Cover your work area with wax paper then lay a freezer paper strip on it and pour some melted chocolate on the strip.
Use an offset spatula to spread the chocolate over the entire strip. Try to use one sweeping motion each way to keep from getting ripples in your chocolate. If your chocolate is too thin, just pour a little more on top and spread it again.
Use the spatula to lift the edge of the freezer paper and lift up the strip.
Step 5: Clean Edges
Hold the very top of the strip with your fingers and use the fingers of your opposite hand to slide down the edges of the strip and clean off any chocolate that has run over the edge. You wilLay the cleaned strip down on the wax paper covered baking sheet.l want to keep a damp rag next to you because you will be constantly cleaning chocolate off your hands.
While it sets up, use your spatula to scrape up the excess chocolate and add it back to your bowl of melted chocolate.Lay the cleaned strip down on the wax paper covered baking sheet.
Step 6: Make Loop
Now this is the part that may take a little practice. You need to allow the chocolate strip to set just long enough that it is no longer runny but not too long or it will be too stiff to bend and will break on you. This is also the point where it starts to lose its shine. For me, this was about a minute. You will have to experiment because your levels of humidity, room temperature, and the temperature of your chocolate can all affect the drying time. If you let it set too long and it breaks, don’t worry, you can just allow it to dry a few more minutes then peel it all off of the freezer paper and melt it back in your bowl of chocolate. The freezer paper can be wiped off with a paper towel and used again.
When the chocolate is at the setting point, carefully pick up the strip, bend it, and attach the two ends together. They will stick to each other without any needed adhesive.
If you want it flatter, attach more of the ends together and lay it flat on the wax paper. I like to make at least 6 of the larger strips flatter since they will be the bottom loops.
After all the strips are covered, place the baking sheet in the refrigerator for about 15 minutes to allow the chocolate to firm up completely.
Step 7: Remove Freezer Paper
Remove the loops from the refrigerator and then carefully peel the freezer paper off of each one. It helps to wear light cotton gloves while doing this, to keep from getting finger prints on your chocolate, but I forgot to do that.
Step 8: Assemble Bow
Now to assemble the loops and create the bow. Lay out a clean sheet of wax paper on a baking sheet and melt some more chocolate. I like to pour my chocolate into a squeeze bottle for this part but you can also put it in a decorating bag
with a #4 round tip
or just carefully use a spoon.
Squeeze out a mound of melted chocolate on the wax paper.
Place two of the flatter loops directly across from each other with their ends settled in the chocolate.
Squeeze some more melted chocolate on top of the ends and then attach two more loops.
You will notice that I have a slight crack in one of the loops but I wasn’t too concerned because I knew it would be covered by other loops.
Continue evenly spacing the loops so that you have six loops going around in a circle.
Now add melted chocolate to the end of another large loop and gently lay it on top of the bottom row of loops, trying to space in between loops. Add 3 or 4 more large loops the same way.
If needed, squeeze melted chocolate in the middle or on to ends to make sure it all adheres.
Now squeeze some more melted chocolate in the center of the bow and start attaching the smaller loops. You may have to carefully move them around or tilt them a bit to fit them in. You may not need all of your loops, just use as many as you need to make it as full as you want without cracking them to fit them all in.
The final loop will go straight up in the center of the bow.
Step 9: Refrigerate
When the bow is completely assembled, place the baking sheet in the refrigerator for about 15 minutes to allow the chocolate to harden completely. Remove and store in a cool, dry place.
Once your cake is made and you are ready for the bow, use a turner and slide it under the bow, releasing the chocolate from the waxed paper, and carefully lift. You can either just lay it directly on top of the cake or you can add a small mound of icing on top of the cake and adhere it to the icing.
My cake is a six inch cake so my bow was only 5 inches. Next time I want to try a 7 inch bow, it looks fuller. I hope you have a chance to make this bow it is so pretty! Here is the recipes I use for my chocolate cake.
Ingredients
- •12 ounces chocolate, chopped into small pieces
- •1 cup heavy cream
- •optional 3 tablespoons flavored liqueor
Instructions
- 1.Place chocolate pieces in a large bowl. Heat heavy cream on medium high until it comes to a boil. Remove from heat and immediately pour cream over chocolate and stir until completely mixed and glossy. Allow ganache to cool before pouring over cakes as a glaze. The longer you allow the ganache to cool, the thicker it will set. Typically I stick mine in the refrigerator so it is slightly cold before whipping. For piping or frosting, allow the ganache to completely cool and set up. When you are able to spoon the ganache and it can hold its texture, it is ready for piping.
Chocolate Cake recipe Here
Chocolate Mousse Recipe Here
Other Valentines Day Recipe’s you might like

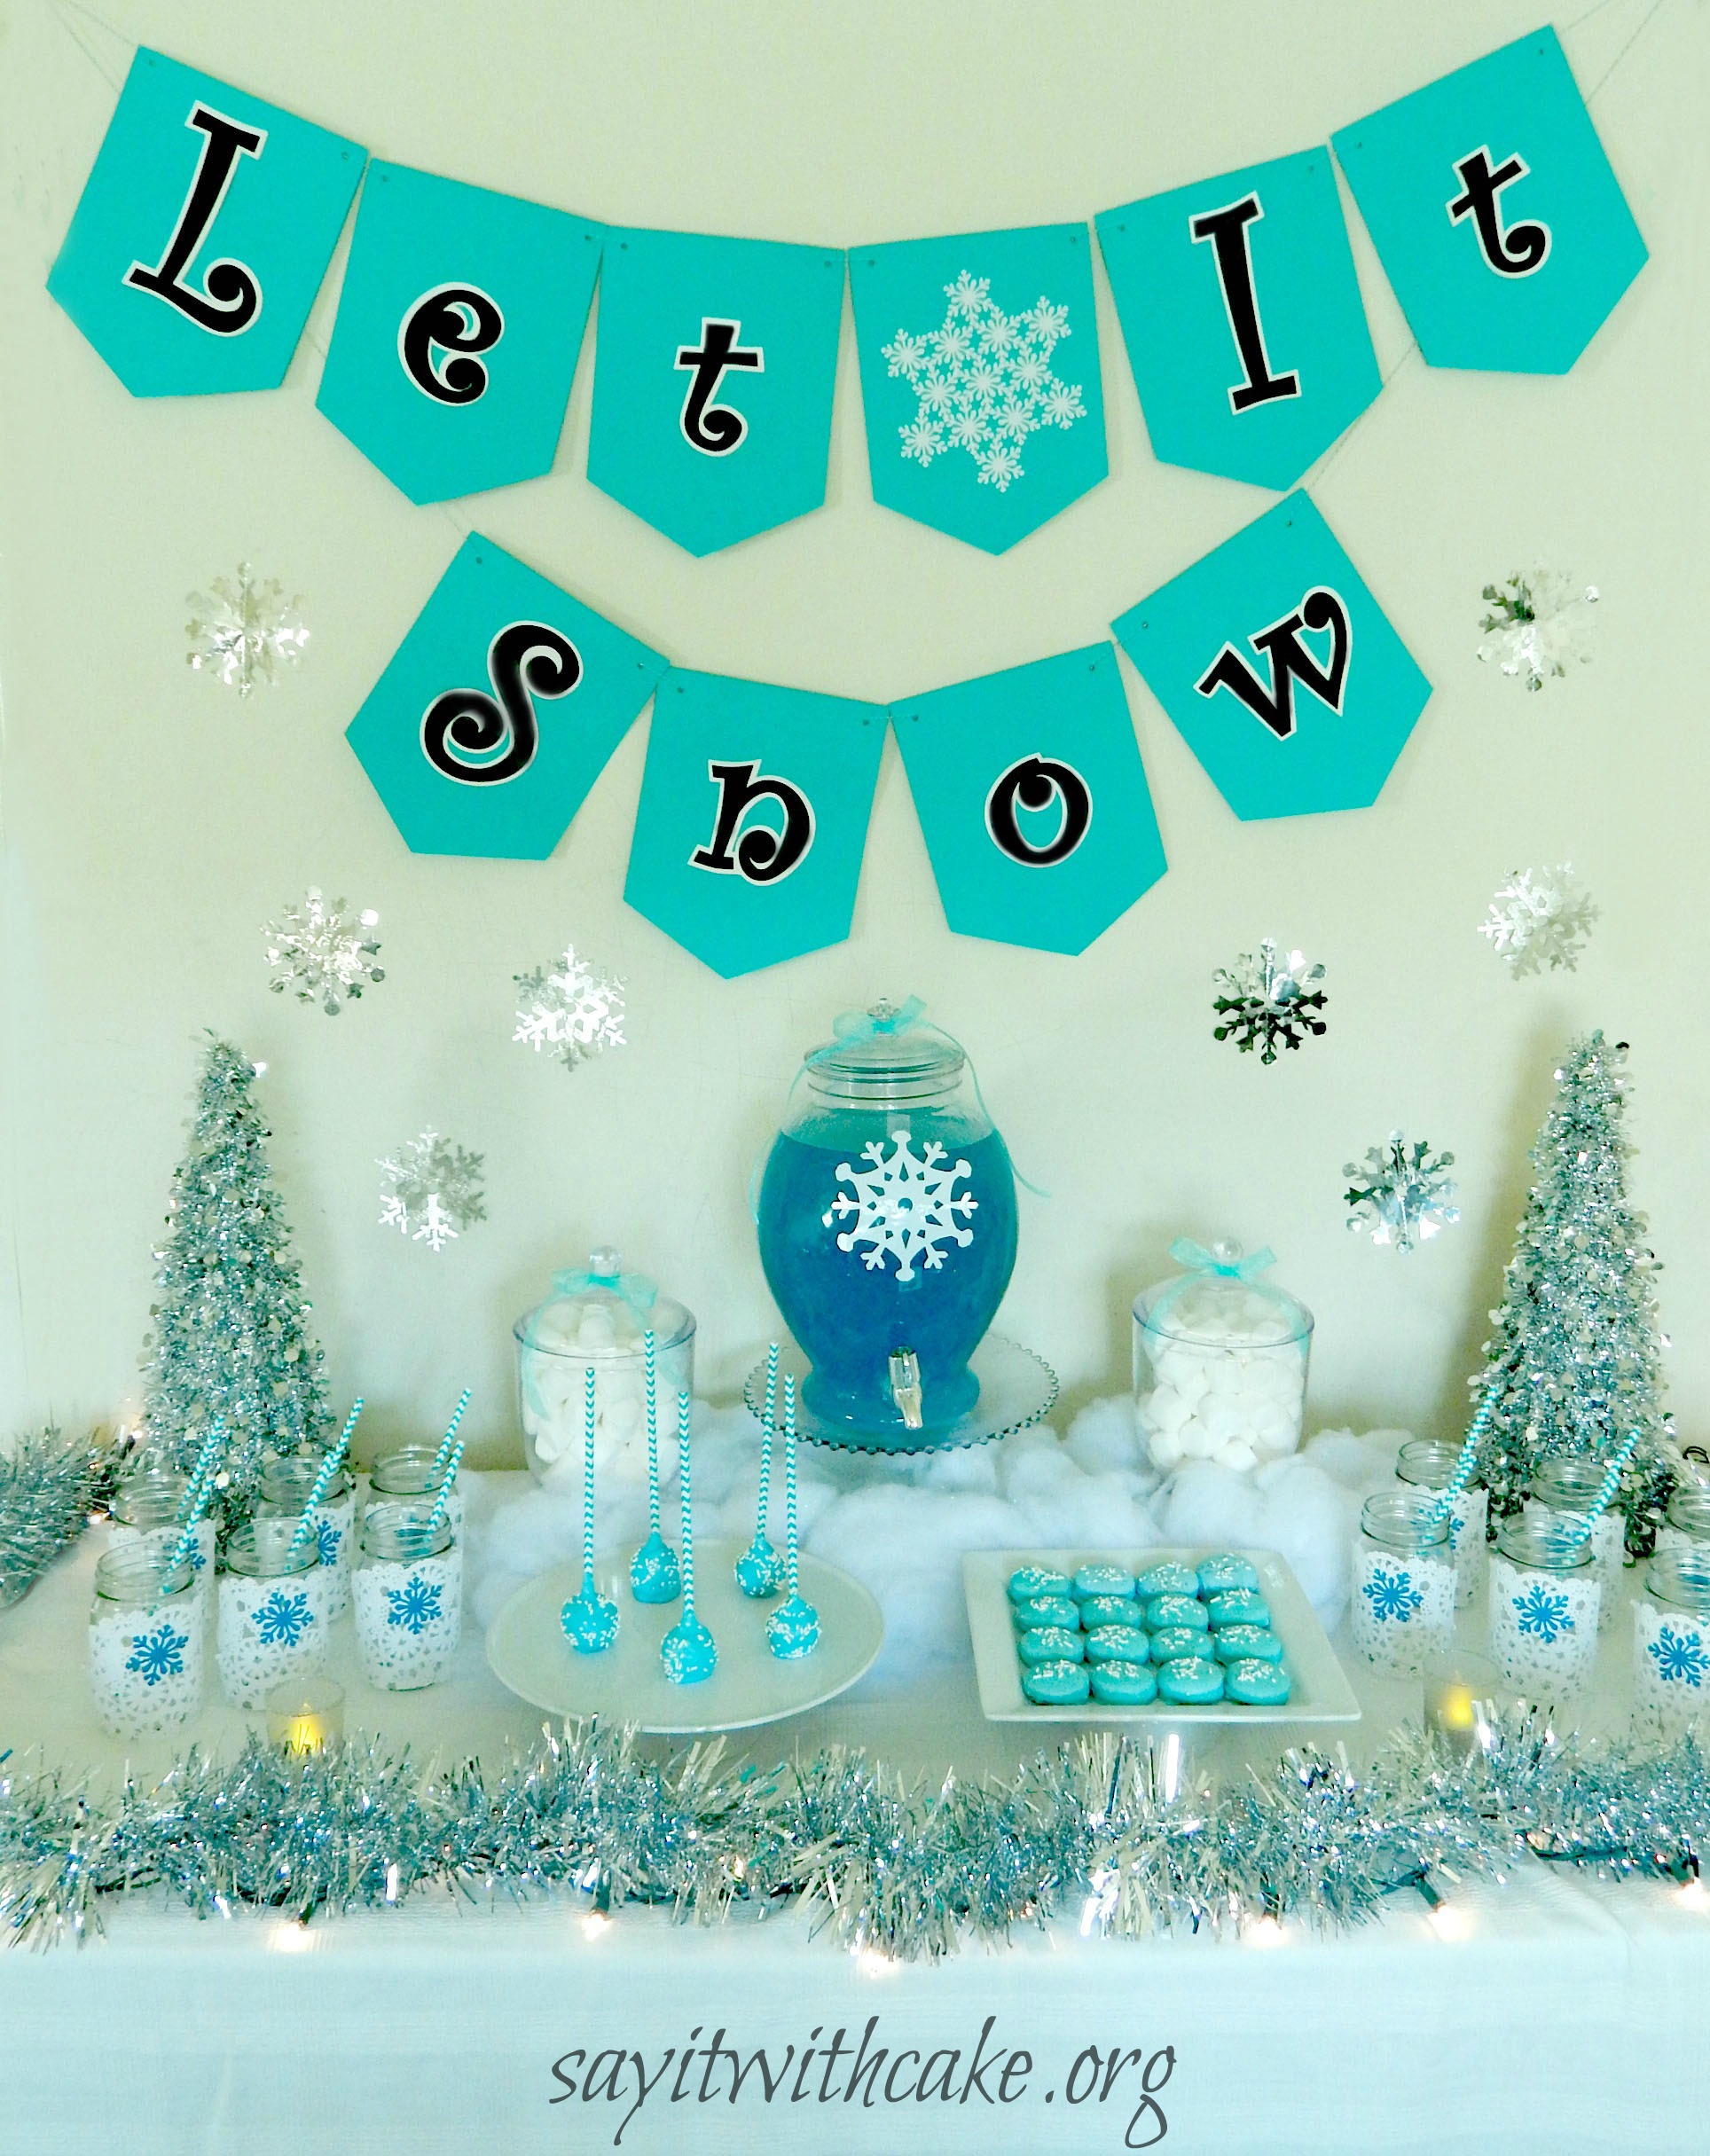 I live in San Diego and it never snows here. The closest thing we have is snow world over at Sea World. I created this dessert table for a Christmas party in hopes of a White Christmas! This Let it Snow Christmas party is in icy blue, silver, and white, with all decorations, banners and food made by Say it with Cake.
The theme for this dessert table is Let it Snow, so I used snowflakes as much as I could! I made the banner out of cardstock paper and blue and white twine. The punch centerpiece is a blue icy punch made out of blue Hawaiian punch and 7up. The cookies are blue chocolate dipped oreos, and the cake pops are vanilla with blue chocolate and white sprinkles. I used paper straws instead of a cake pop stick.
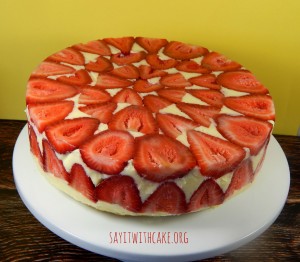
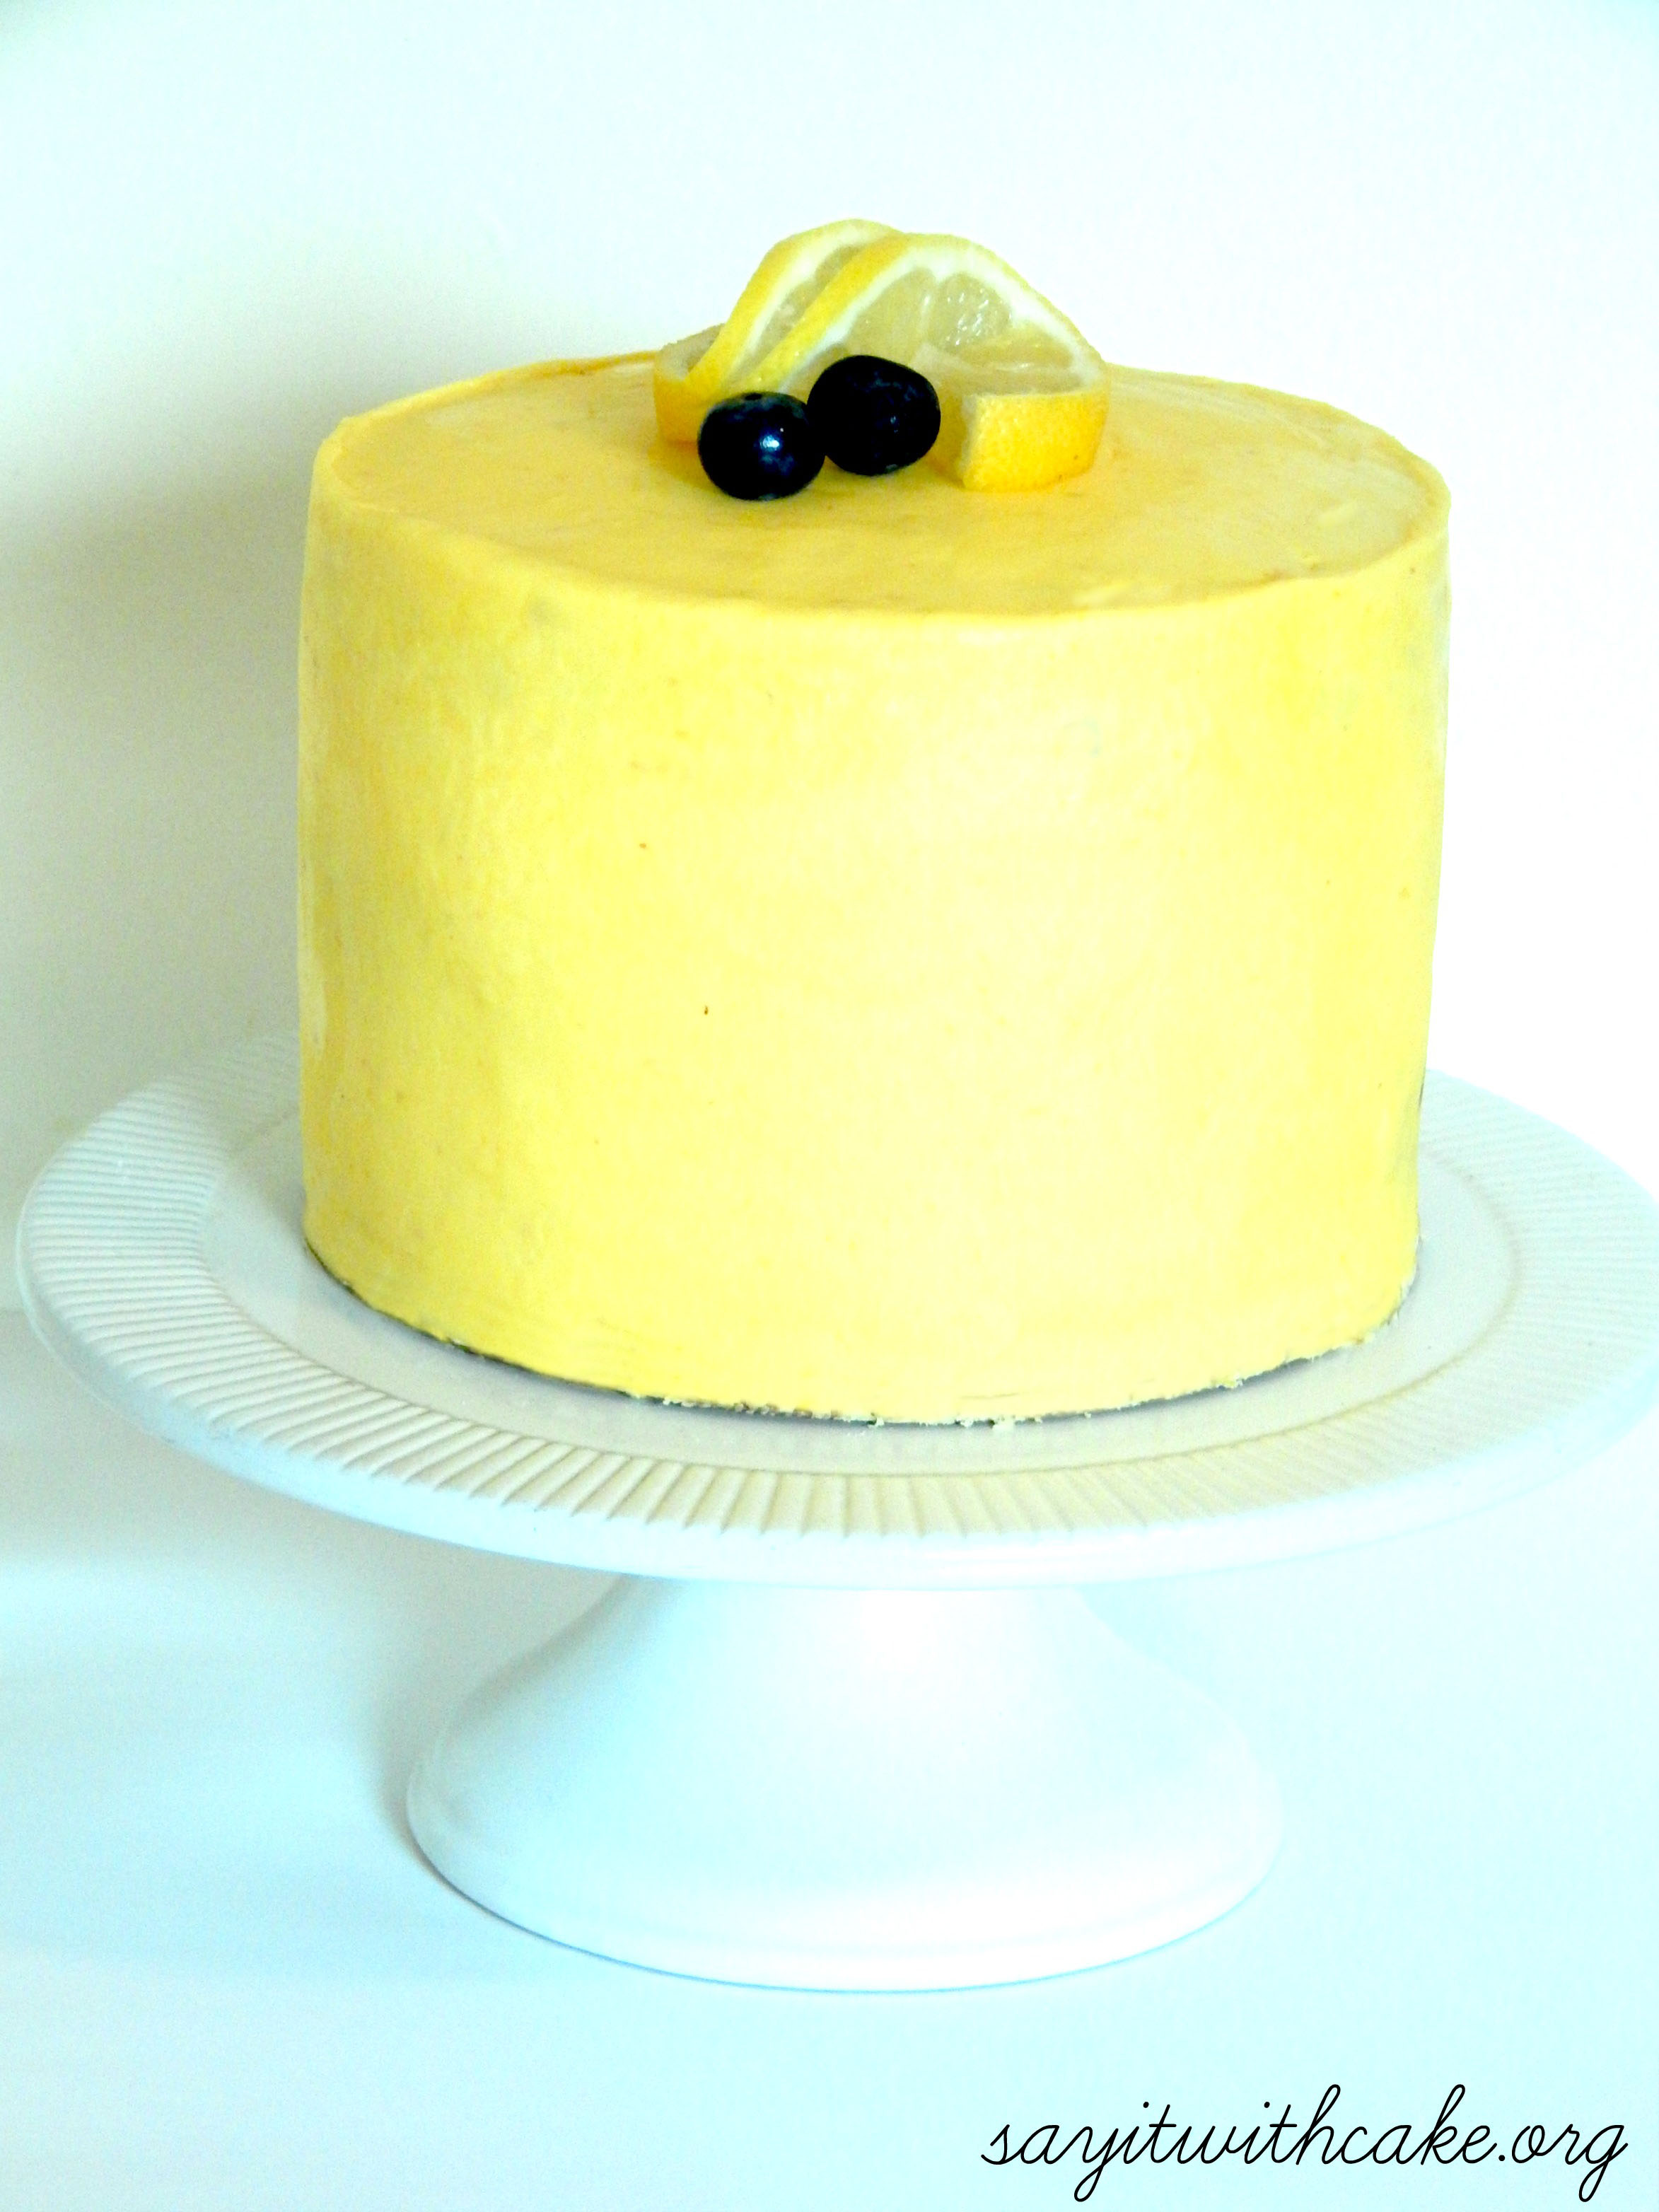
]]>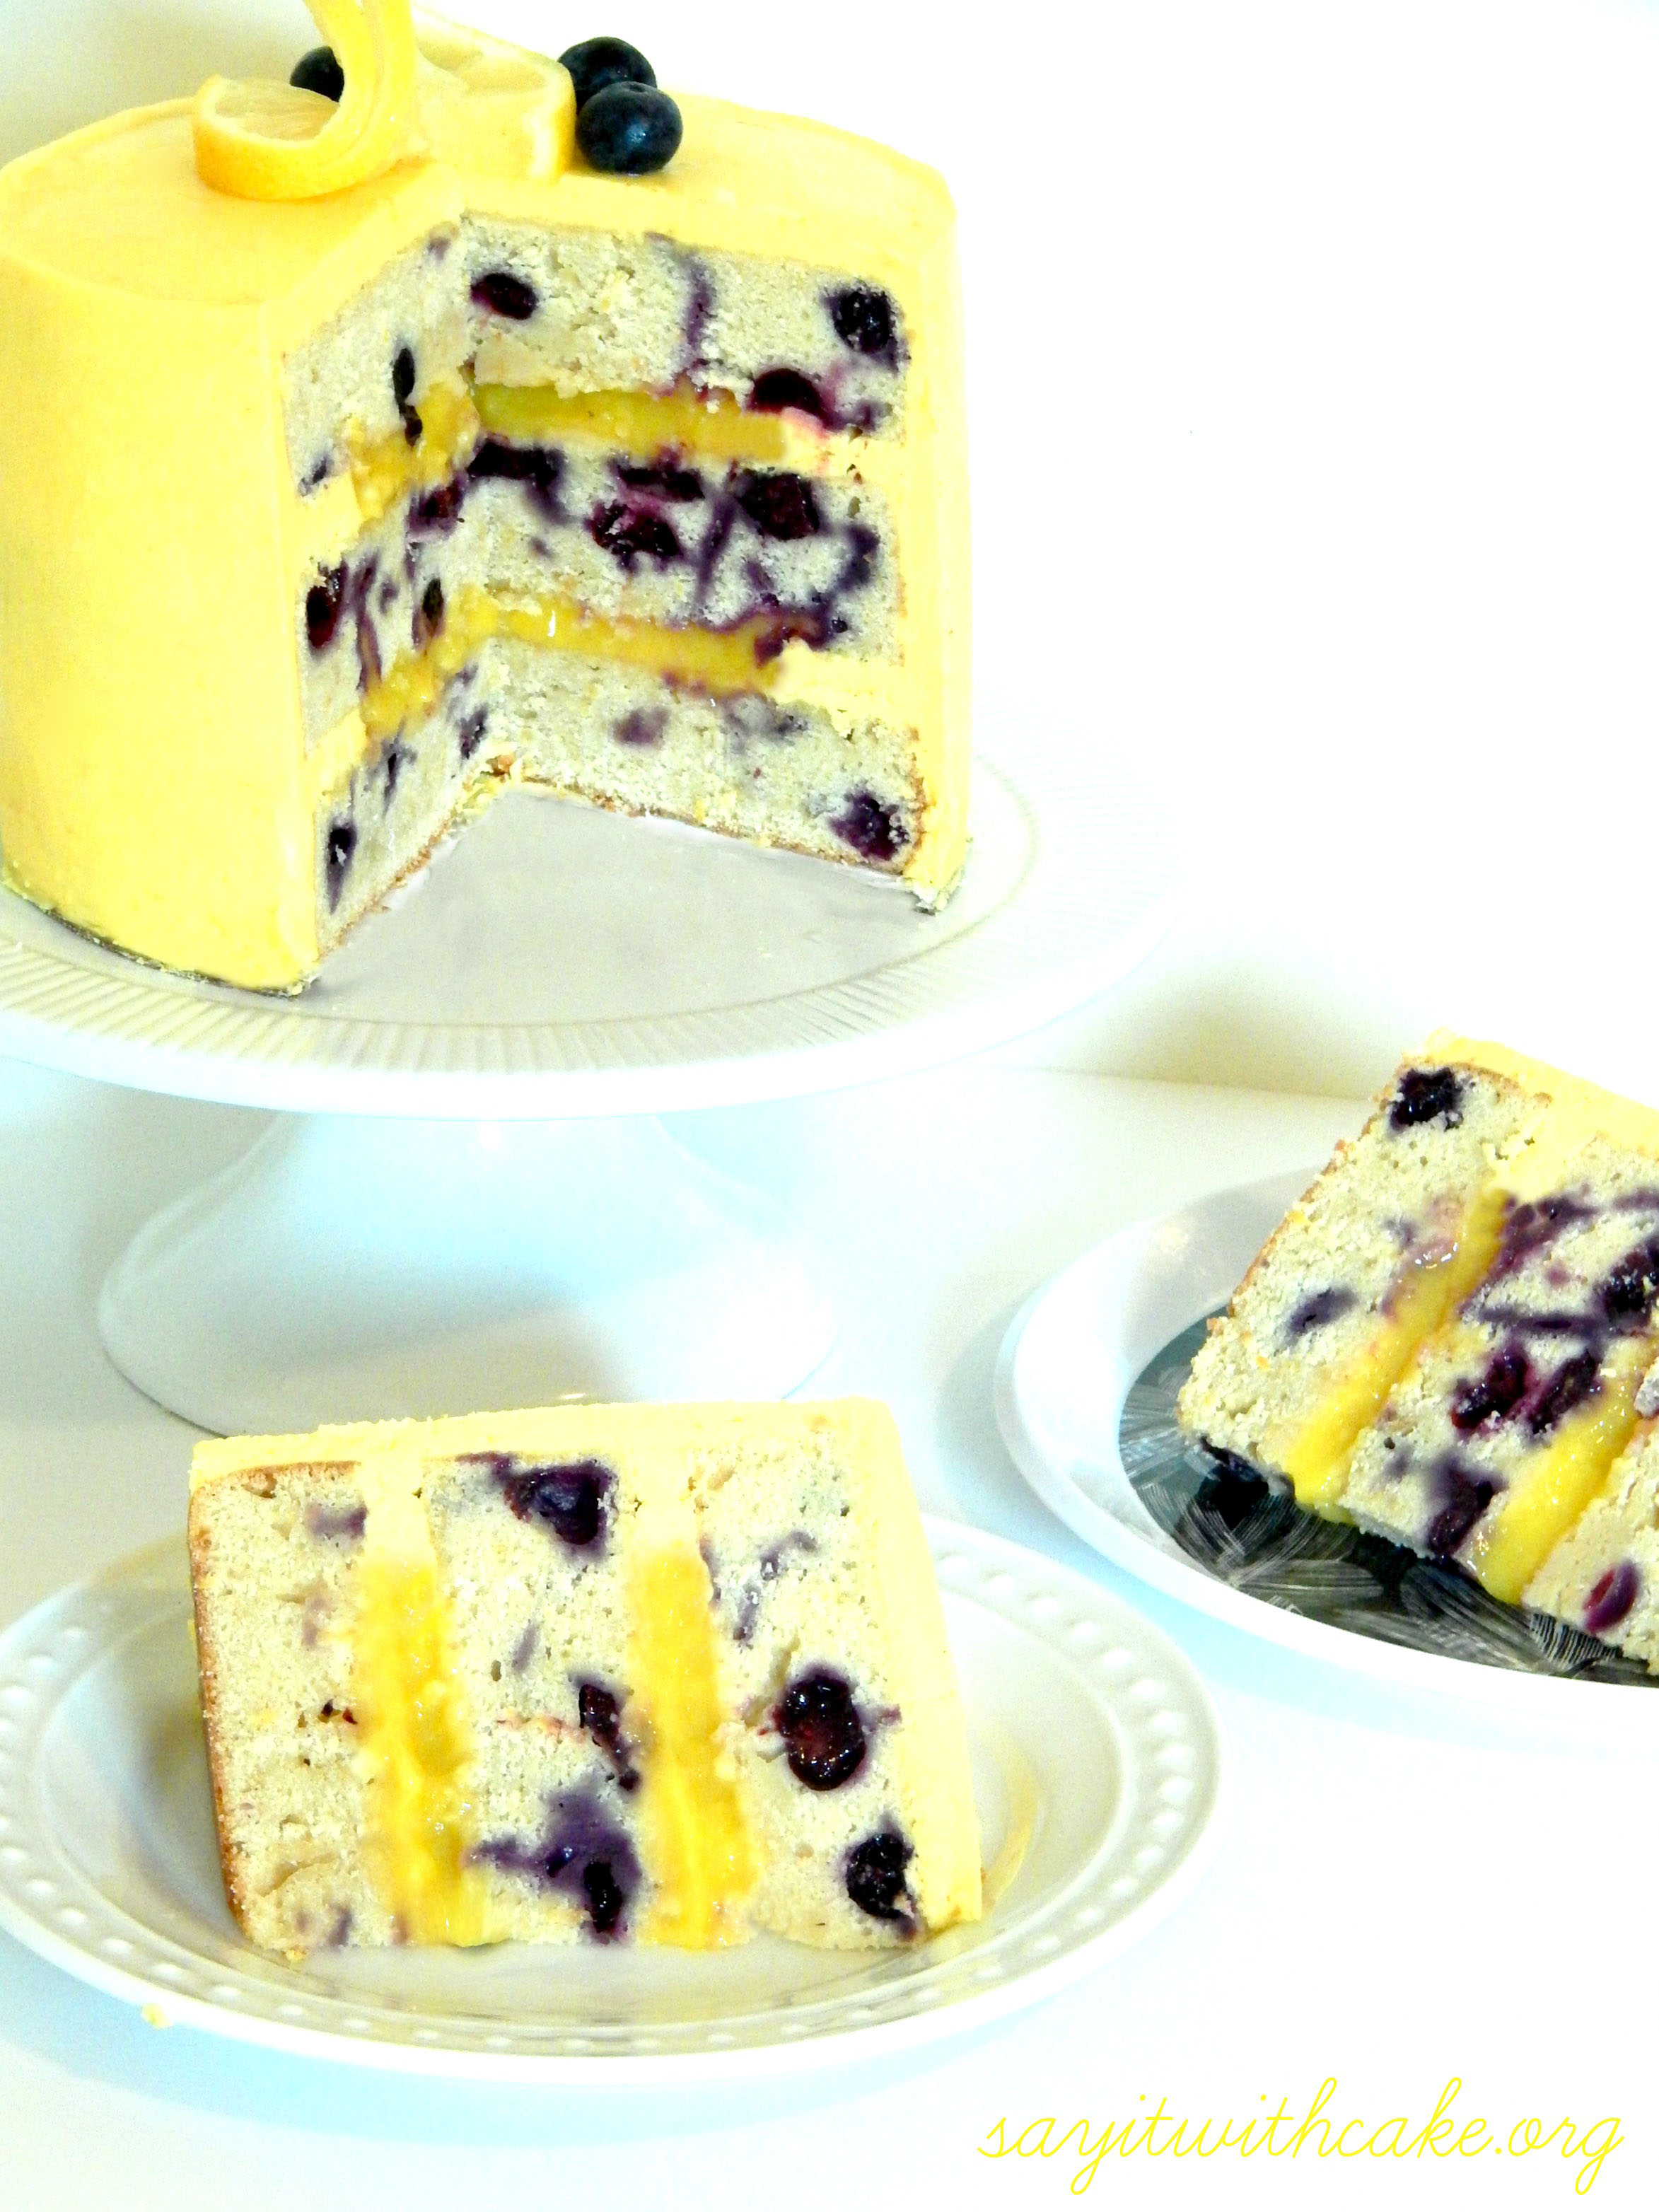 Spring is here! I have been enjoying the sunshine and craving something lemon and blueberry. Don’t you think lemon and blueberry make the perfect combination? The lemon curd filling is perfectly tart and goes so well with the blueberries.
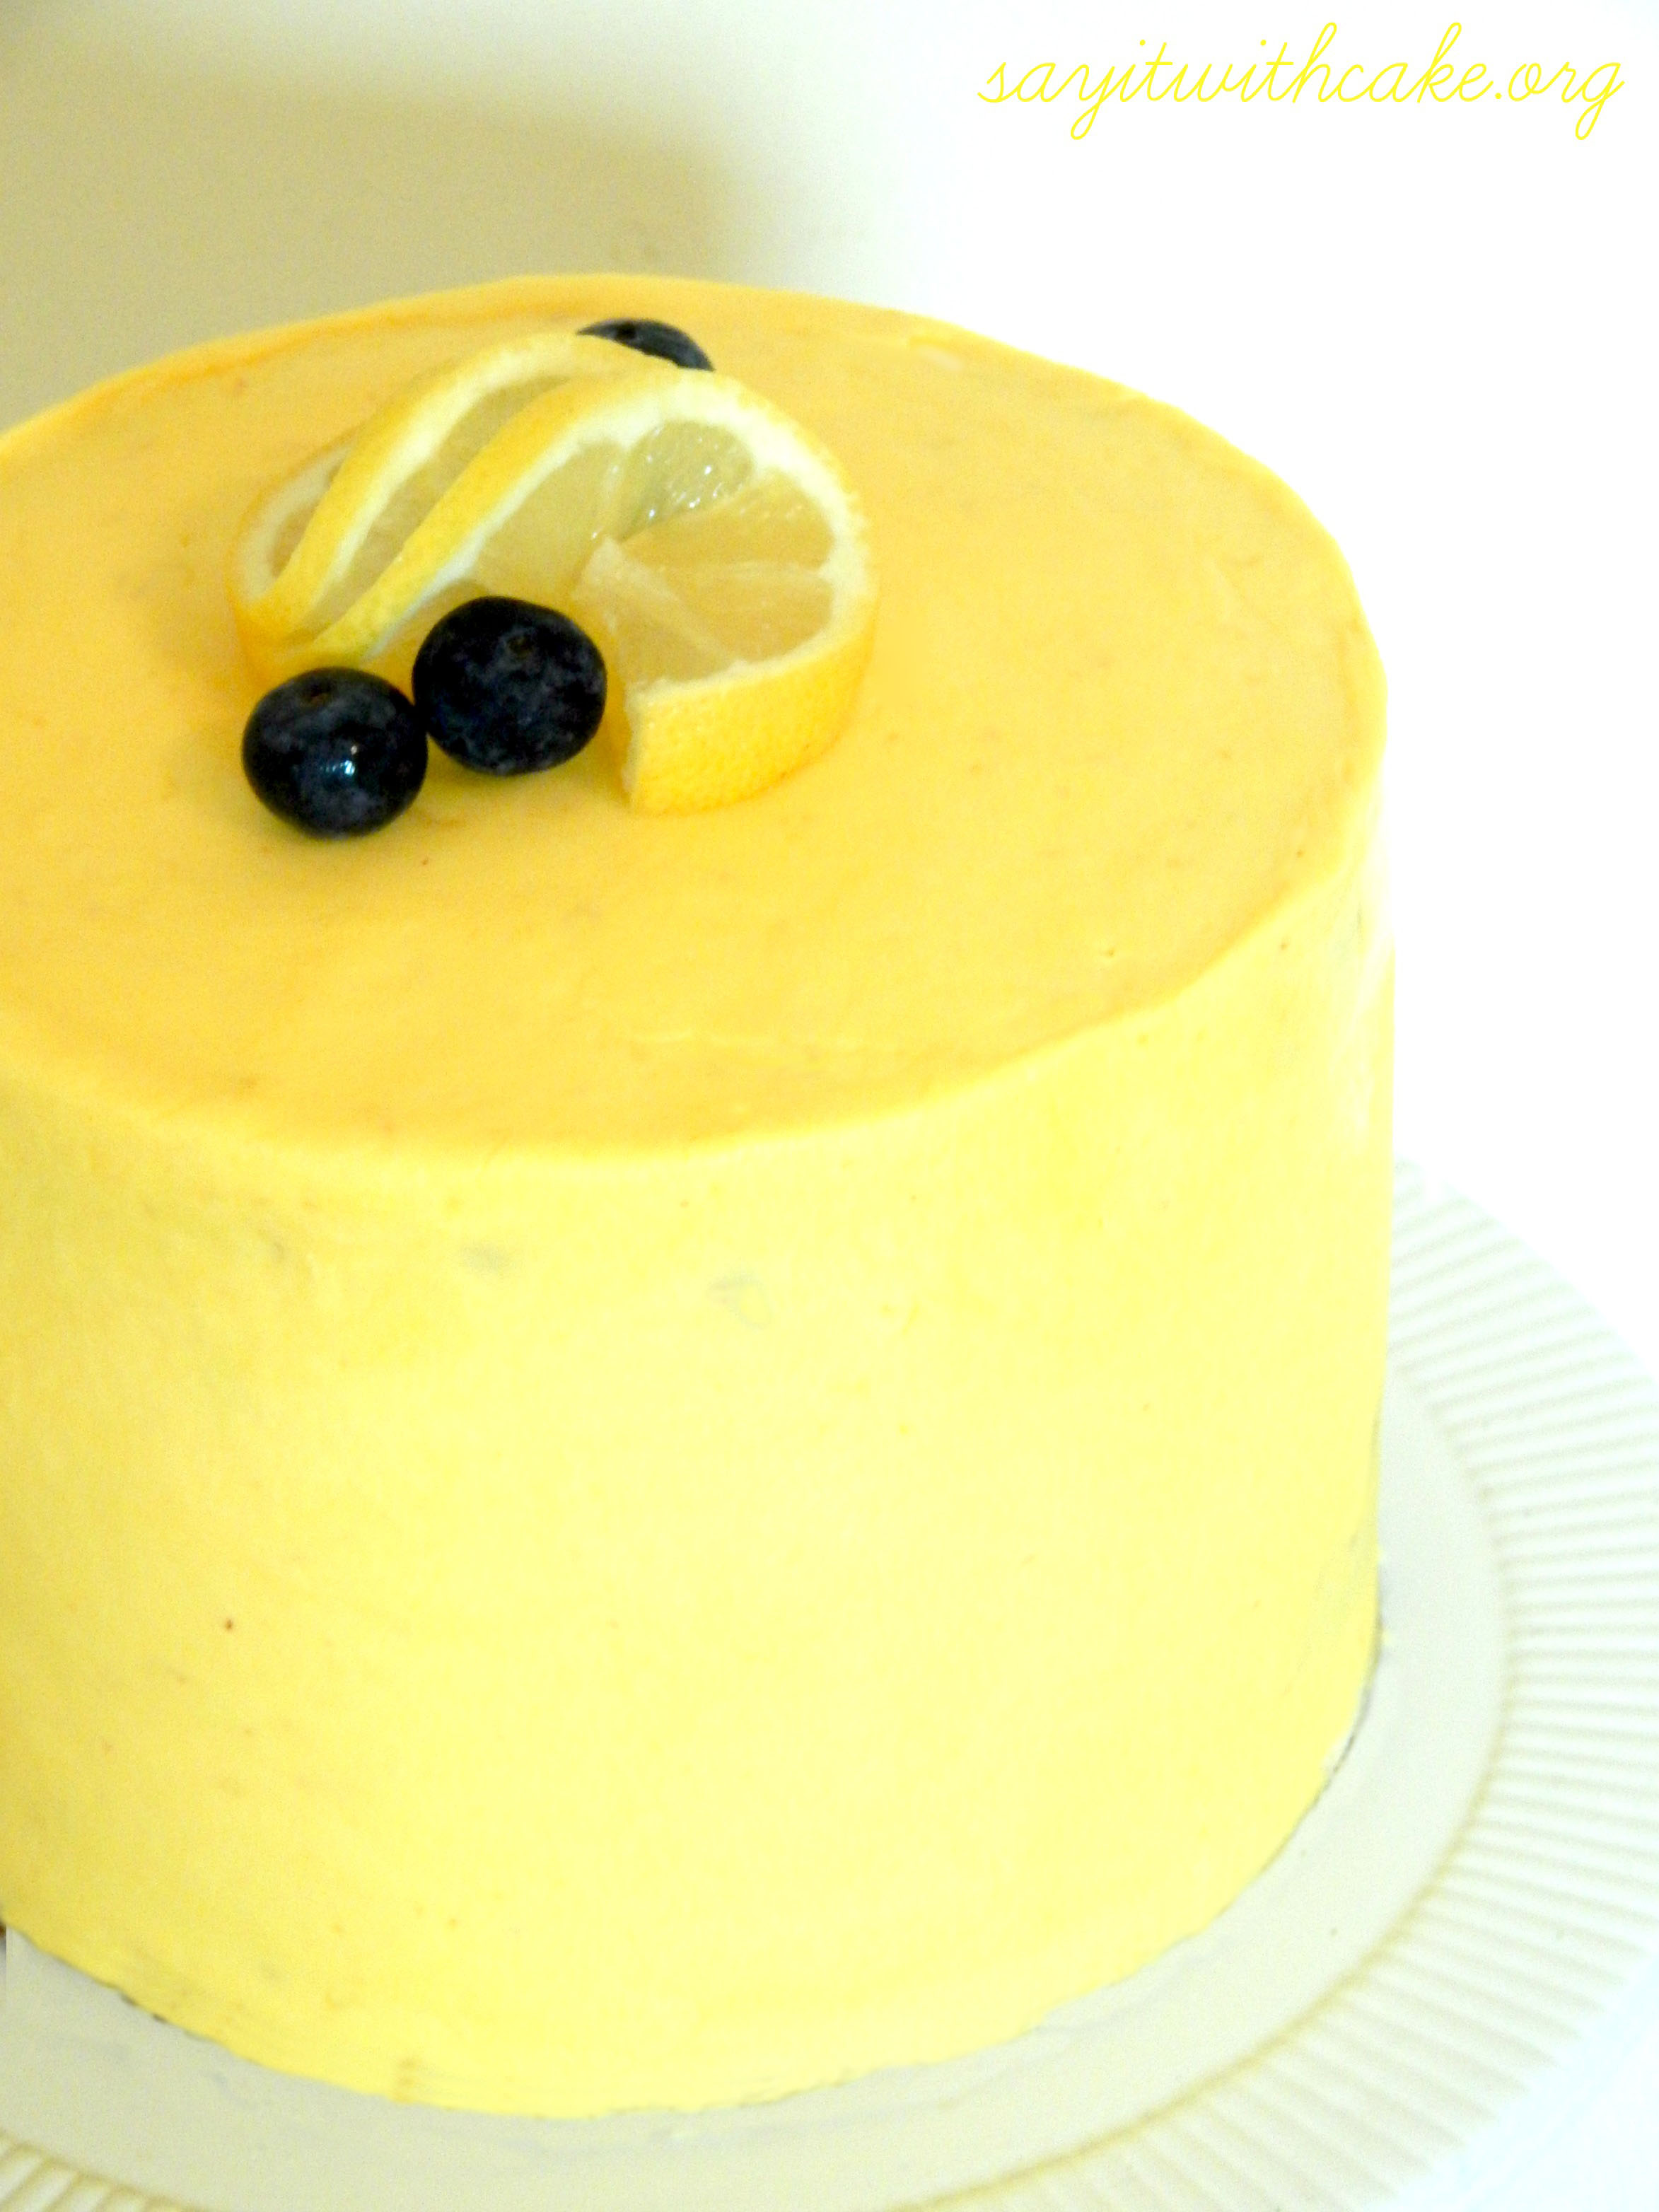
After several failed attempts, I finally was able to find a recipe that ensured my blueberries wouldn’t sink to the bottom. The first try was a mess. The blueberries sank to the bottom and turned the cake purple. The cake wouldn’t stay together. Although it was delicious, it was not presentable! The second try was with a cake mix. This turned out a little better, but still even though I covered the blueberries in flour, they would not stay put! So the third recipe I tried was VERY thick batter! This seemed to do the trick!
The lemon curd was fairly easy to make and delicious!!
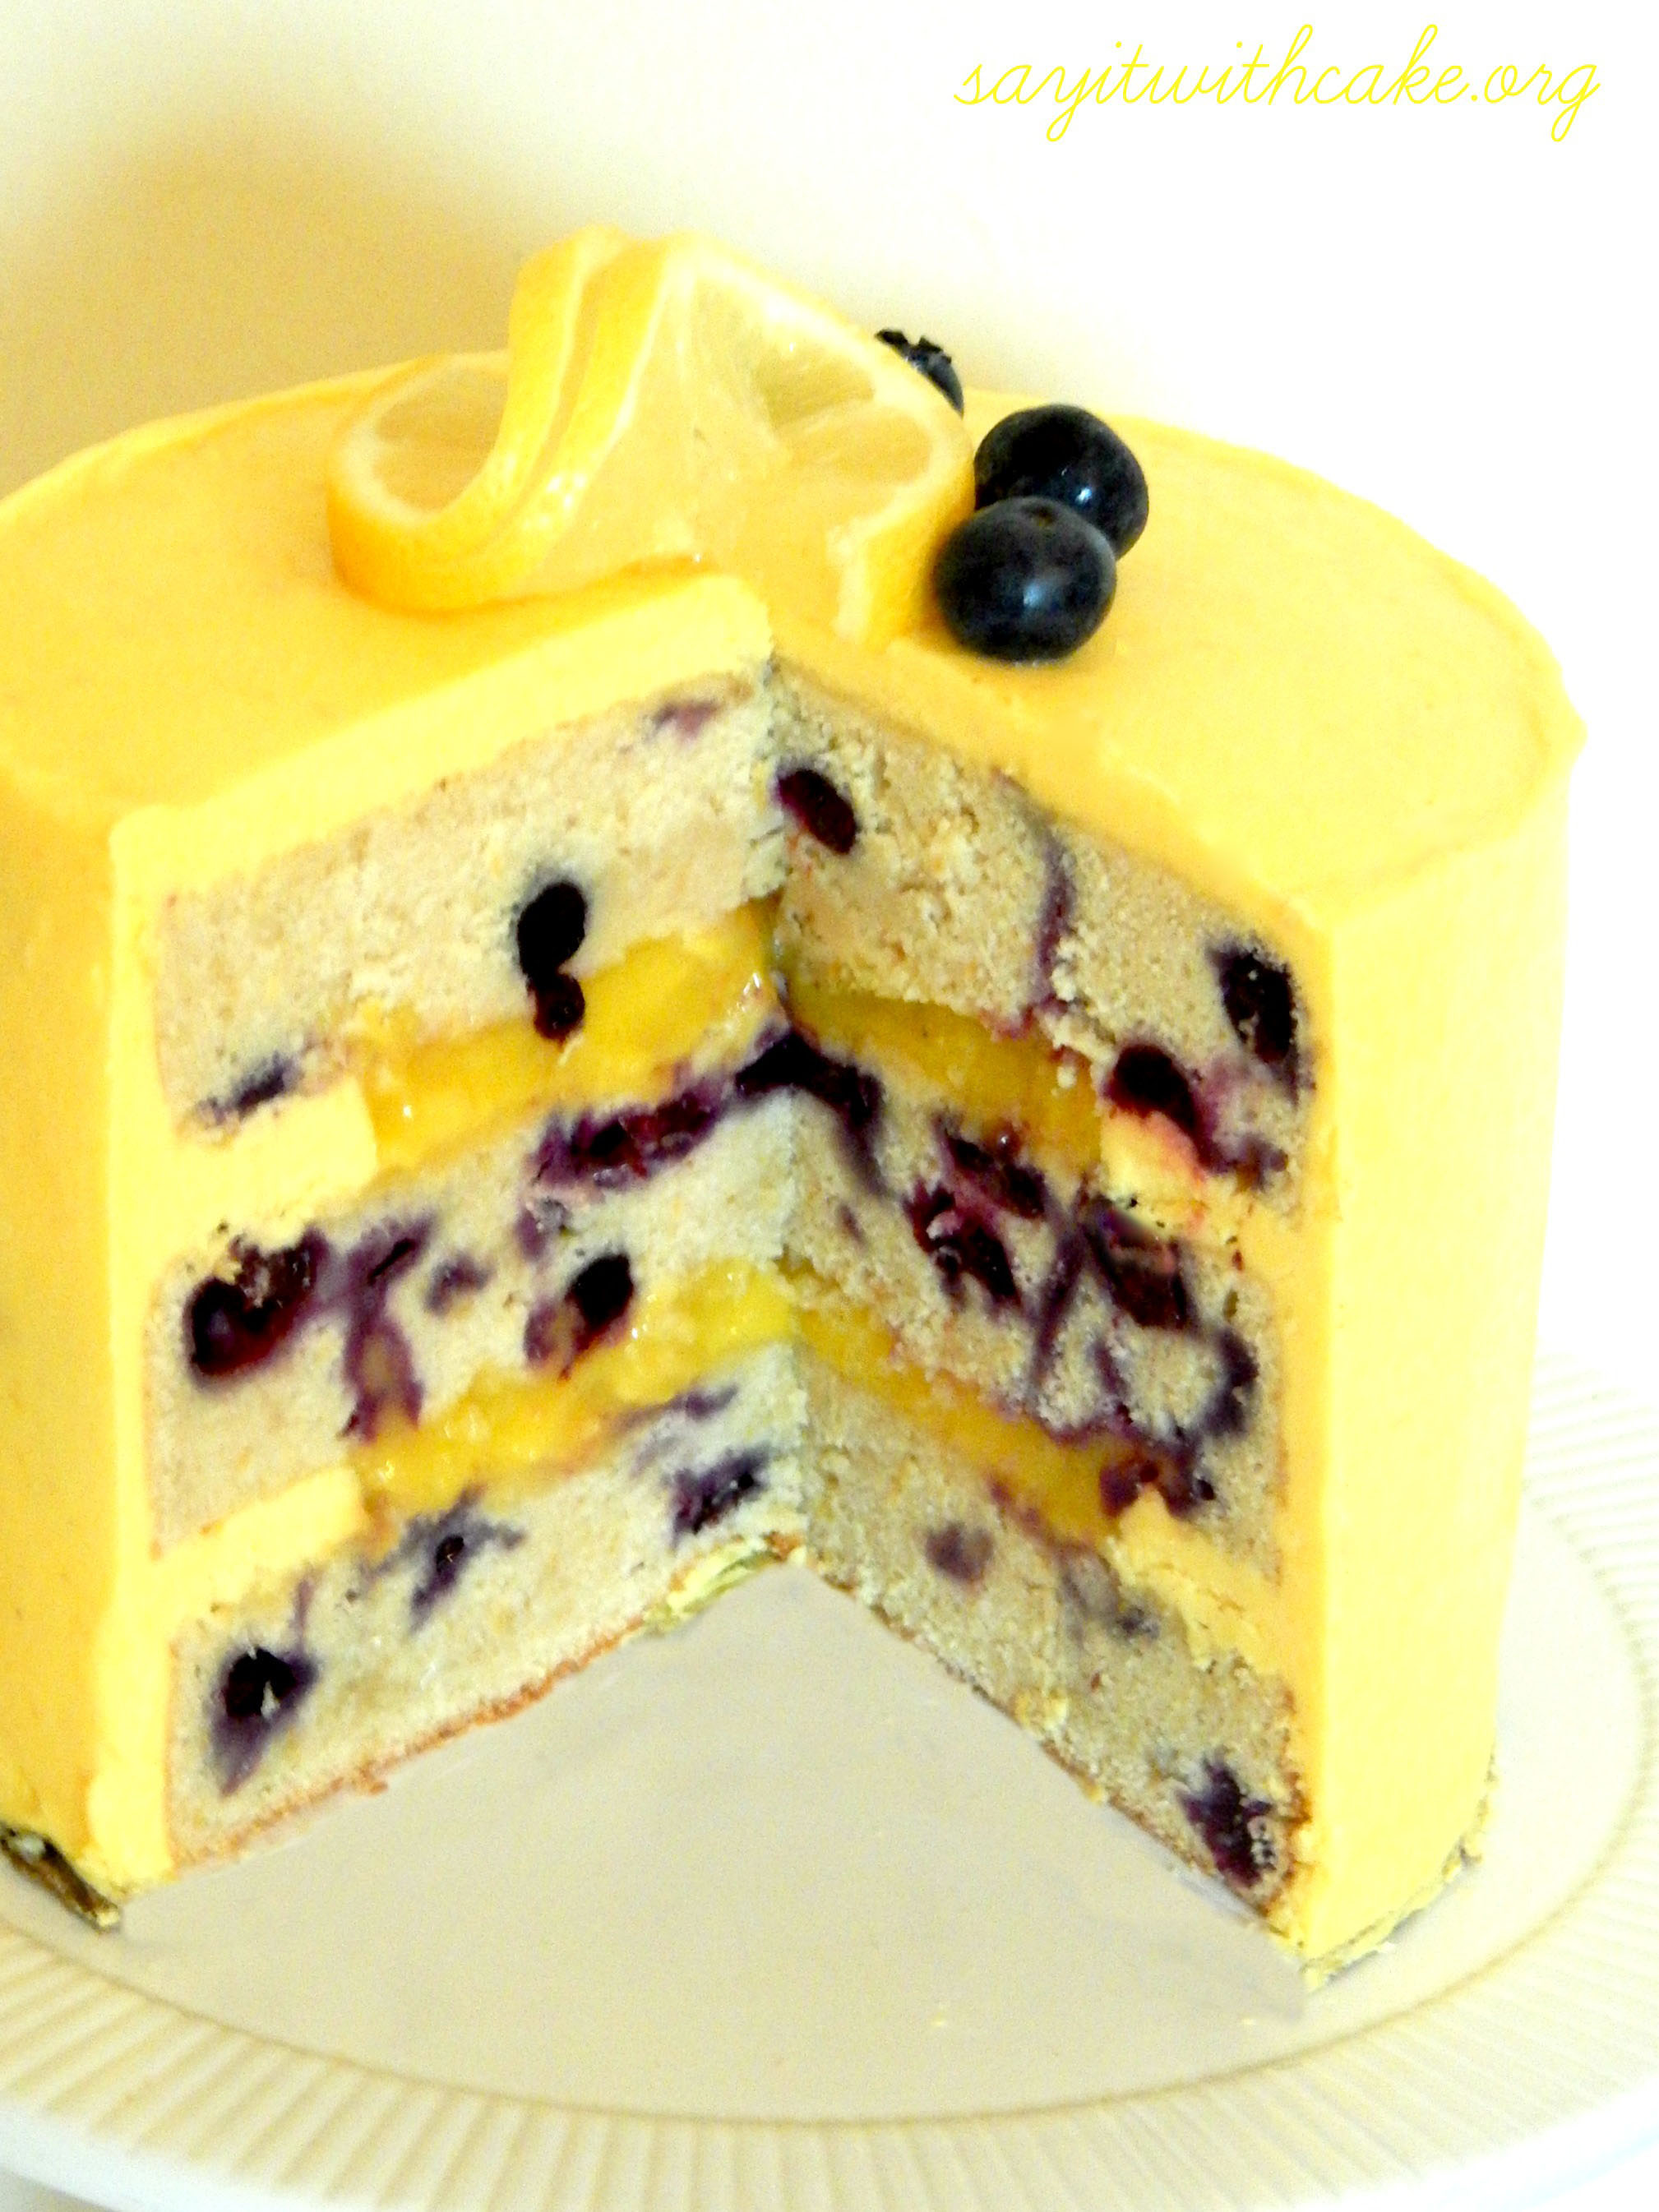
The tips I will give you for making this cake: Coat the blueberries in flour before folding them into the batter, and use a thick cake batter. Make a dam with stiff frosting to hold in the lemon curd (if you don’t do this, the lemon curd will seep out the edges and bulge out of the sides of the cake. I learned the hard way!) . Make the Lemon curd the day before and let it cool over night.
Ingredients
- By Sally's Baking Addiction
- 1 cup (230g) unsalted butter, softened to room temperature
- 1 and 1/4 cups (250g) granulated sugar
- 1/2 cup (100g) light brown sugar
- 4 large eggs, at room temperature*
- 1 Tablespoon vanilla extract
- 3 cups (375g) all-purpose flour, careful not to overmeasure*
- 1 Tablespoon baking powder
- 1/2 teaspoon salt
- 1 cup (240ml) buttermilk*
- zest + juice of 3 medium lemons*
- 1 and 1/2 cups blueberries, fresh (258g) or non-thawed frozen (275g)
- 1 Tablespoon all-purpose flour
- By Sweetapolita
- 1 cup (2 sticks)(227 g) unsalted butter, softened
- 2 teaspoons (10 ml) lemon zest
- 5 cups (625 g) icing sugar, sifted
- 2 tablespoons (30 ml) fresh lemon juice
- 1/4 cup (60 ml) whipping cream (35% cream)
- 1/4 teaspoon (1.25) pure lemon extract
- a pinch of salt
- yellow food gel, optional
- *loosely adapted from Williams Sonoma
- Yield: ~ 1-3/4 cups
- 4 lemons (or 6 Meyer lemons), or 2 oranges, or 5 limes (or 8 Key Limes), preferably organic
- 2 whole eggs plus 4 egg yolks
- 1 cup sugar (200 grams) (7 ounces)
- 4 tablespoons (60 grams) (2 ounces) unsalted butter, at room temperature and cut into small even cubes
Instructions
- Preheat the oven to 350F. Spray three 8x2 inch cake pans with nonstick spray. Set aside.
- Make the cake. Using a handheld or stand mixer with a paddle attachment, beat the butter on high until creamy - about 1 minute. Add granulated and brown sugars and beat on medium-high speed until creamed, about 2-3 minutes. Scrape down the sides and bottom of the bowl as needed. Add eggs and vanilla. Beat on medium speed until everything is combined, about 2 full minutes. Scrape down the sides and bottom of the bowl as needed. Set aside.
- In a large sized bowl, toss together the flour, baking powder, and salt. Slowly add the dry ingredients to the wet ingredients. Beat on low speed for 5 seconds, then add the milk, lemon zest, and lemon juice. Remove from the mixer and stir lightly until everything is just combined. Toss the blueberries in 1 Tablespoon of flour and fold into the batter. Batter is extremely thick. Do not overmix at any point. Overmixing will lend a tough, dense textured crumb.
- Spoon batter evenly into 3 prepared cake pans. Bake for about 21-26 minutes or until a toothpick inserted in the center comes out clean. Remove from the oven and allow to cool completely before frosting.
- Cream butter and lemon zest in bowl of electric mixer fitted with paddle attachment, about 3 minutes. Slowly add icing sugar, mixing on low speed for about 2 minutes.
- Add remaining ingredients and beat on med-high for 3-4 minutes until very fluffy. If using color gel, add a drop or two , then beat until blended.
- 1. Wash citrus really well (with a bristled brush under cold water) and using a Zester, remove all of the coloured portion of the peel from the fruit (not the white pith–it’s bitter!) into a bowl or onto a piece of wax paper.If you don't have a zester, you can use the small side of a cheese grater. Rotate fruit as necessary to get as much of the zest off. Repeat until you have 2 teaspoons (30 mL) of the zest, and set aside.
- 2. Slice the citrus in half crosswise (I find room temperature citrus is best for juicing) using a sharp knife, and extract as much of the juice as you can using a citrus reamer, or I use a small Citrus Juicer. Just be sure to catch all of the juice in a bowl and to completely strain the seeds before using. Repeat the juicing until you have 2/3 cup (5 fl oz/160 mL) of the strained juice.
- 3. Get your double boiler ready by filling a saucepan with 1? of water, then placing a metal bowl on top of the saucepan. You will need to ensure the bowl fits snugly into the top of the saucepan and that the bottom of the bowl doesn’t touch the water (important, or your eggs will cook!). You can now remove the bowl and continue with making the curd.
- 4. Whisk the juice, whole eggs, egg yolks and sugar in the bowl until smooth. Add the butter cubes to the bowl, but don’t stir.
- 5. Heat the water in the saucepan over low heat until it simmers (not boils) and place the bowl atop the rim. Stirring gently, but constantly, using heatproof spatula or wooden spoon, cook until the curd has thickened and all of the butter has melted and is incorporated, about 10 minutes (this can vary). To test if the curd is thick enough, remove the spatula or spoon from the curd and check that it’s coated.
- 6. Strain the curd over a bowl using a fine-mesh sieve and then stir in the zest. Cover with plastic wrap pressed directly against the curd (to prevent a skin from forming) and chill for at least 3 hours (I like to chill it overnight). It also thickens up a bit more while chilling.
- Spread thin dollop of frosting on an 8-inch thin cake board or cake plate. Transfer 1 cake layer to board, face up.
- Create a dam around the perimeter of the layer using frosting in a pastry bag fitted with a coupler, then spread lemon curd (apprx 1 cup) inside the dam--this prevents the curd from reaching out over edges.
- Top with second layer, face-up; repeat frosting around perimeter and lemon curd filling.
- Top with third cake layer, face-down (brown smooth side up). Spread thin layer (crumb coat) of over top and sides of cake, using offset palette knife and bench scraper for smooth finish. Place cake in refrigerator for about 30 mins to chill.
- from refrigerator and using same method, frost cake with generous layer of frosting, smoothing again.
Enjoy!
Shamene
Other cakes you may like!
This cake was featured here!
Linked up here: The Country Cook
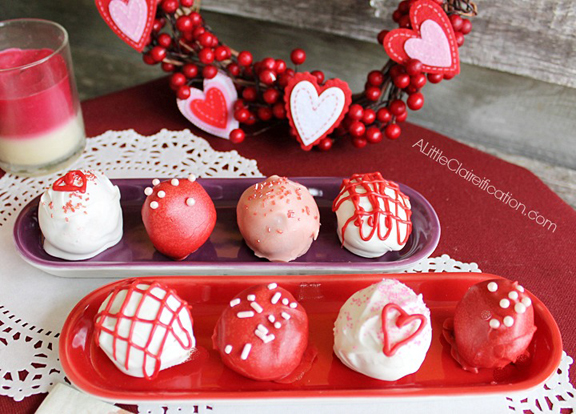
]]> Valentine’s Day is just around the corner! If you are like me, then you must be searching the internet for the cutest yummiest recipes for Valentines Day. So I gathered up 21 of my favorite Valentine’s Day Sweets and Treats for you to chose from!
Chili Chocolate Valentine Truffles by A little Claireification
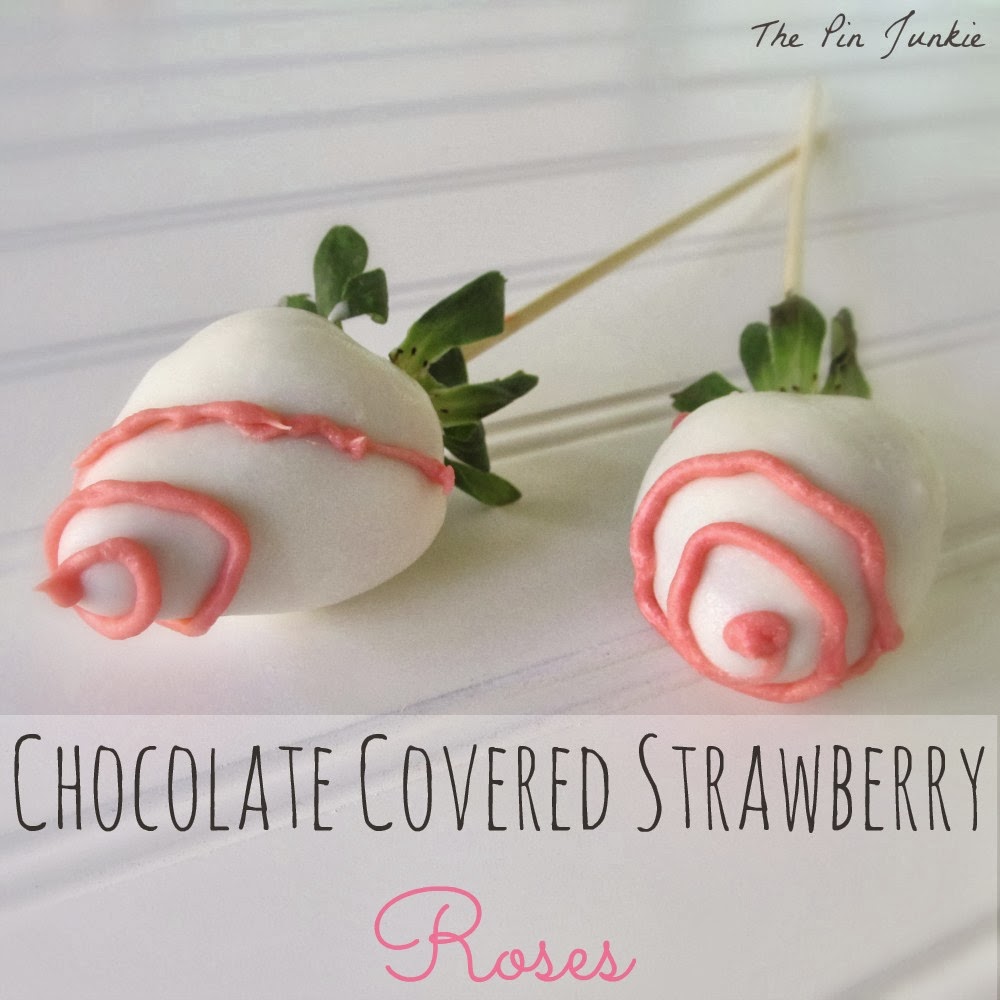
Chocolate Covered Strawberry Roses by The Pin Junkie
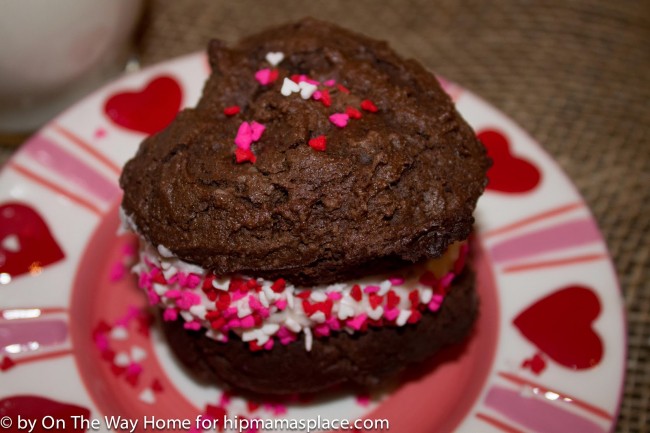
Chocolate whoopie Pie by hipmamasplace

Dark Chocolate & Strawberry Buttercream Cake with Chocolate Covered Strawberries by Sayitwithcake
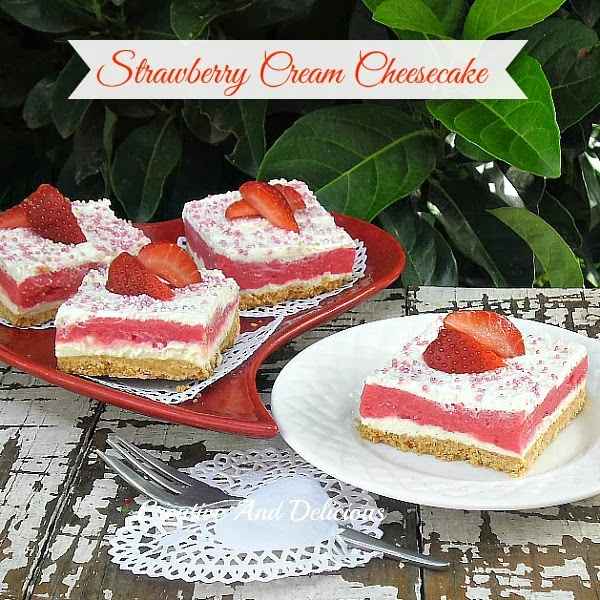
Strawberry Cream Cheesecake by Creative and Delicious
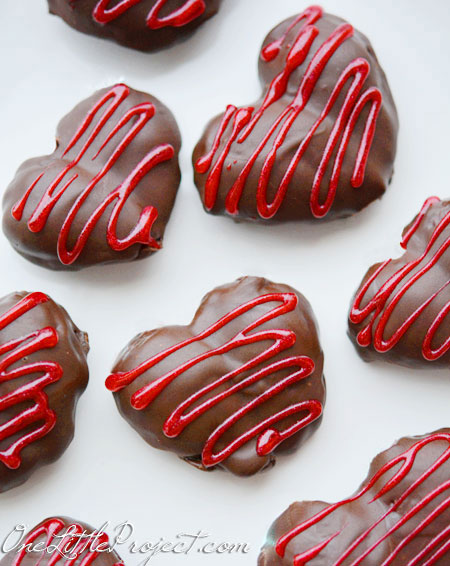
Chocolate Strawberry Hearts by One Little Project
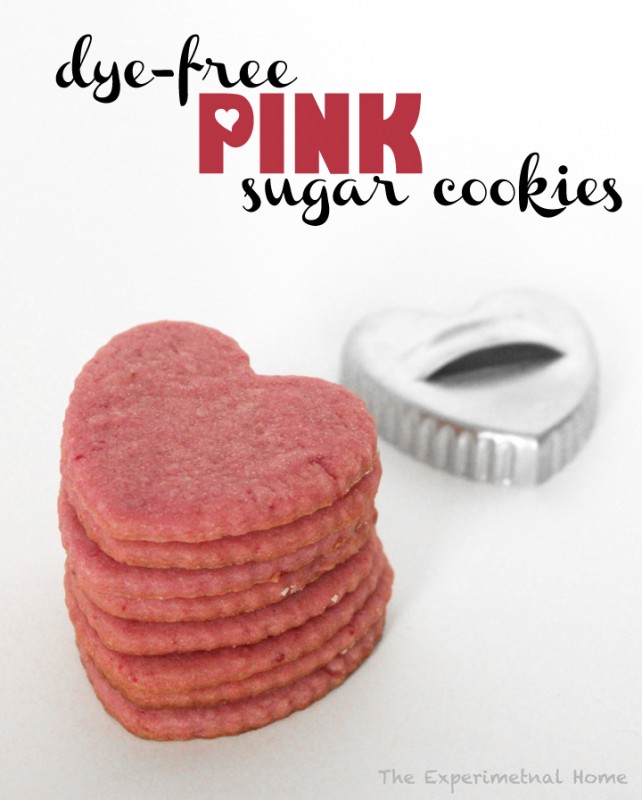
Pink Sugar Cookies by The Experimental Home
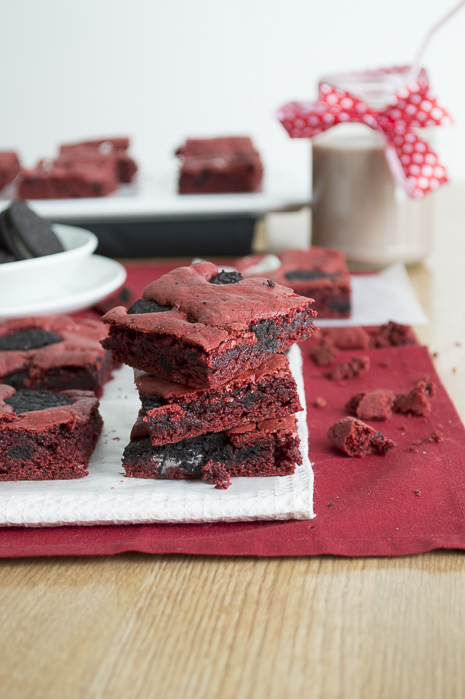
Red Velvet Oreo bars by The First Year Blog
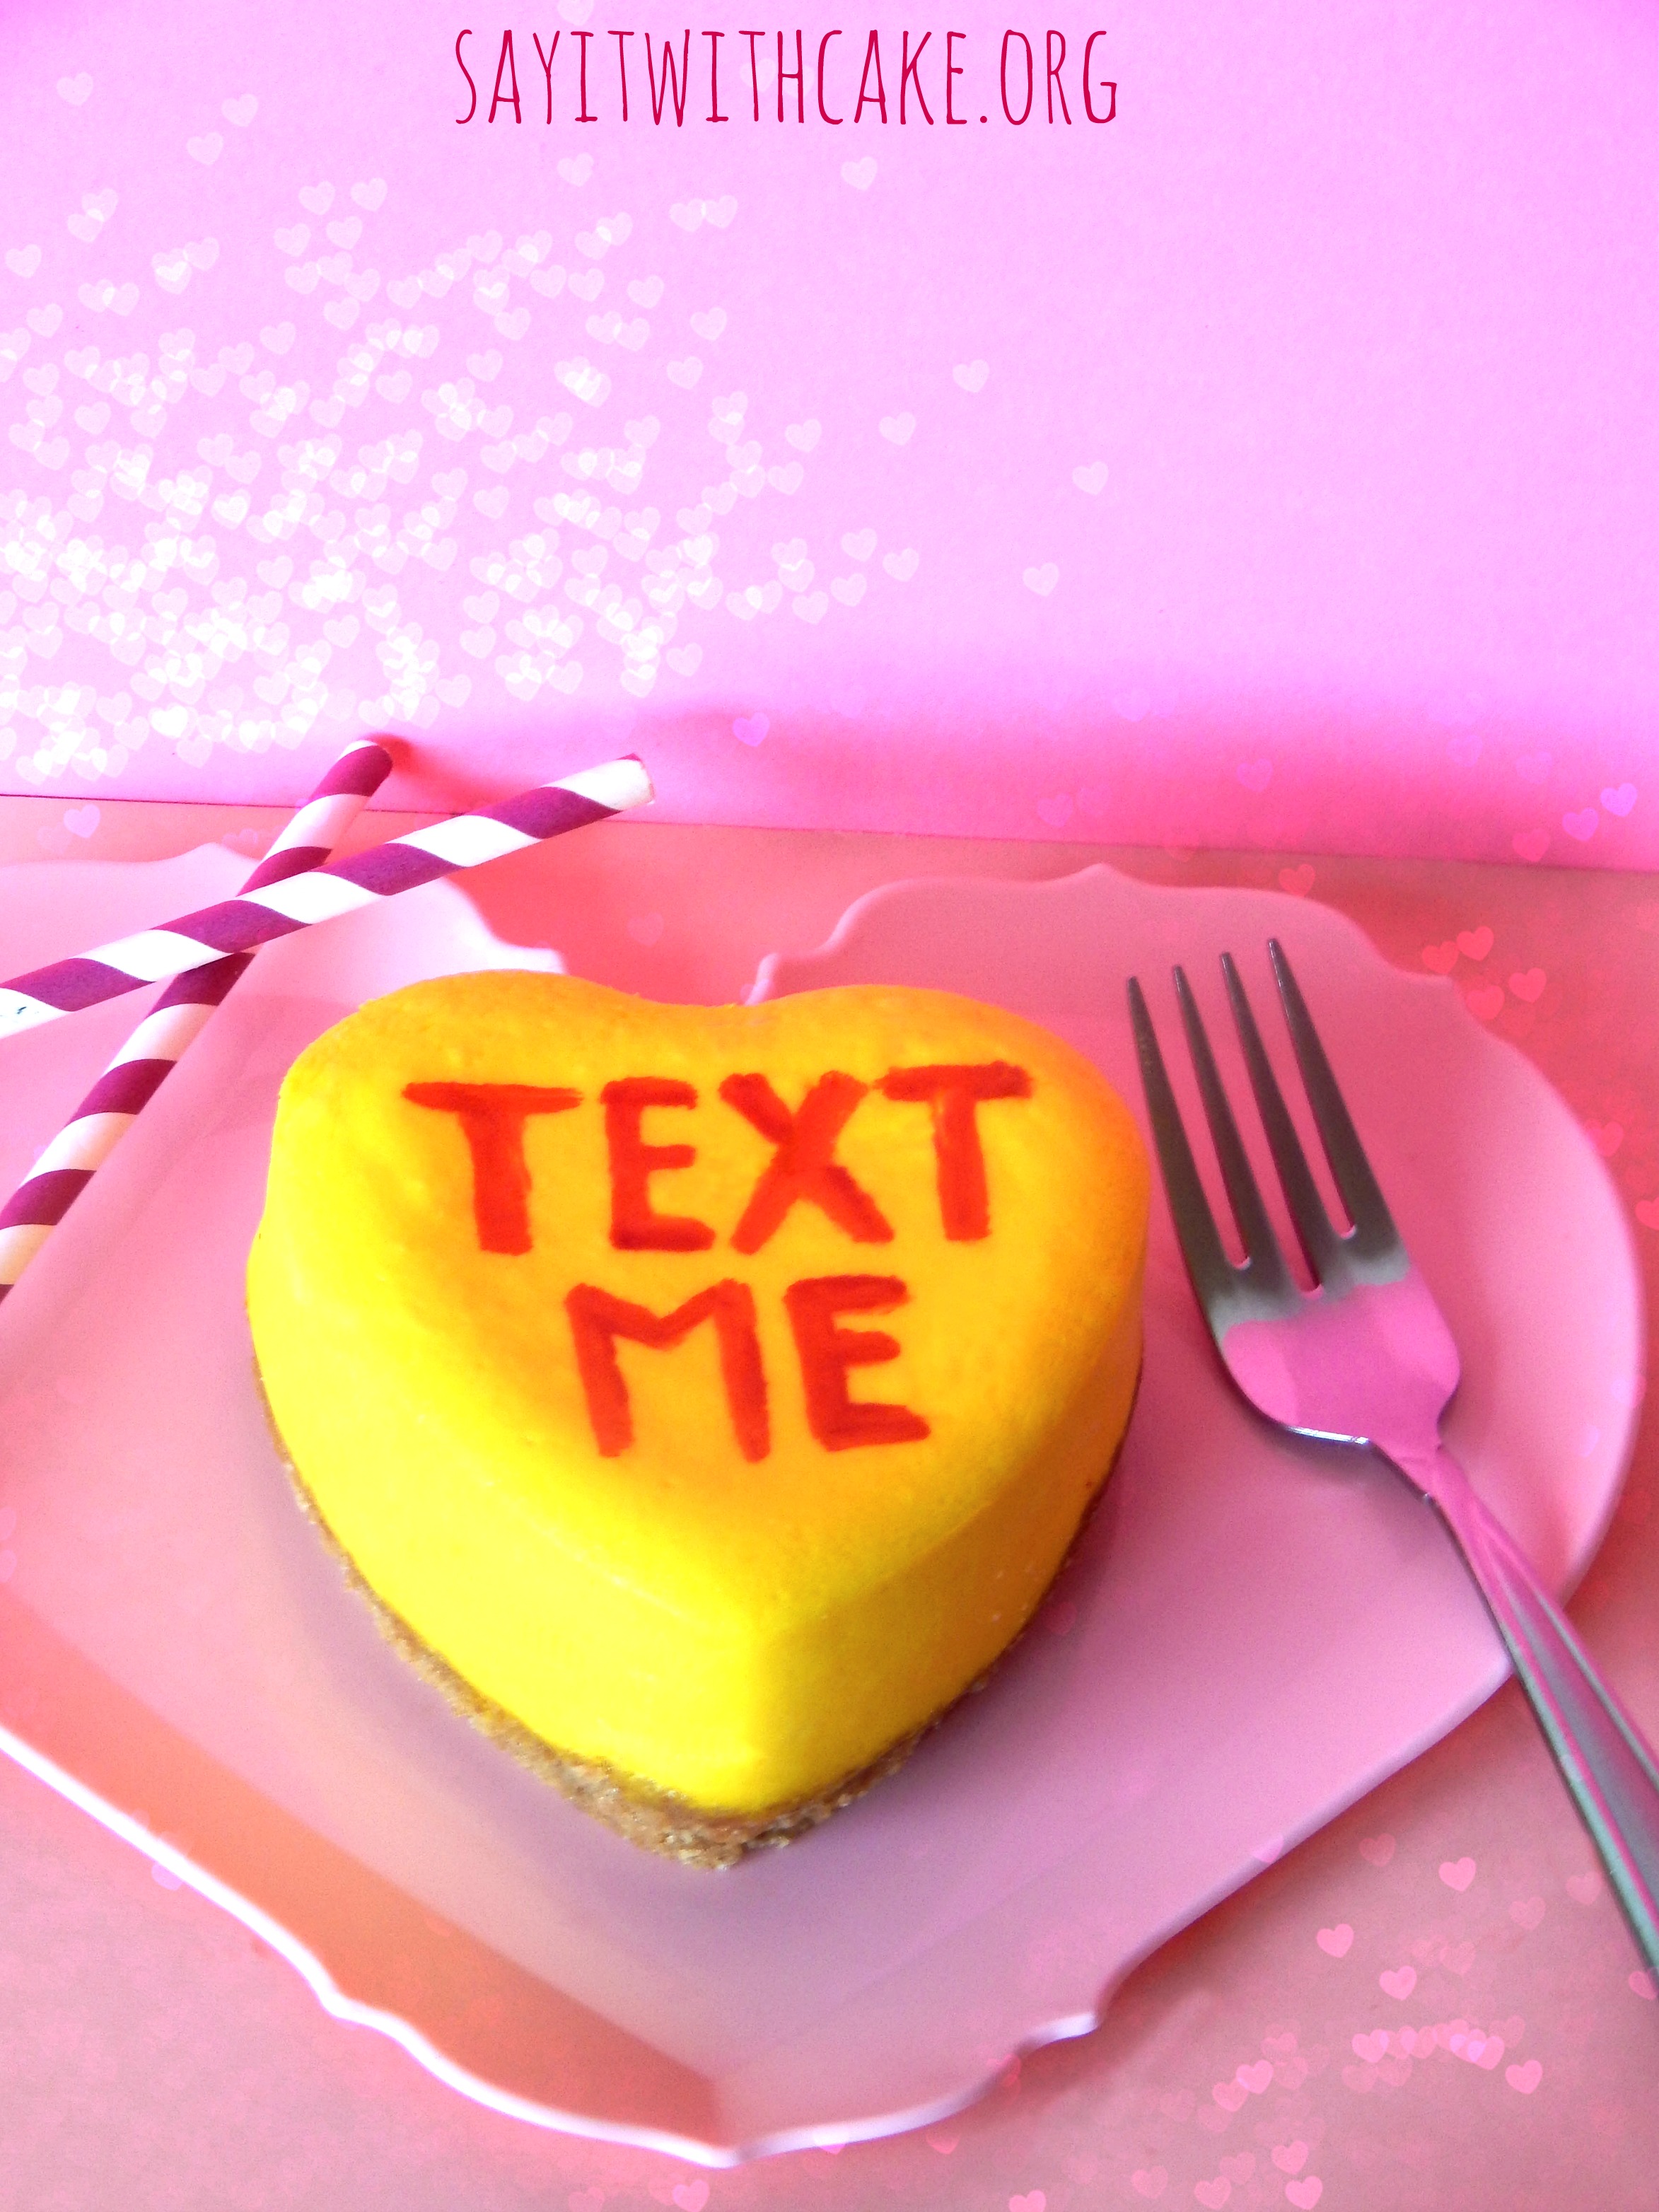
Conversation Heart Cheesecakes by Sayitwithcake
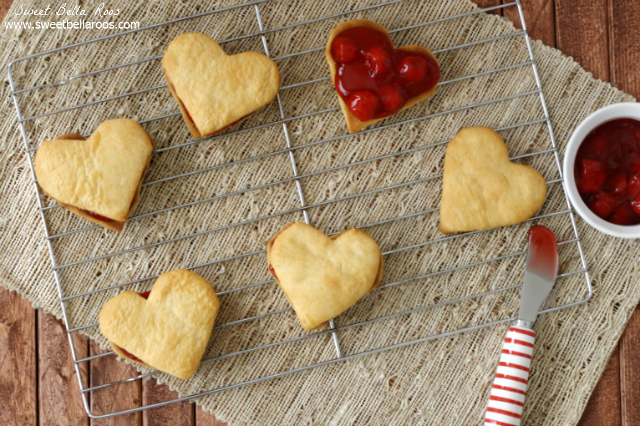
Heart Shaped Cherry Pies by Sweet Bella Roos
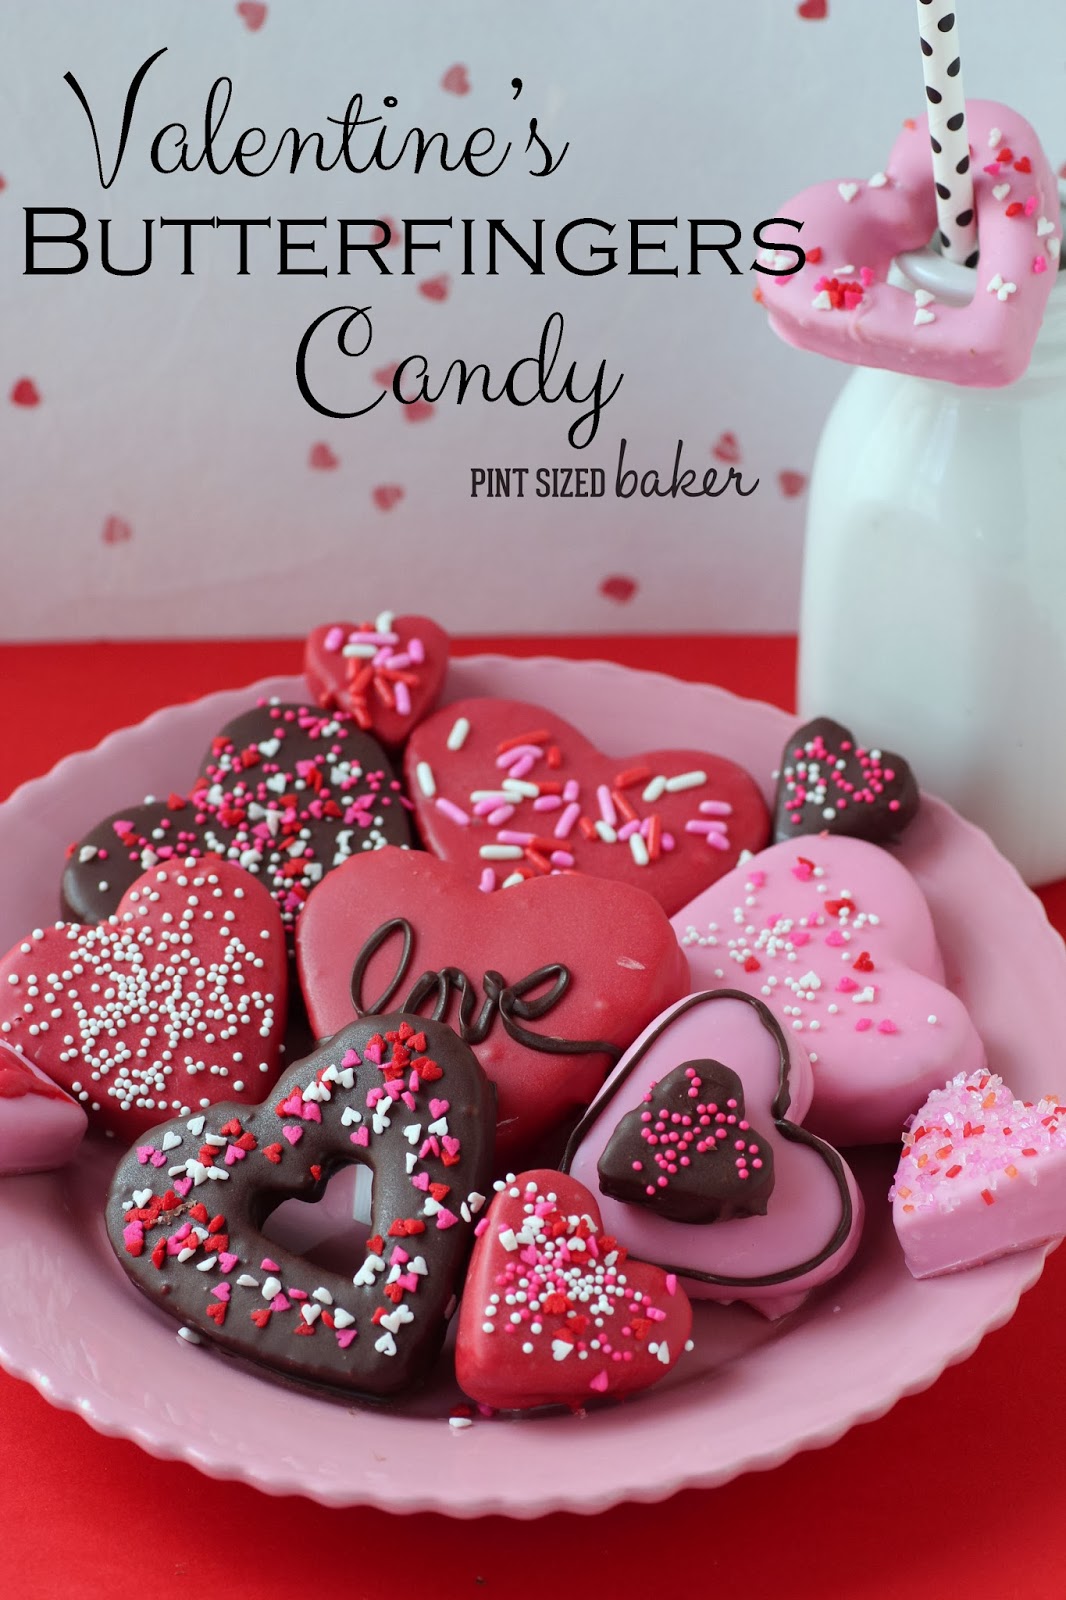
Valentine’s Butterfingers Candy by Pint Sized Baker
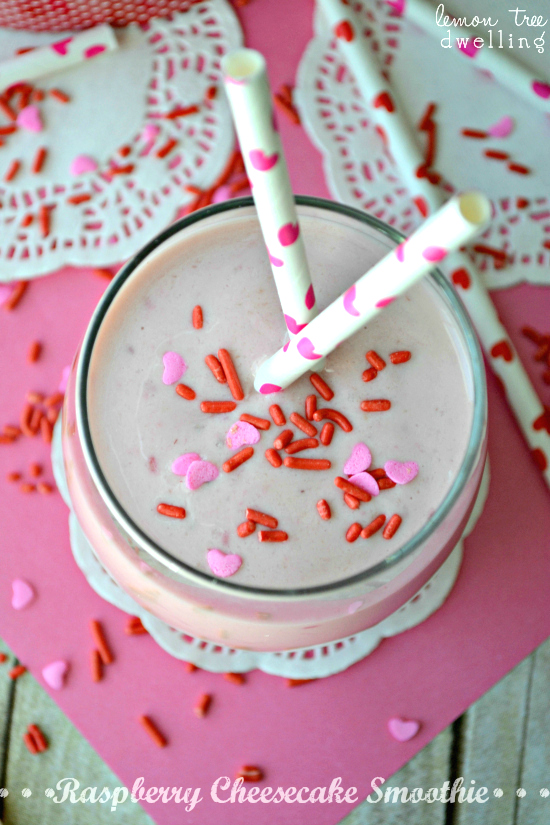
Raspberry Cheesecake Smoothie by Lemon Tree Dwelling
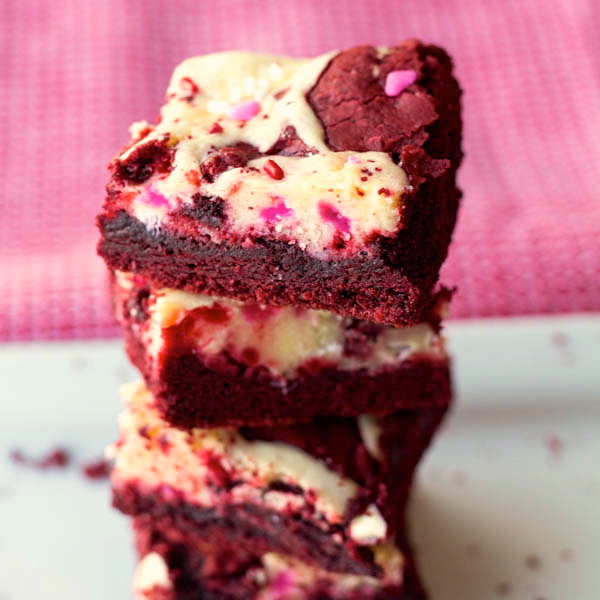
Red Velvet Gooey Cheesecake Bars by Two in the Kitchen
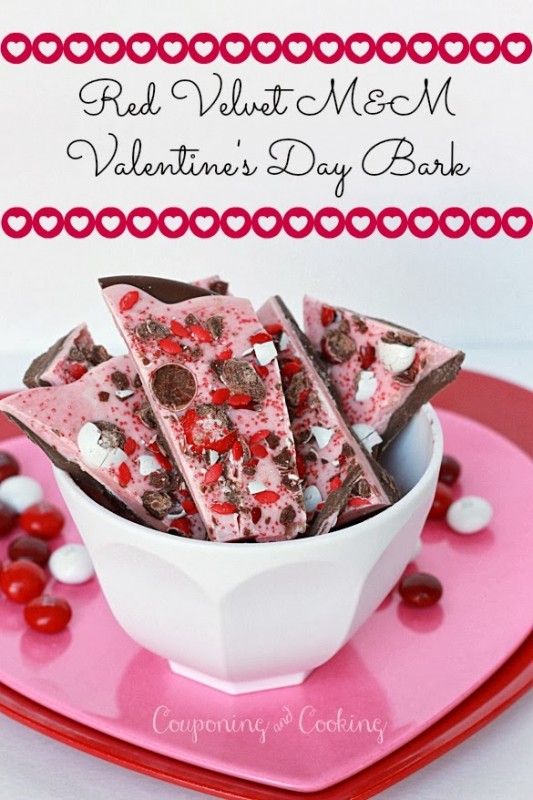
Valentine’s Bark by Couponing and Cooking
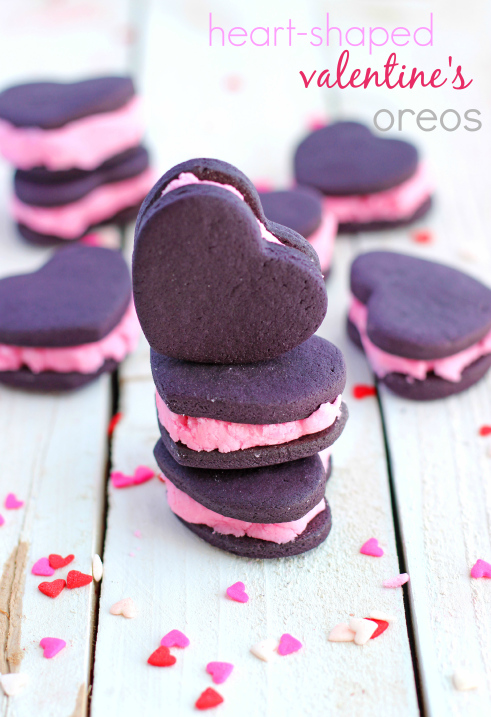
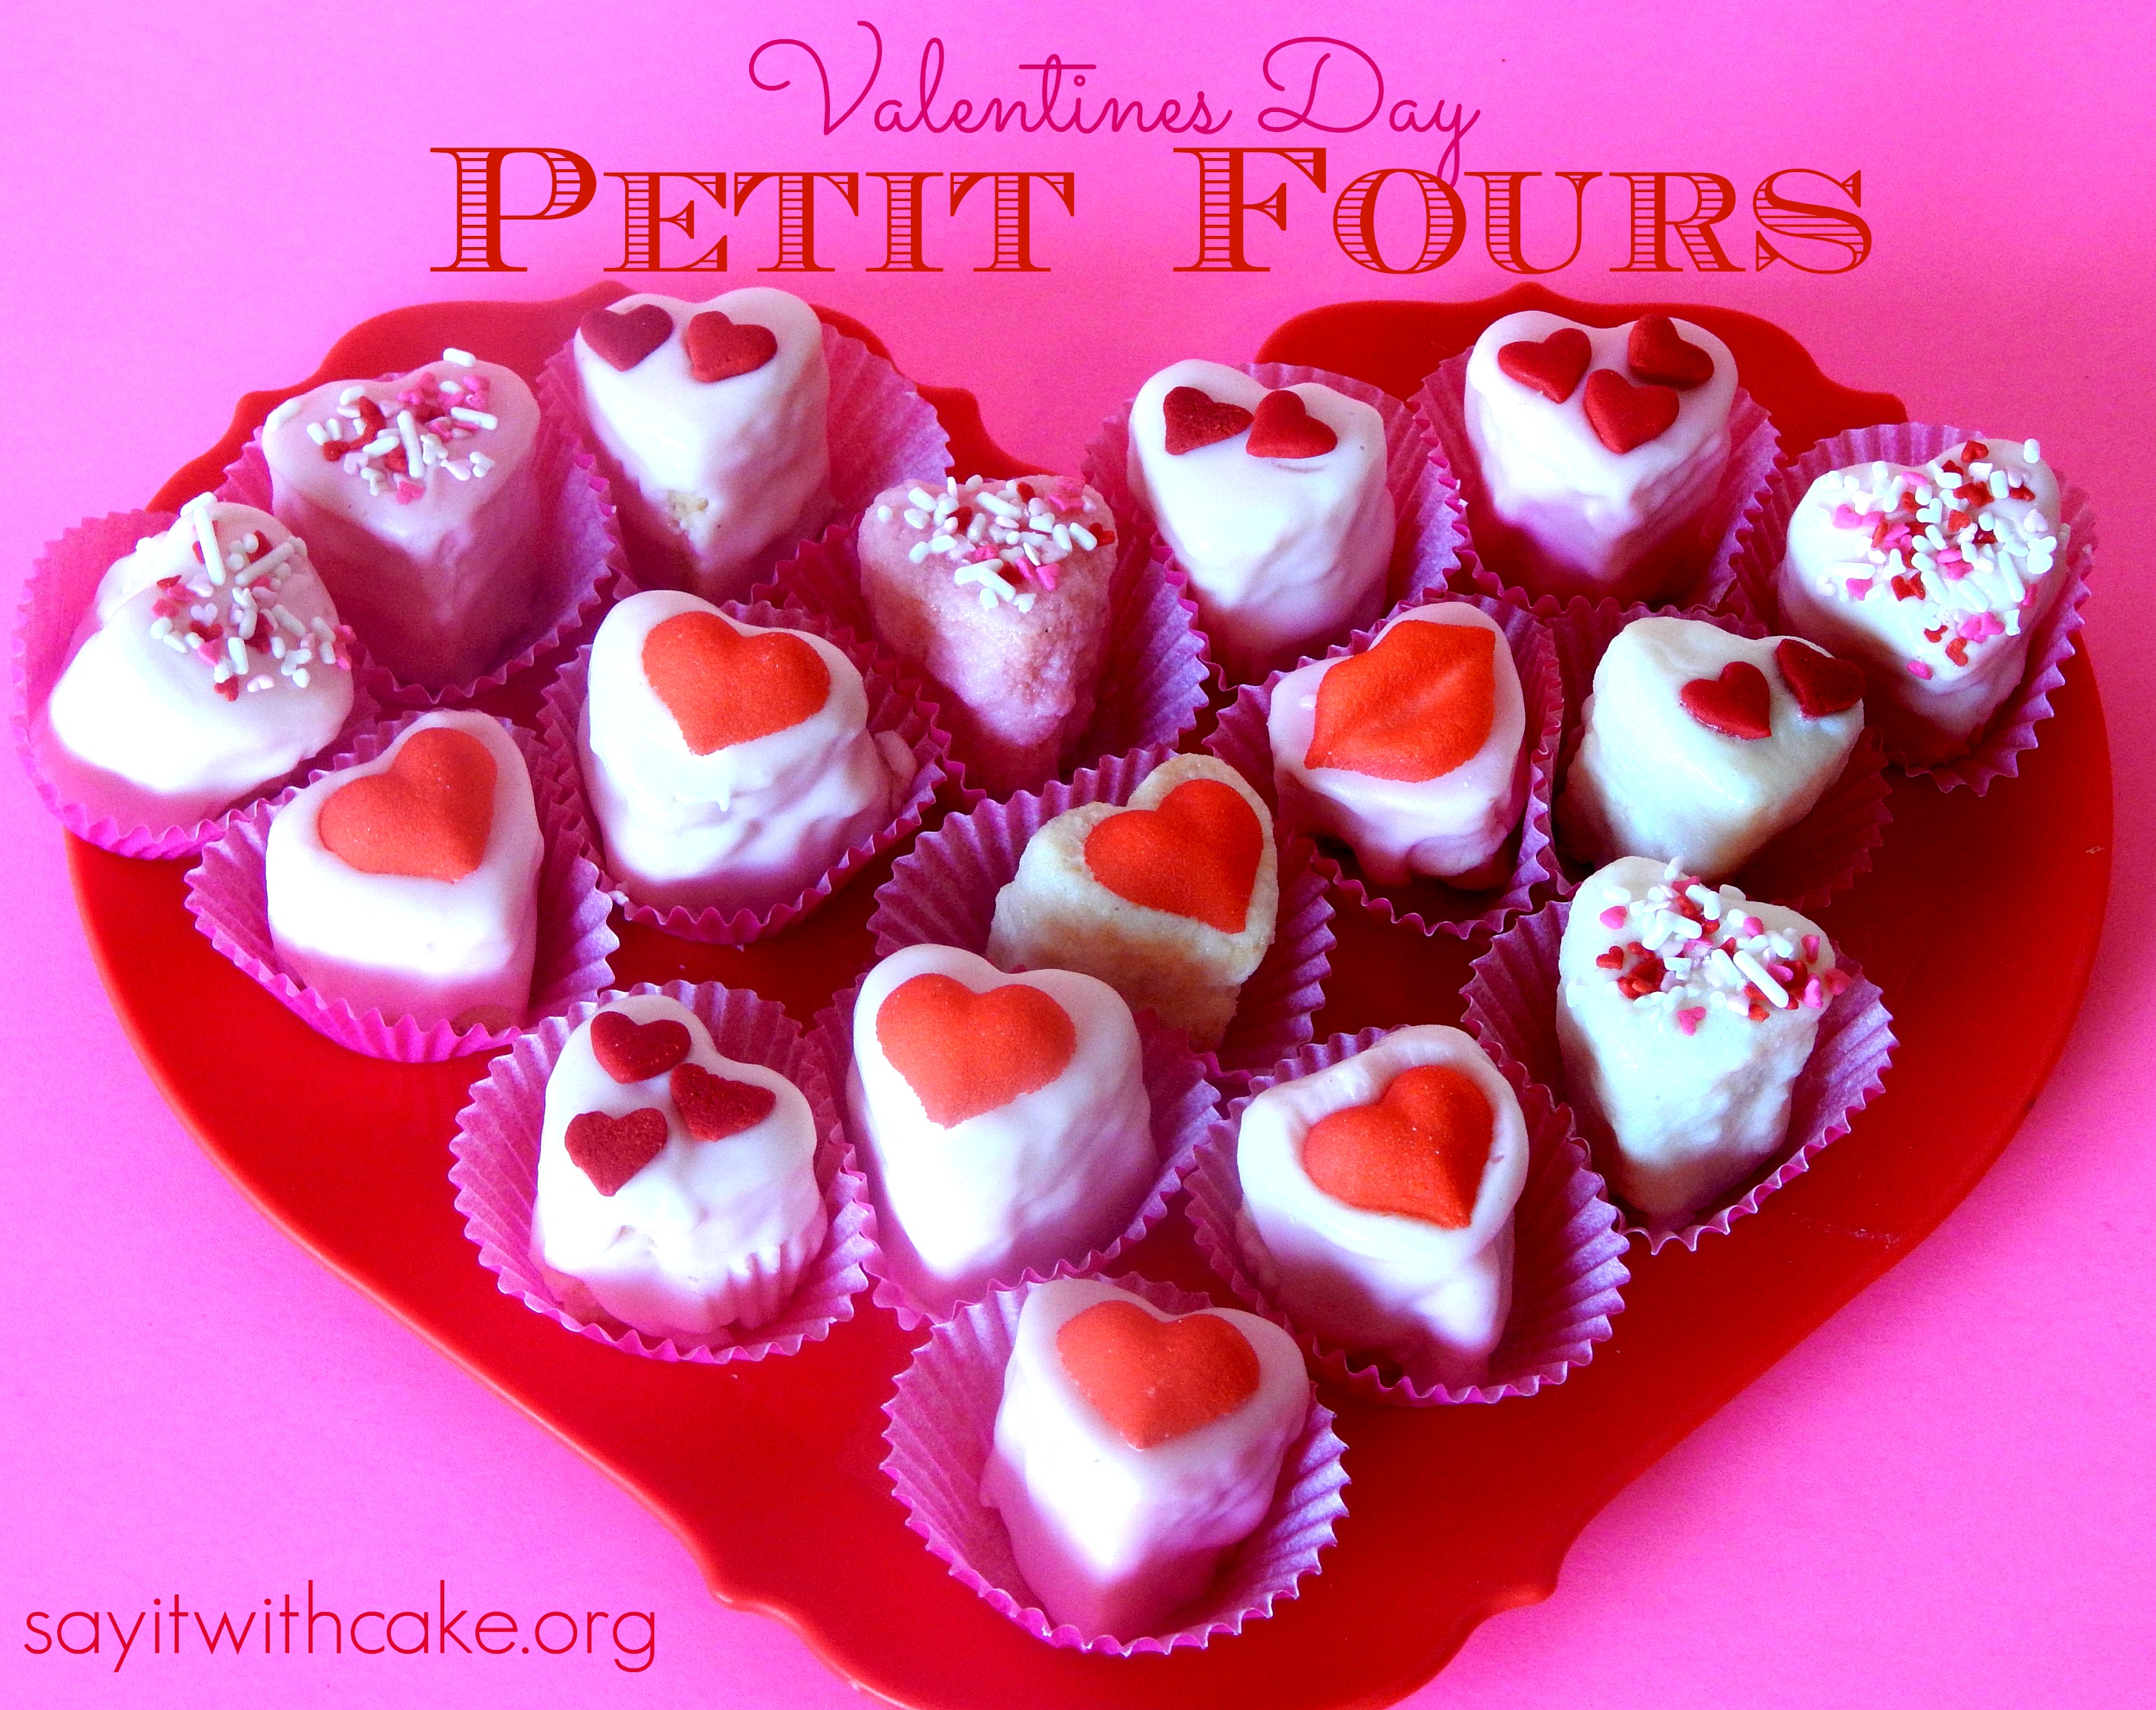
Petit Fours by Say it with cake
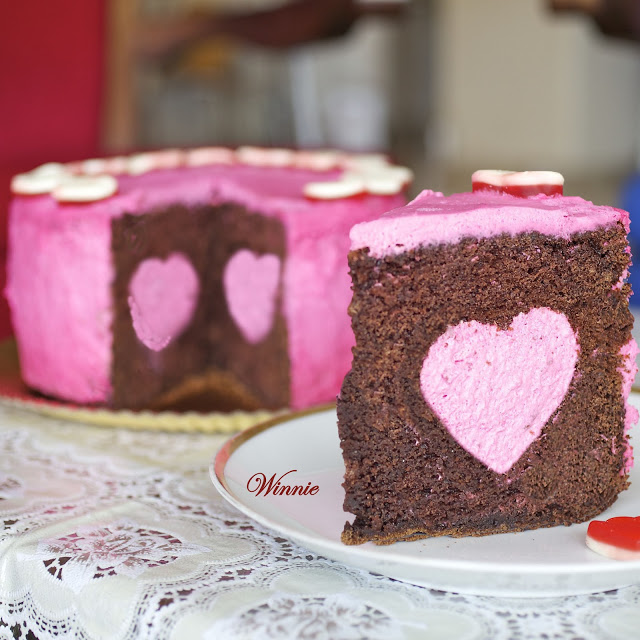
Chocolate cake with Mousse Heart by Winnish.net
]]>
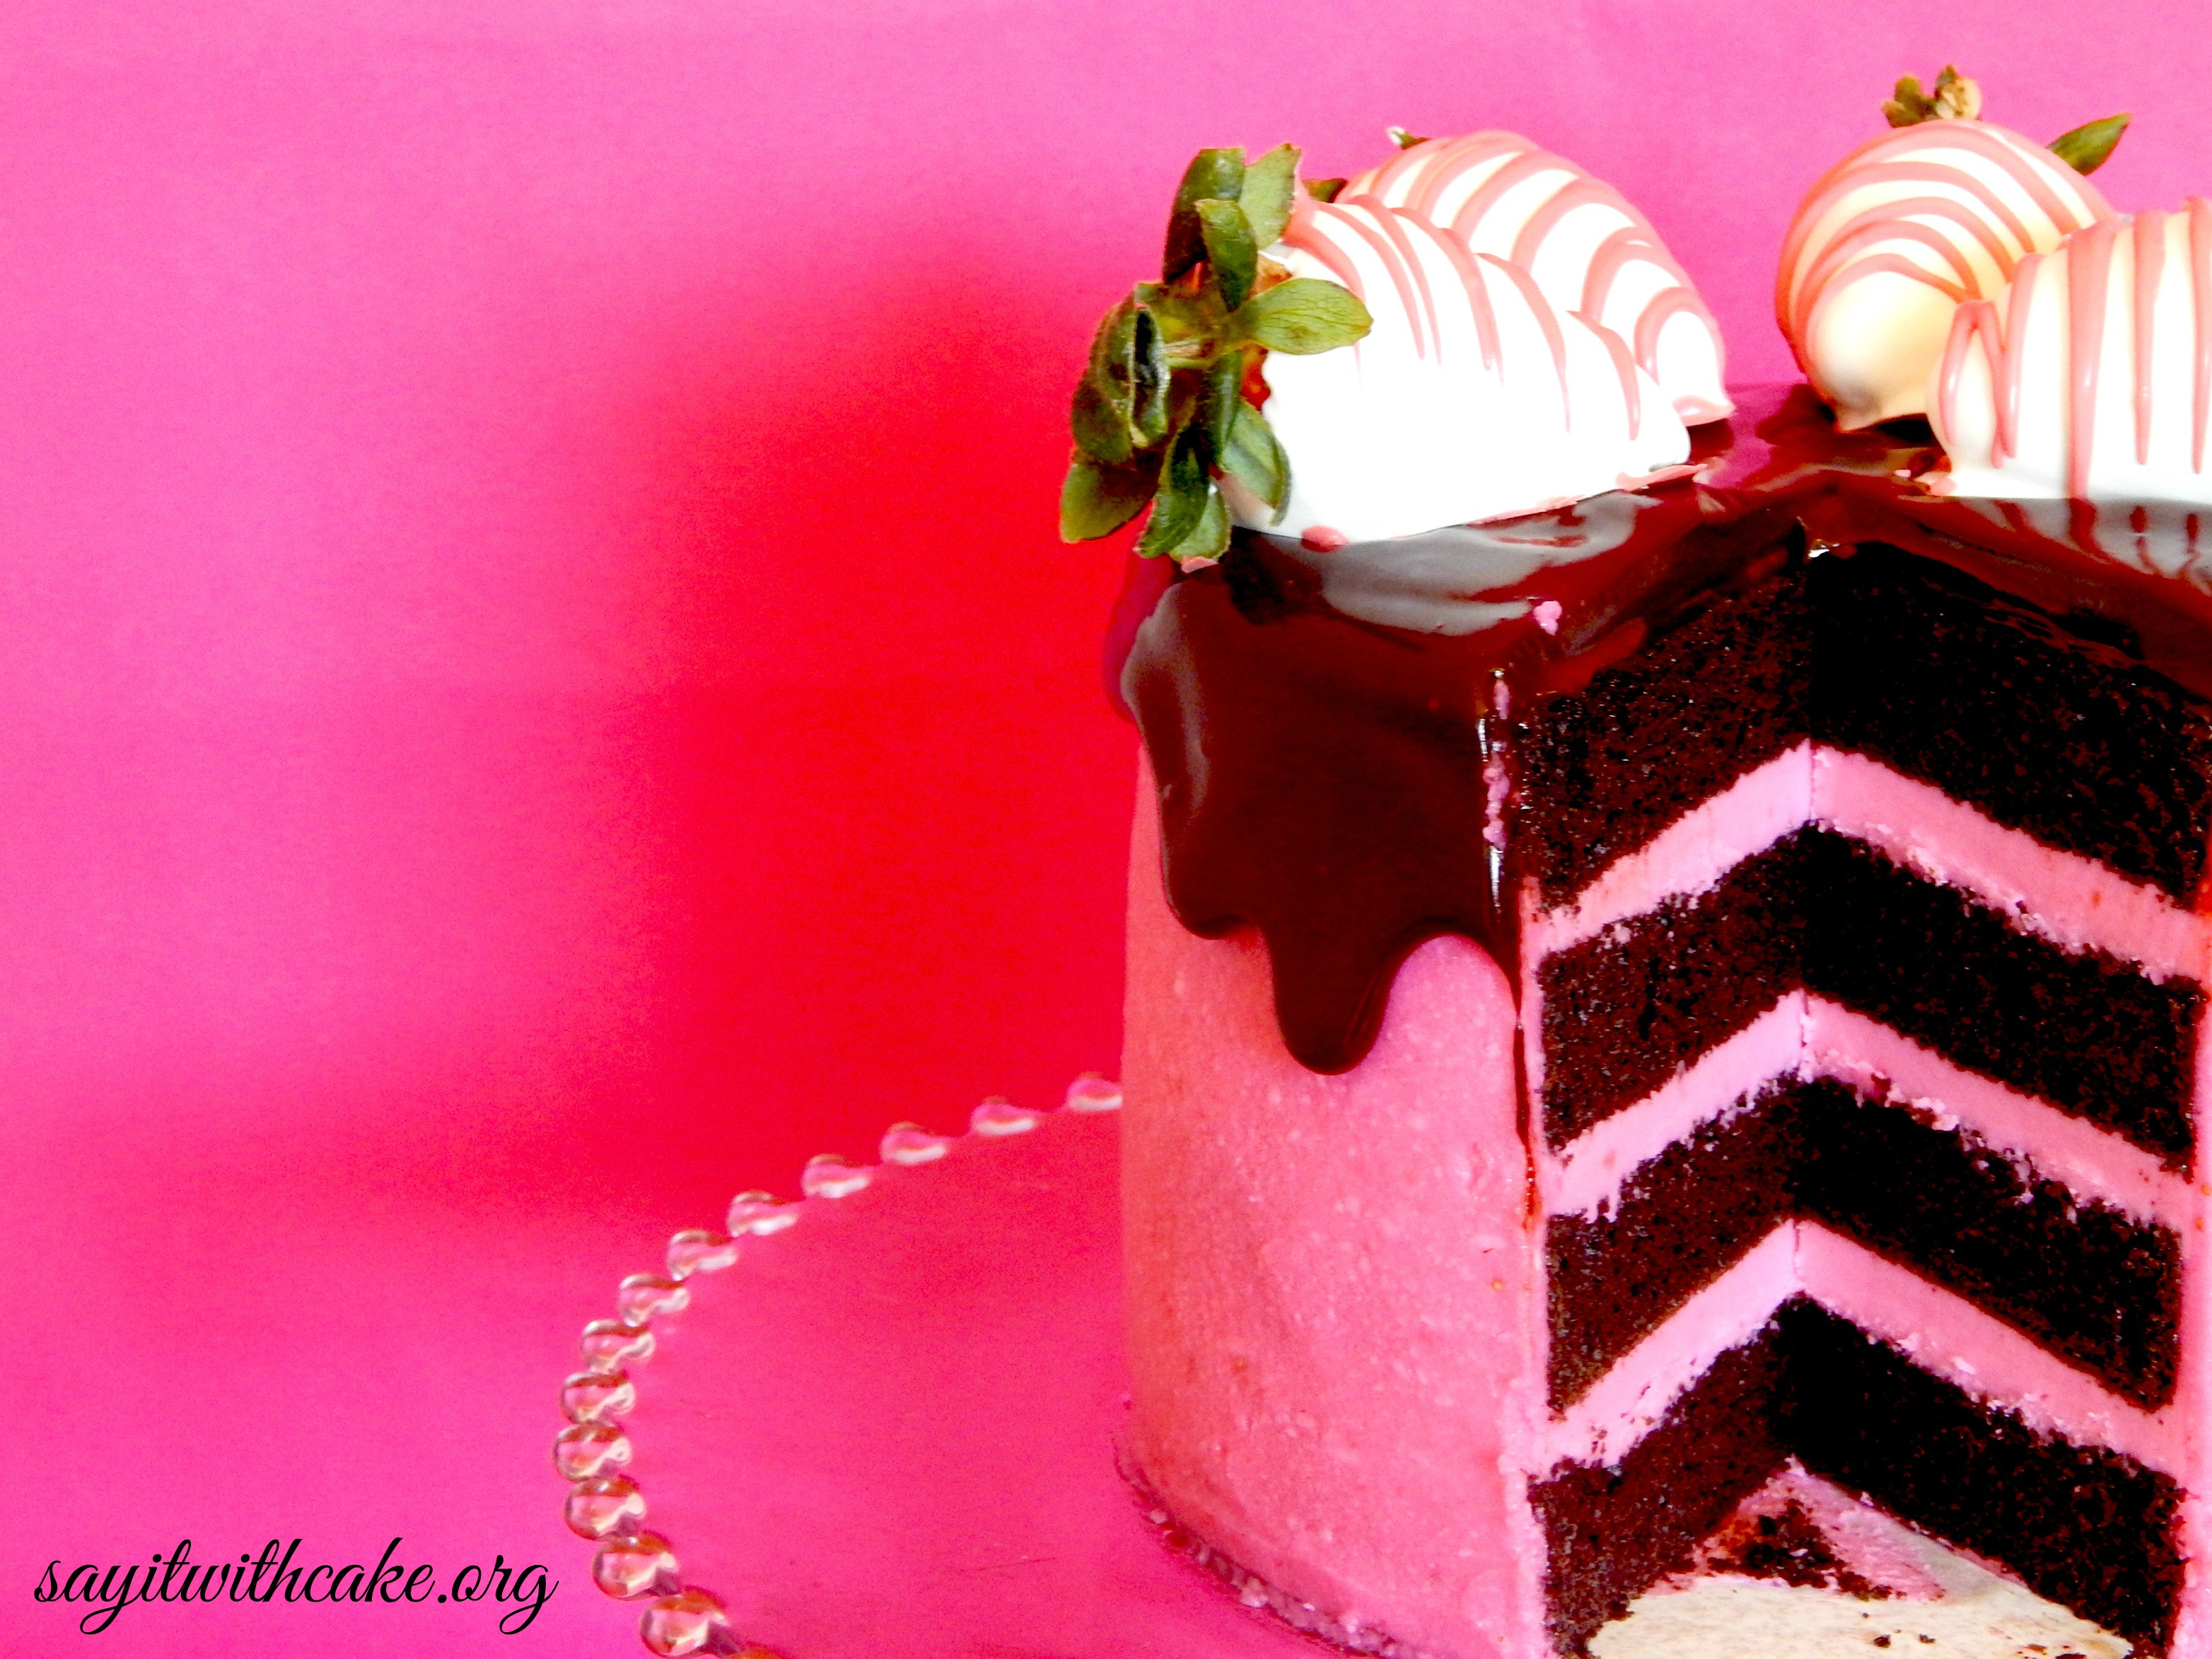
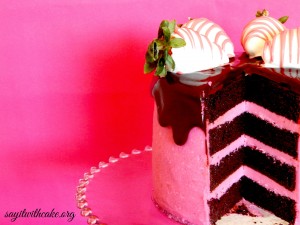
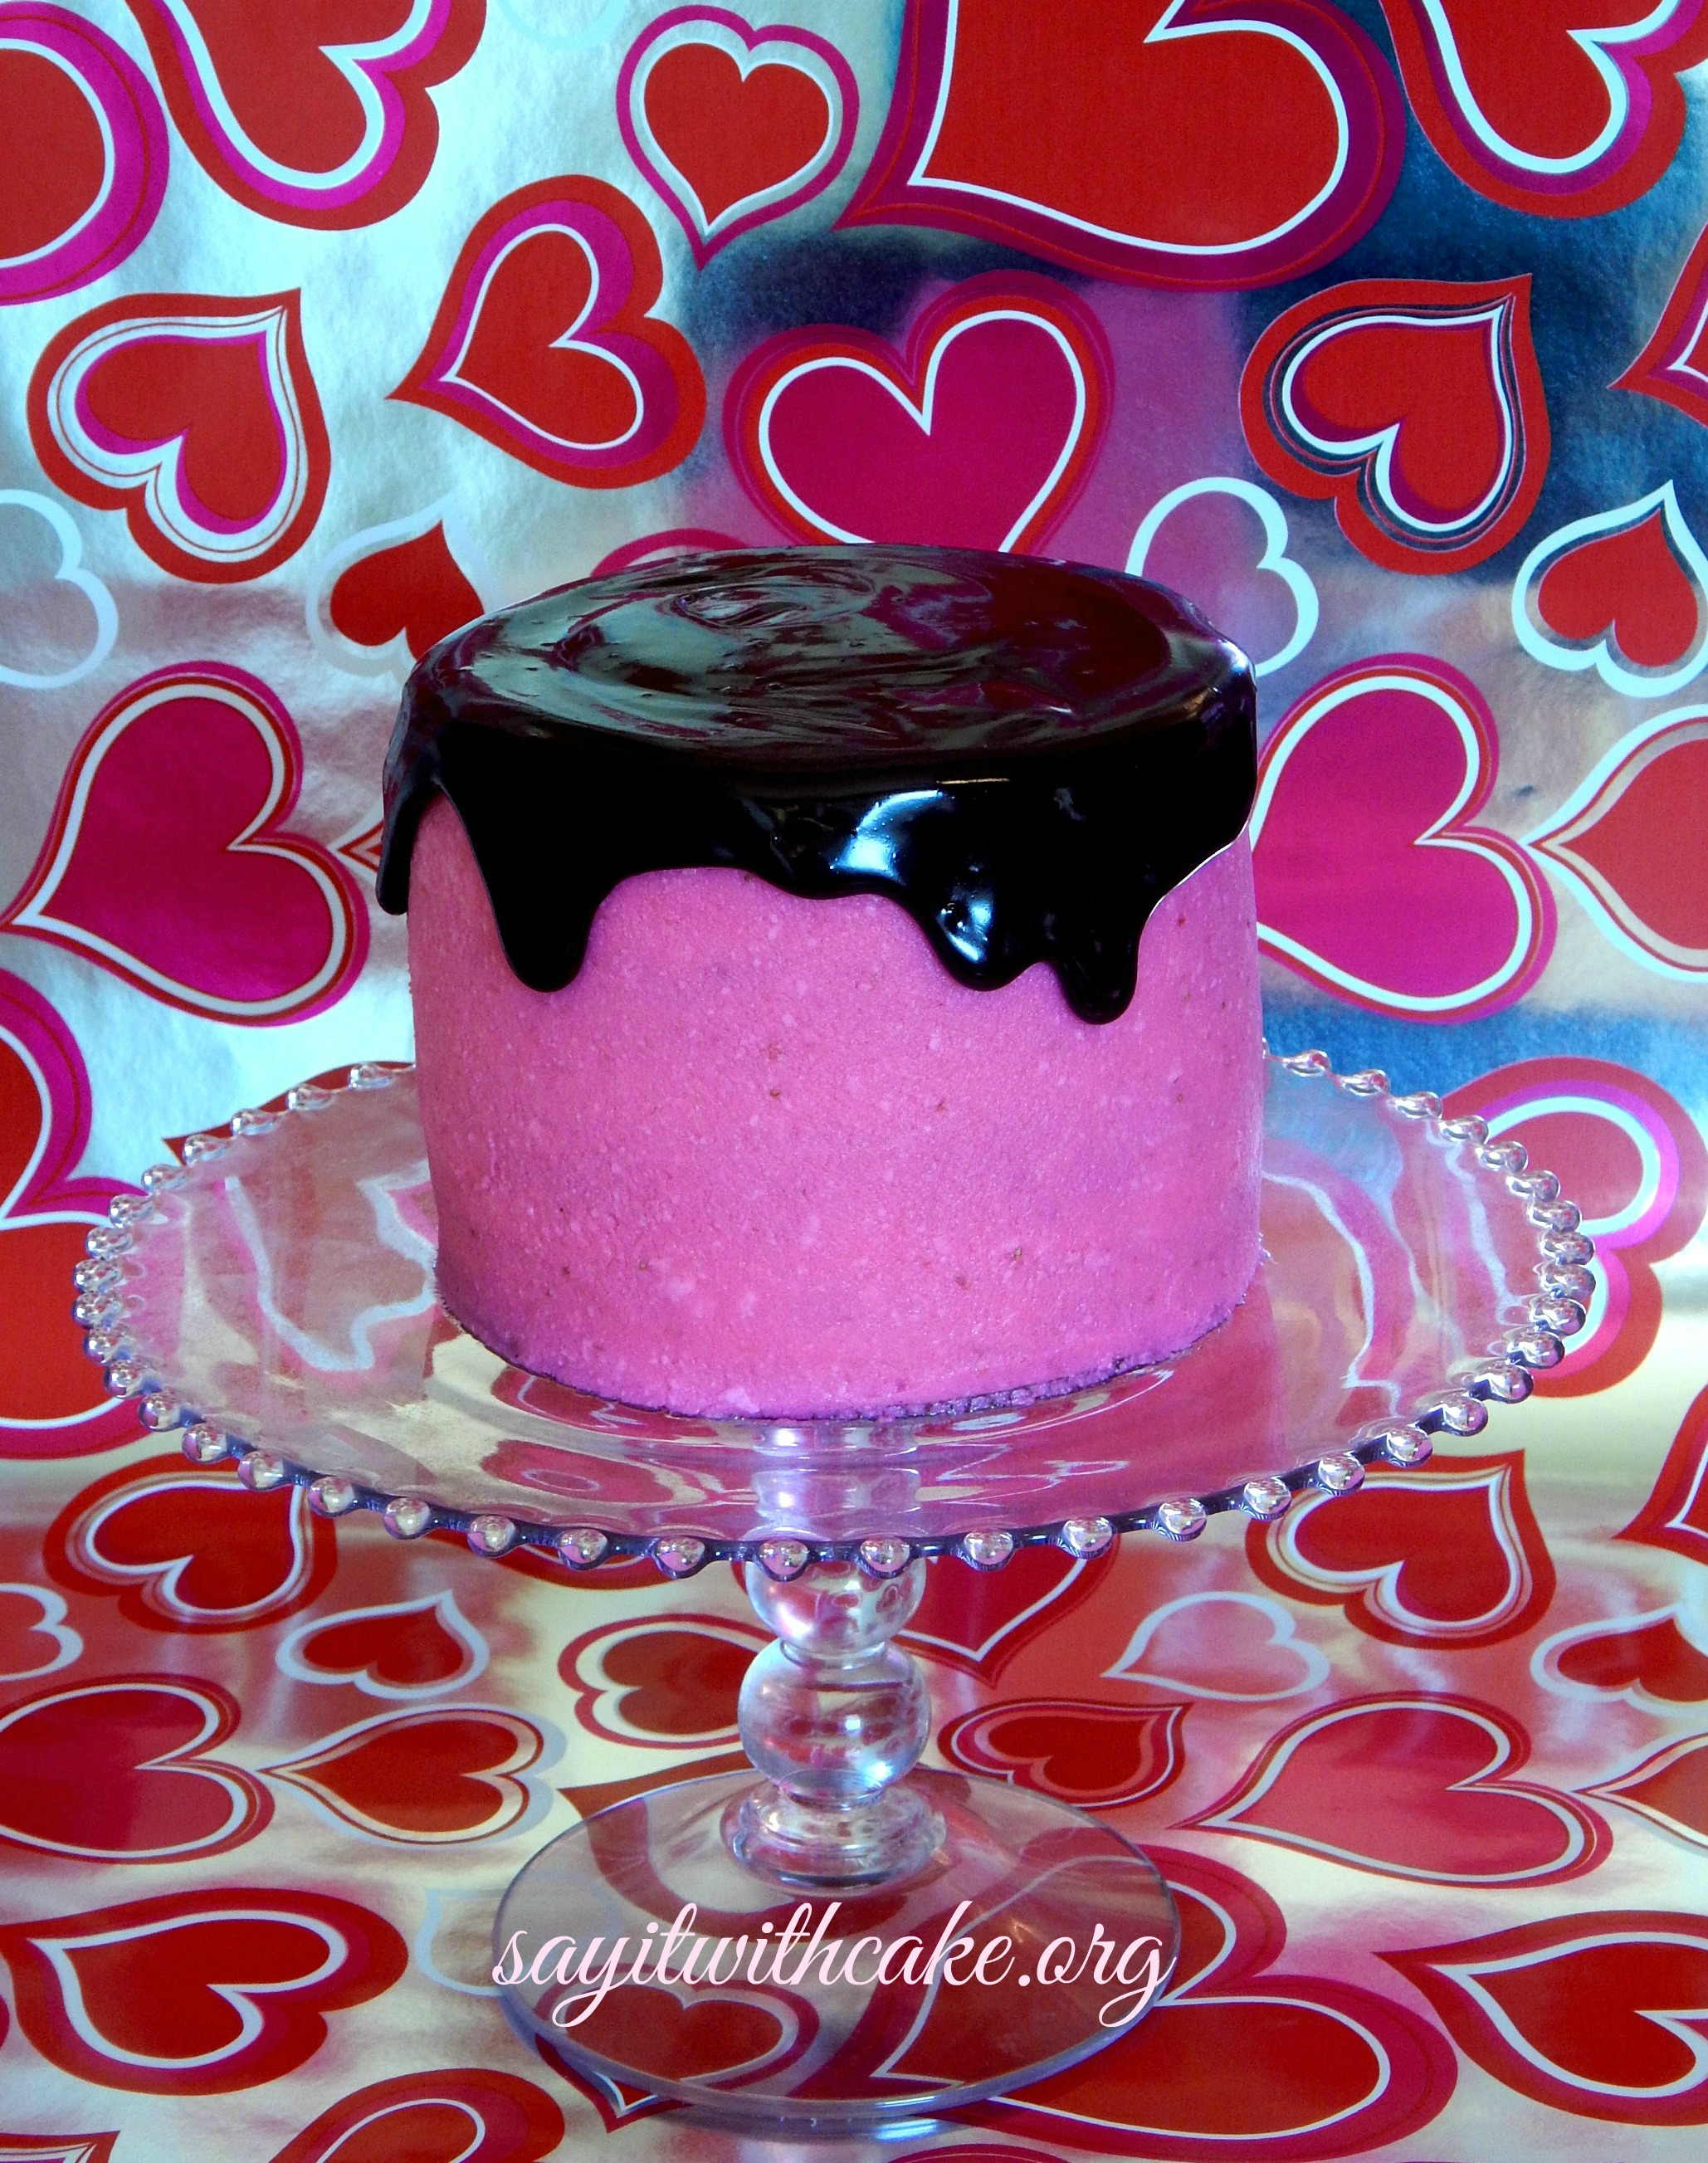
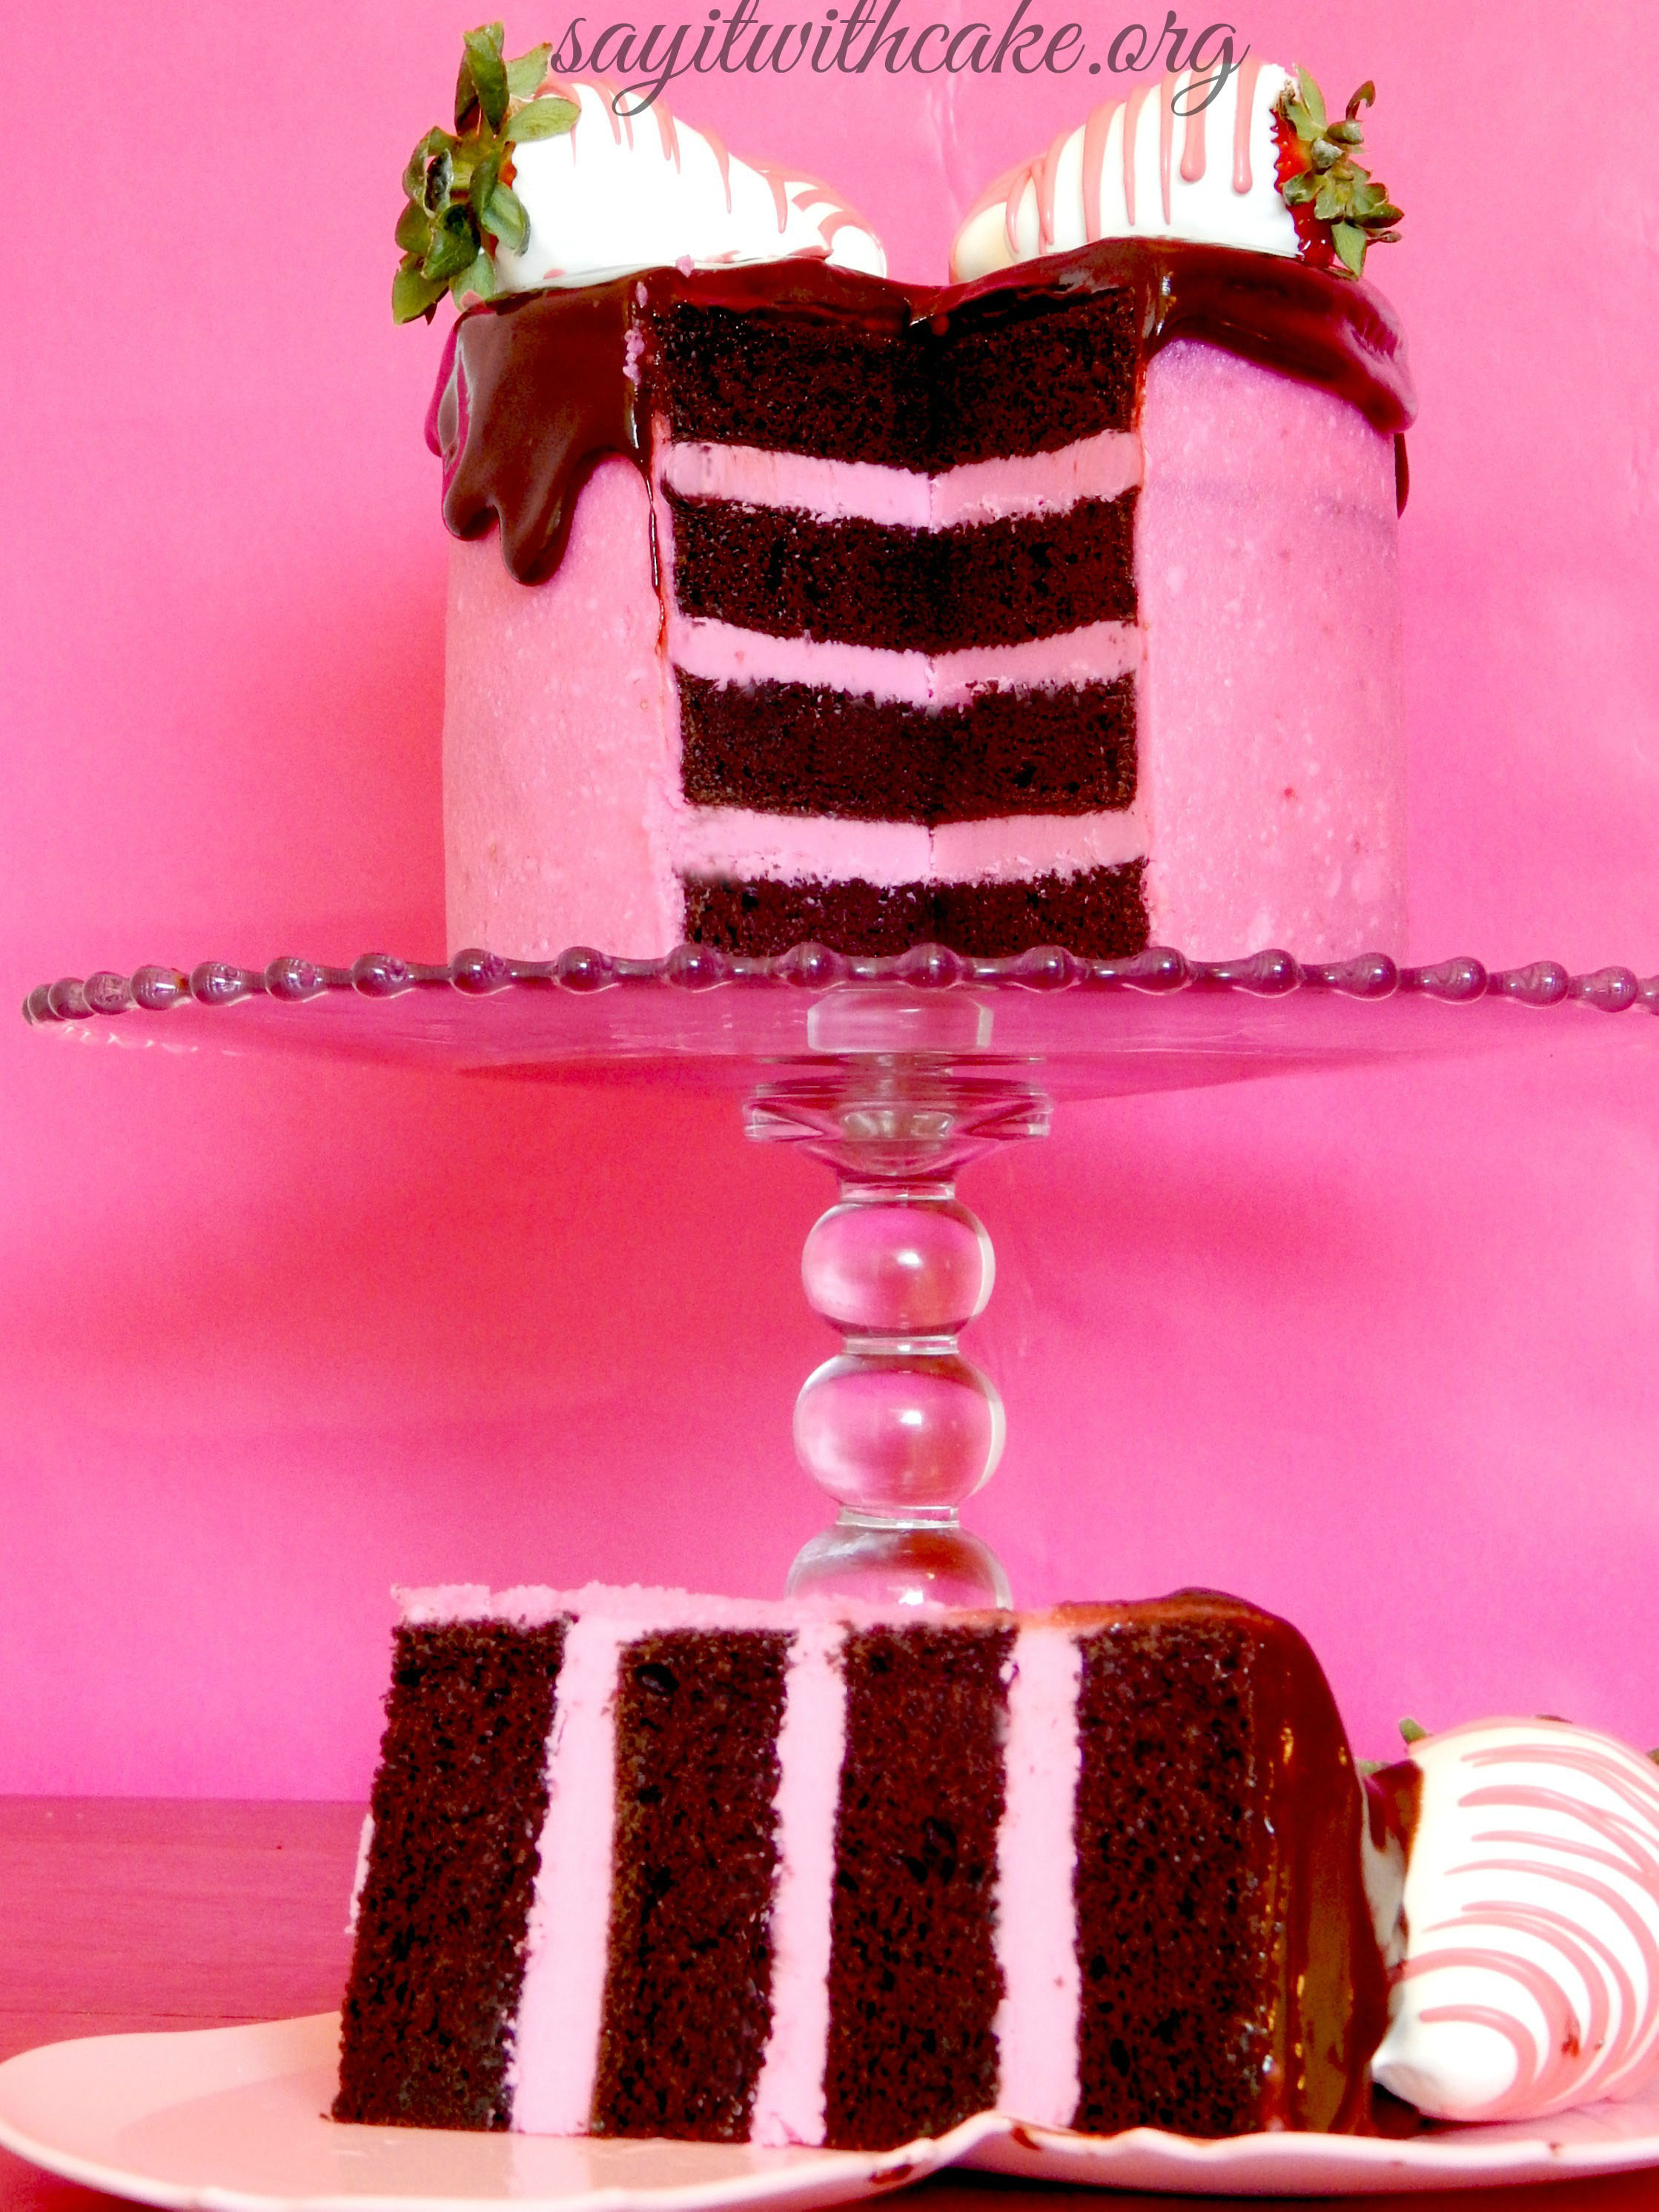
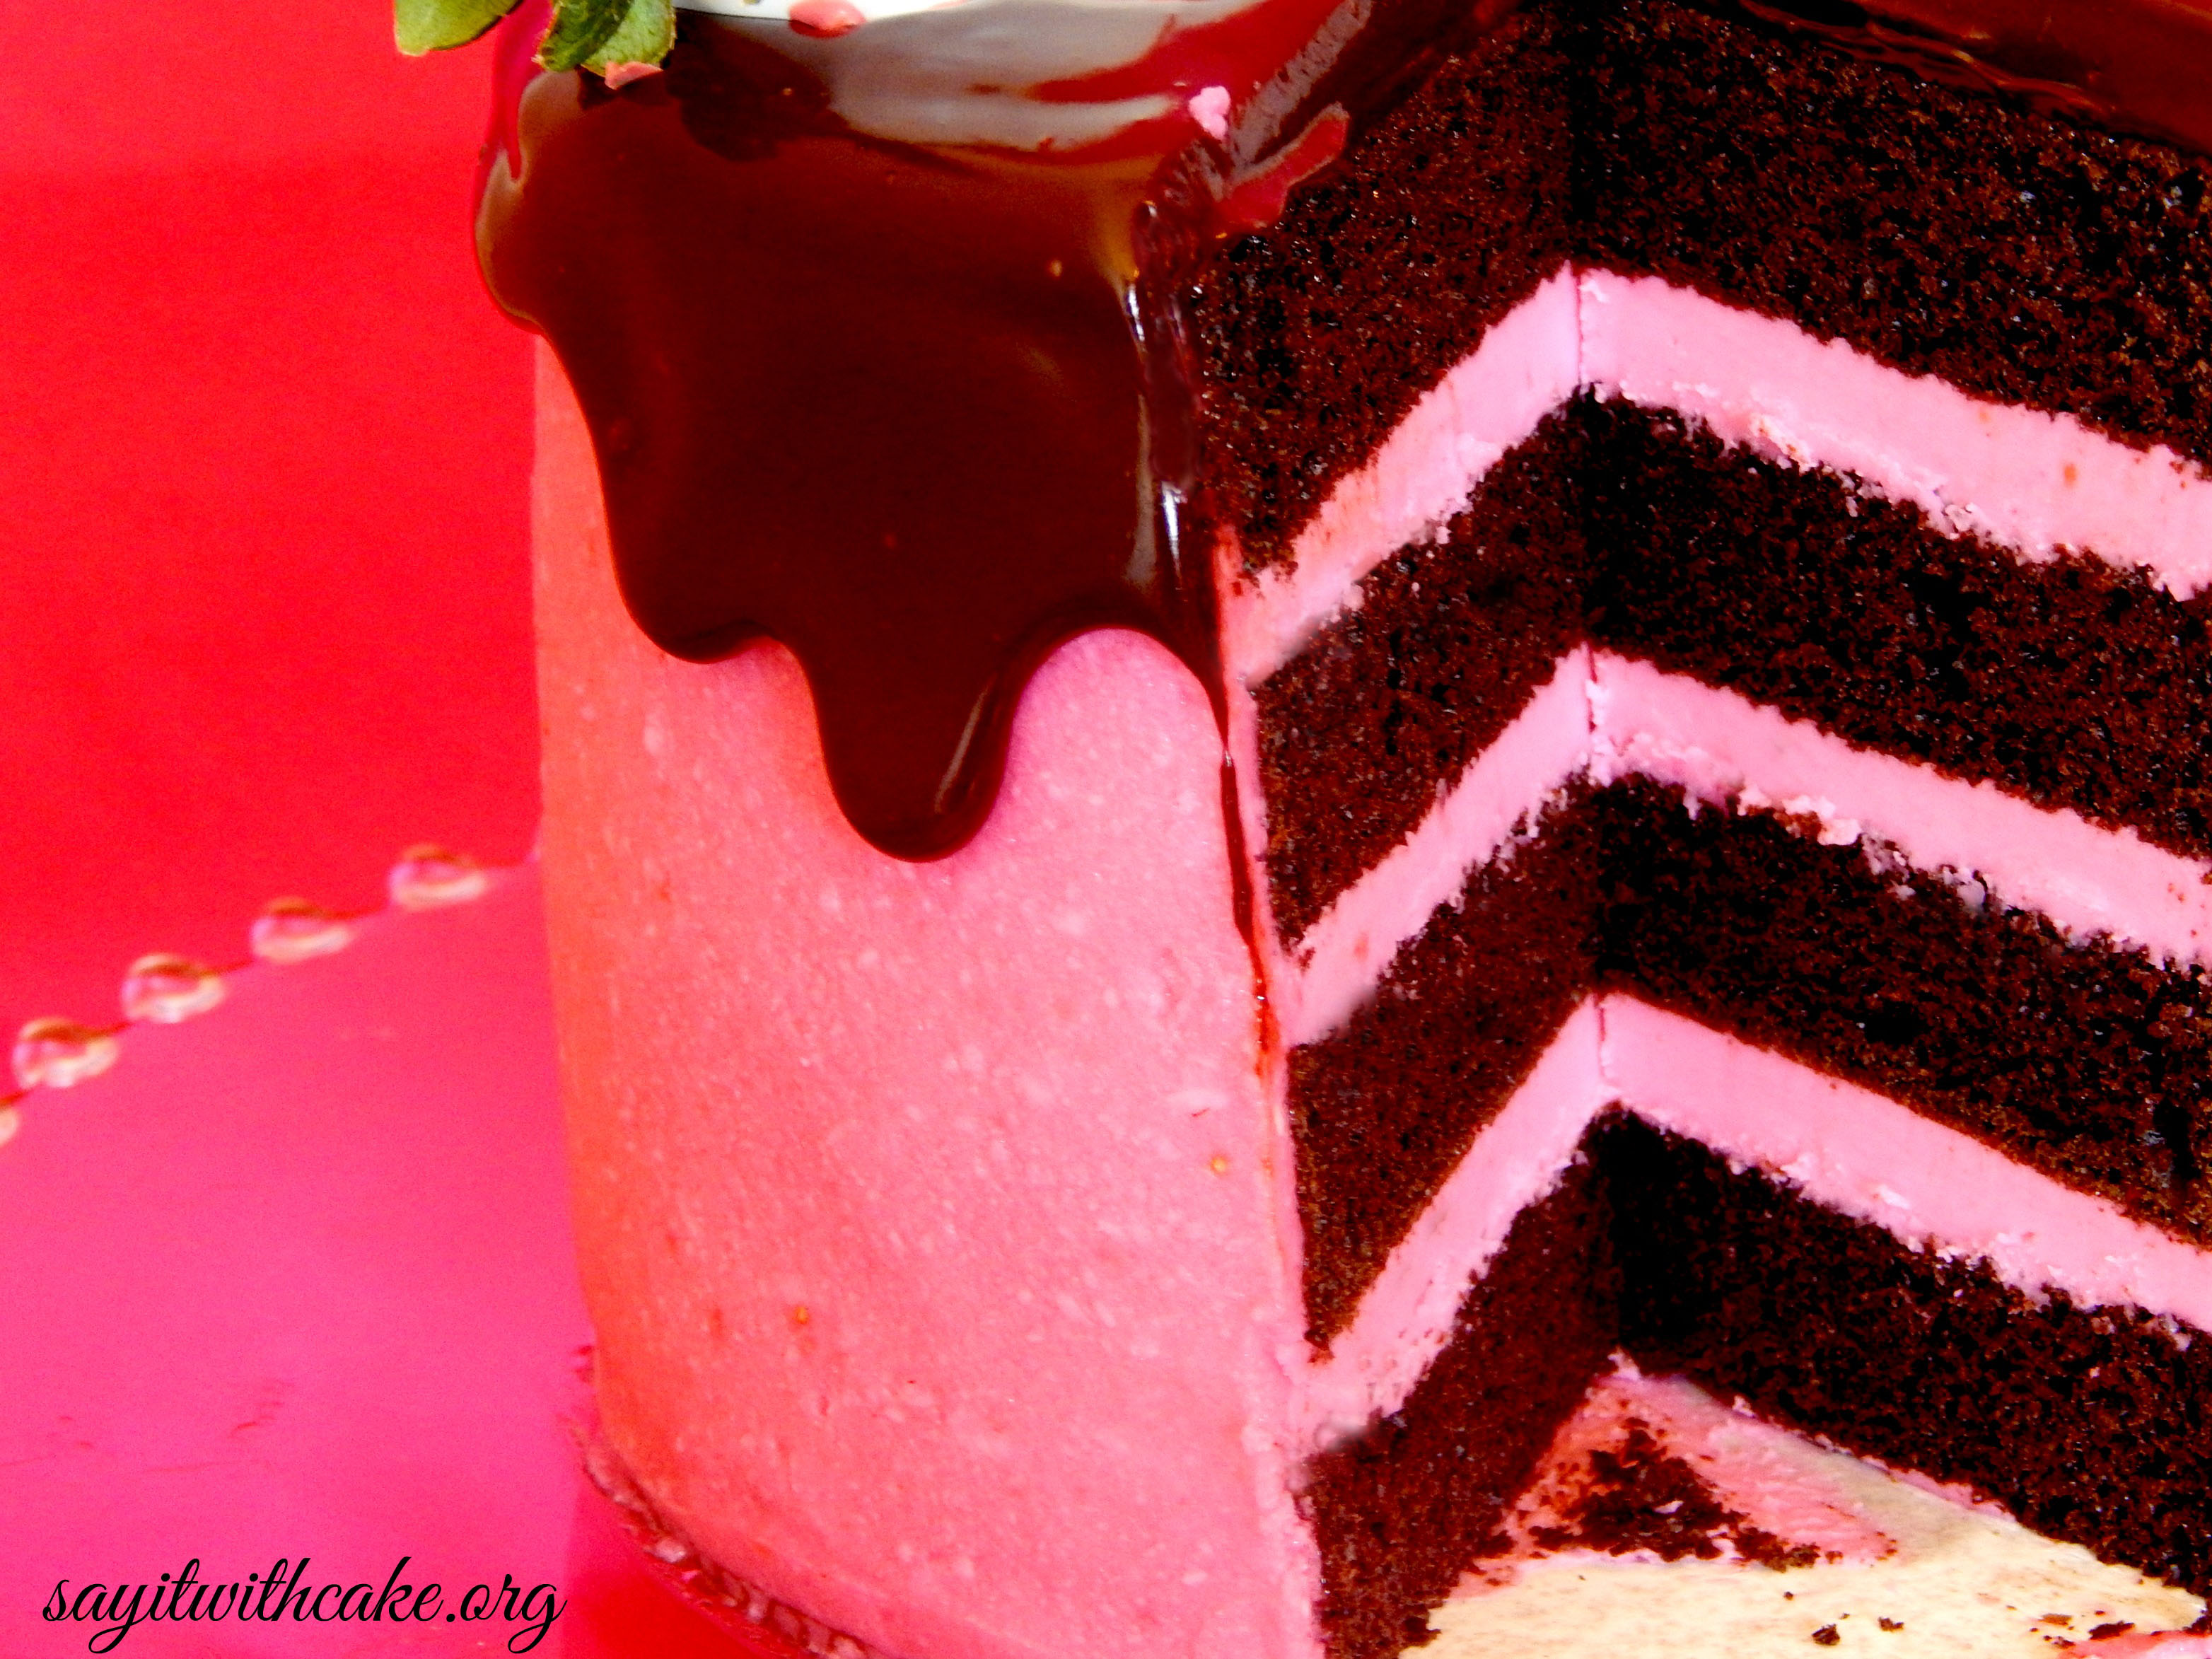
Happy Valentine’s Day!! I have been dreaming of making this cake for a long time, but wanted to wait and make it for Valentine’s Day. Chocolate and chocolate covered strawberries are just perfect for Valentine’s day, don’t you think? This cake is a dark chocolate, four layer cake with strawberry swiss meringue buttercream filling and frosting, covered with a chocolate ganache and topped with white chocolate covered strawberries.
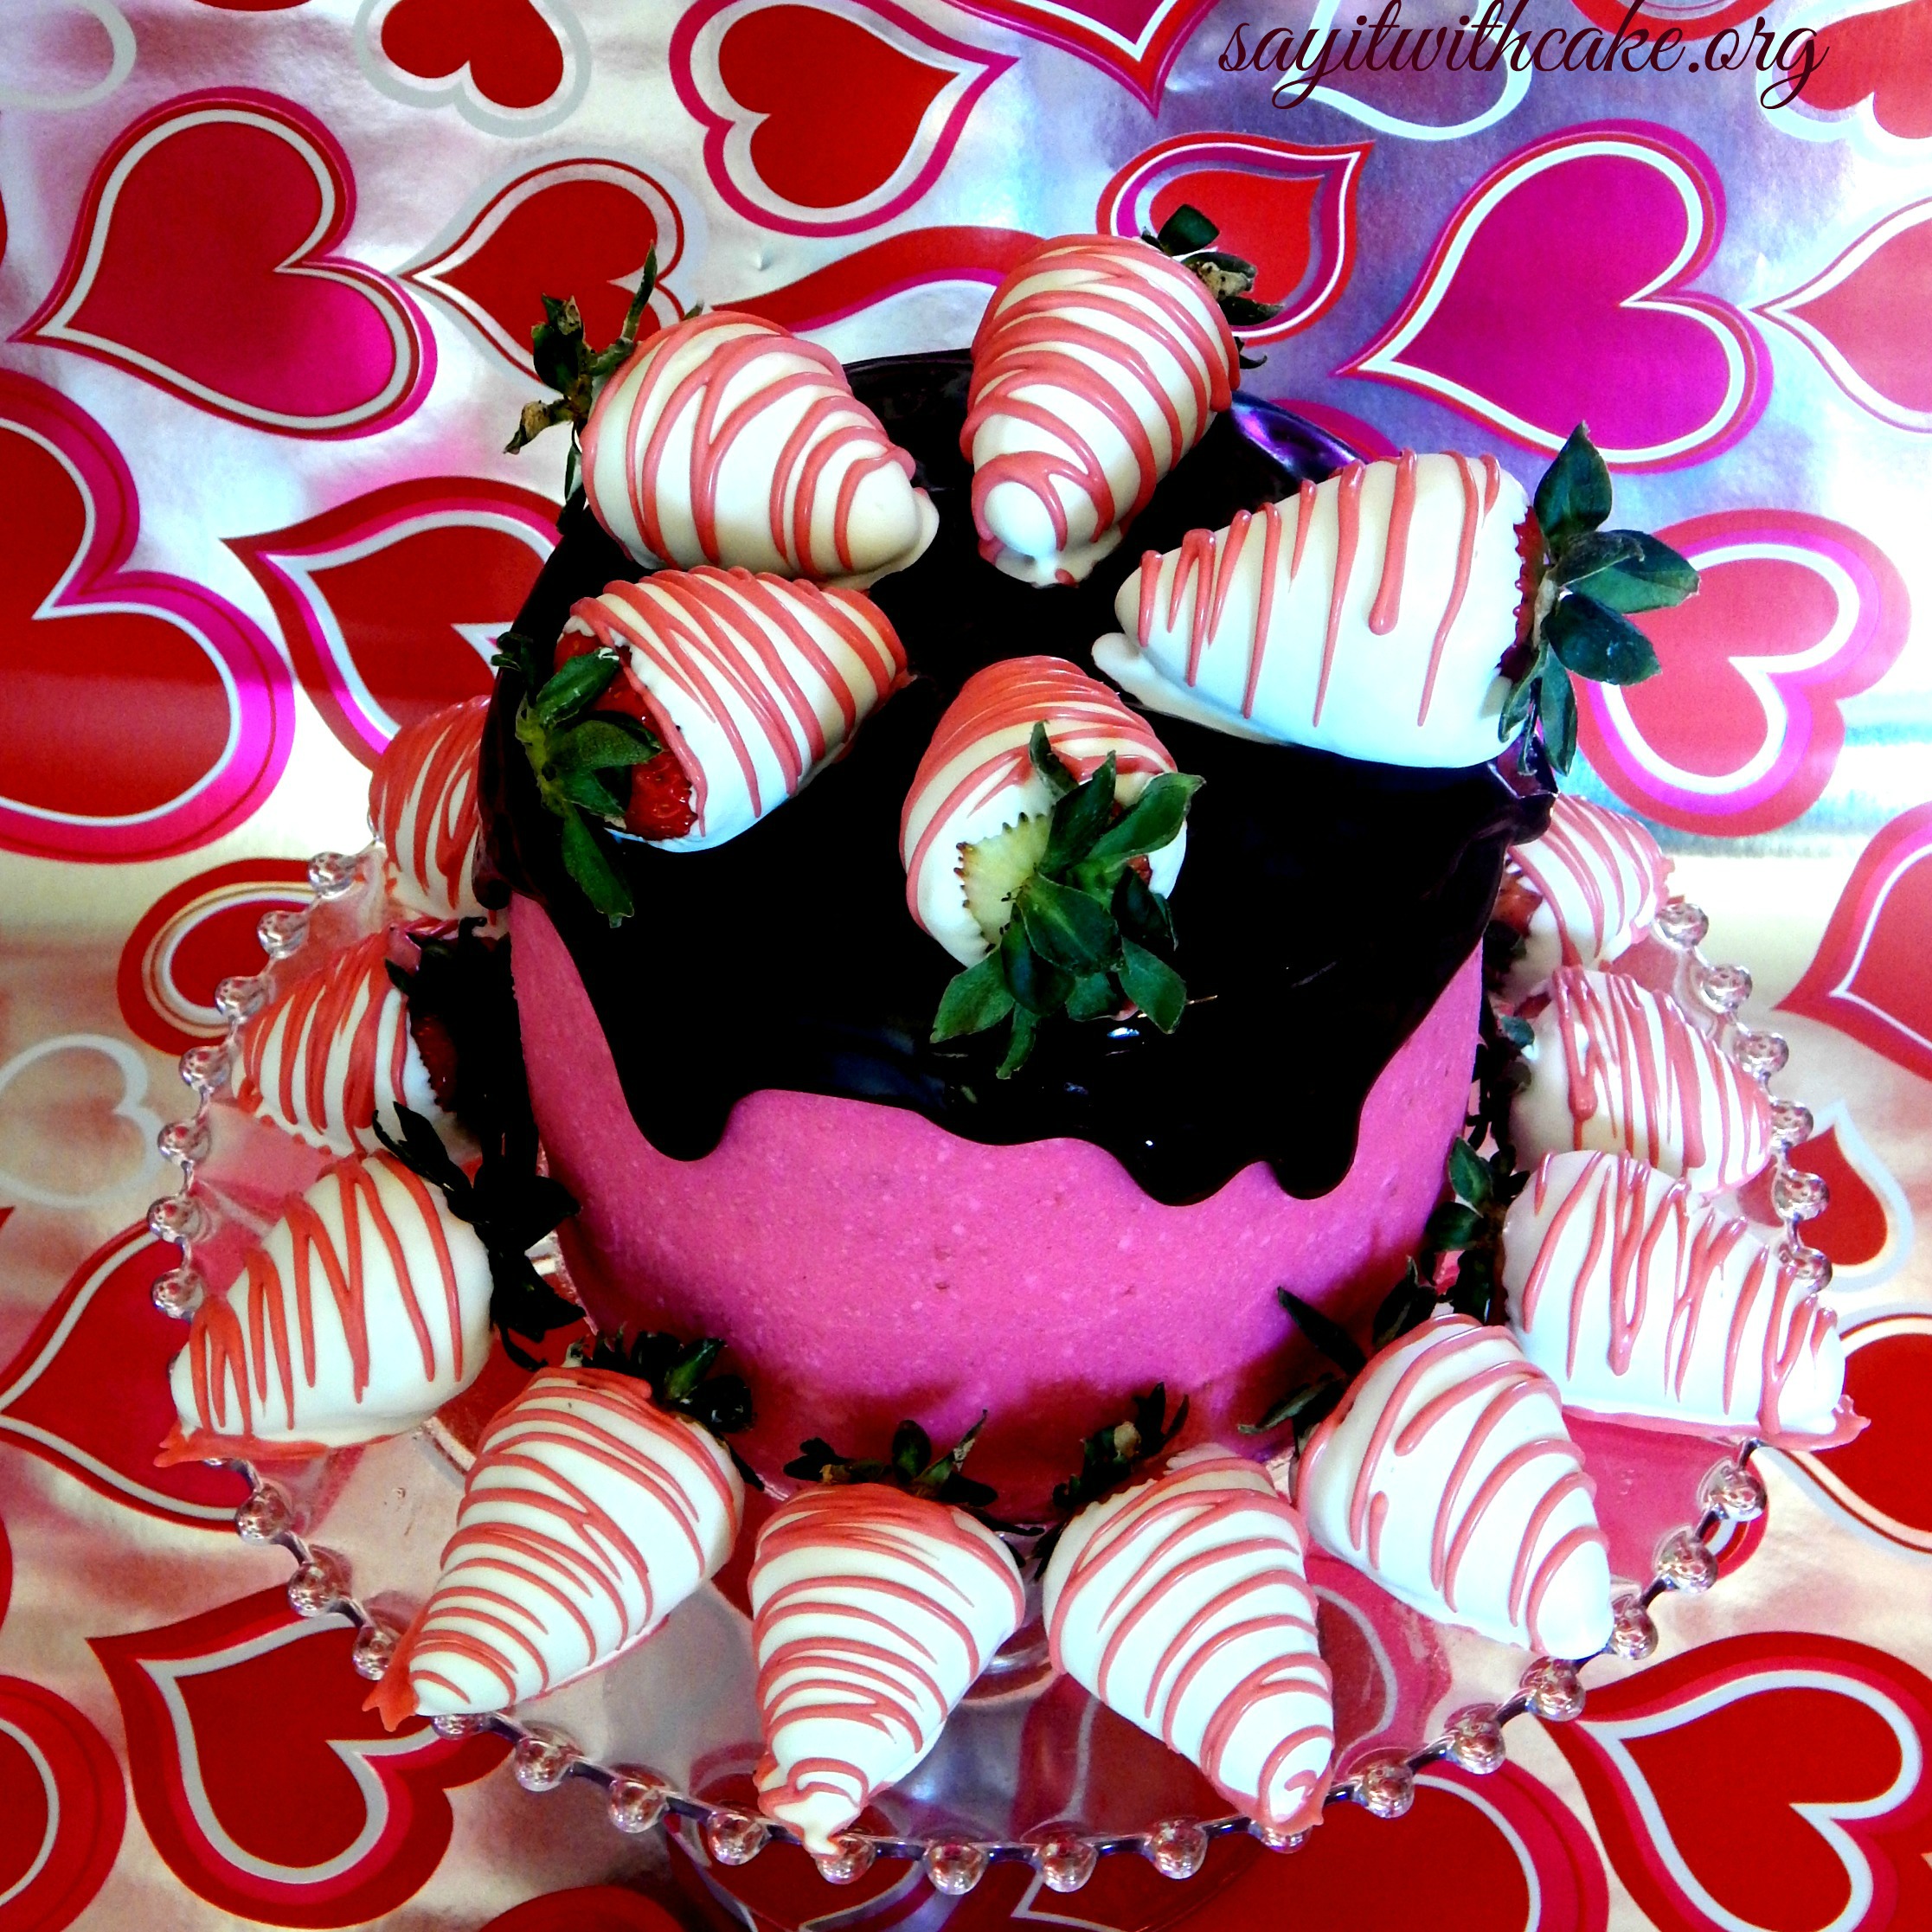
I have never made a swiss meringue buttercream before. I found a recipe that looked delicious and I followed the directions perfectly but I still don’t think it came out as I would have liked. I think I needed to beat the butter a little longer. Also, I wish I would not have put pink food coloring in it. Before I put the food coloring in it you could see the bits of strawberries in it and it looked so yummy! For my next cake, I will leave out the food coloring for sure! I think I need to make swiss meringue buttercream a few more times before I perfect it. It tastes so much better than regular buttercream, in my opinion! It tastes sort of like a strawberry custard.

When I was researching how to make chocolate covered strawberries, I learned a few new tricks! There is something called Paramount Crystals that I bought from my local cake supply store, “Do it with Icing”. It works even better than shortening. What you do is add one teaspoon of Paramount Crystals to one pound of white chocolate candy melts. After microwaving the chocolate and Paramount Crystals together, you mix it up and it becomes so silky smooth. The chocolate stays smooth longer and it is much easier to dip the strawberries in. It didn’t get hard or chunky and I dipped all of my strawberries in one batch. I am so happy I found this little trick and that I can share it with you! I put the strawberries on wax paper and let it dry for a few minutes.
The trick I learned about drizzling chocolate over the chocolate covered strawberries was very helpful. First, I put one strawberry on a piece of wax paper. Then I started the drizzle OFF of the strawberry on one side and finished OFF of the strawberry on the other side. I used my arm, not my wrist, to drizzle by going back and forth. This made a big difference! It made a big mess of chocolate on the wax paper, but they turned out so much better. Sorry if I am not explaining it well!
For the chocolate ganache, one tip is to get a candy thermometer. Because the buttercream is made with butter, if the ganache is too hot it will melt the buttercream. (I know this from experience!) After mixing the ganache, let it cool until it is 86 degrees. Also, make sure that the cake is not too cold or the ganache will set too quickly and may not drizzle down.
Ingredients
- 5 large, fresh egg whites (150 g)
- 1-1/4 cups (250 g) sugar
- 1-1/2 cups (3 sticks) (340 g) butter, cut into cubes and cool, but not cold
- 2 teaspoons (10 ml) pure vanilla extract
- 1/4 cup (59 ml) (or to taste) strawberry puree OR a handful (about 1 cup, or more to taste) of fresh, washed, and dried strawberries, chopped
- pinch of salt
- few drops pink food colouring (optional)
- 4 oz (115 g) high quality bittersweet chocolate, coarsely chopped or callets
- 1/3 cup (76 g) unsalted butter, at room temperature and cut into cubes
Instructions
- If using strawberry puree, place a handful of frozen strawberries in a food processor, and process until a smooth puree. Measure approximately 1/4 cup and set aside (you may want to add more puree to taste).
- Wipe the bowl of an electric mixer with paper towel and lemon juice, to remove any trace of grease. Add egg whites and sugar, and simmer over a pot of water (not boiling), whisking constantly but gently, until temperature reaches 160°F, or if you don't have a candy thermometer, until the sugar has completely dissolved and the egg whites are hot.
- With whisk attachment of mixer, begin to whip until the meringue is thick, glossy, and the bottom of the bowl feels neutral to the touch (this can take up to 10 minutes or so). *Don't begin adding butter until the bottom of the bowl feels neutral, and not warm.
- Switch over to paddle attachment and, with mixer on low speed, add butter cubes, one at a time, until incorporated, and mix until it has reached a silky smooth texture (if curdles, keep mixing and it will come back to smooth). *If mixture is too runny, refrigerate for about 15 minutes and continue mixing with paddle attachment until it comes together. Add vanilla and salt, continuing to beat on low speed until well combined.
- Add strawberry puree to taste or the finely chopped strawberries, and blend until combined. Add small amount of pink food coloring, if desired.
- Place the chocolate and butter in a medium heatproof bowl over a pot of simmering water. Stir the mixture using a rubber spatula until melted and smooth. *Be careful to not get even a droplet of water into your bowl of chocolate and butter.
- tips: don't let bowl touch the water when whisking over the pot of simmering water. Also, if you don't have a candy thermometer, you can take a fingerful out and rub it together and see if you can feel any sugar crystals.
My Cake was featured here!
]]>
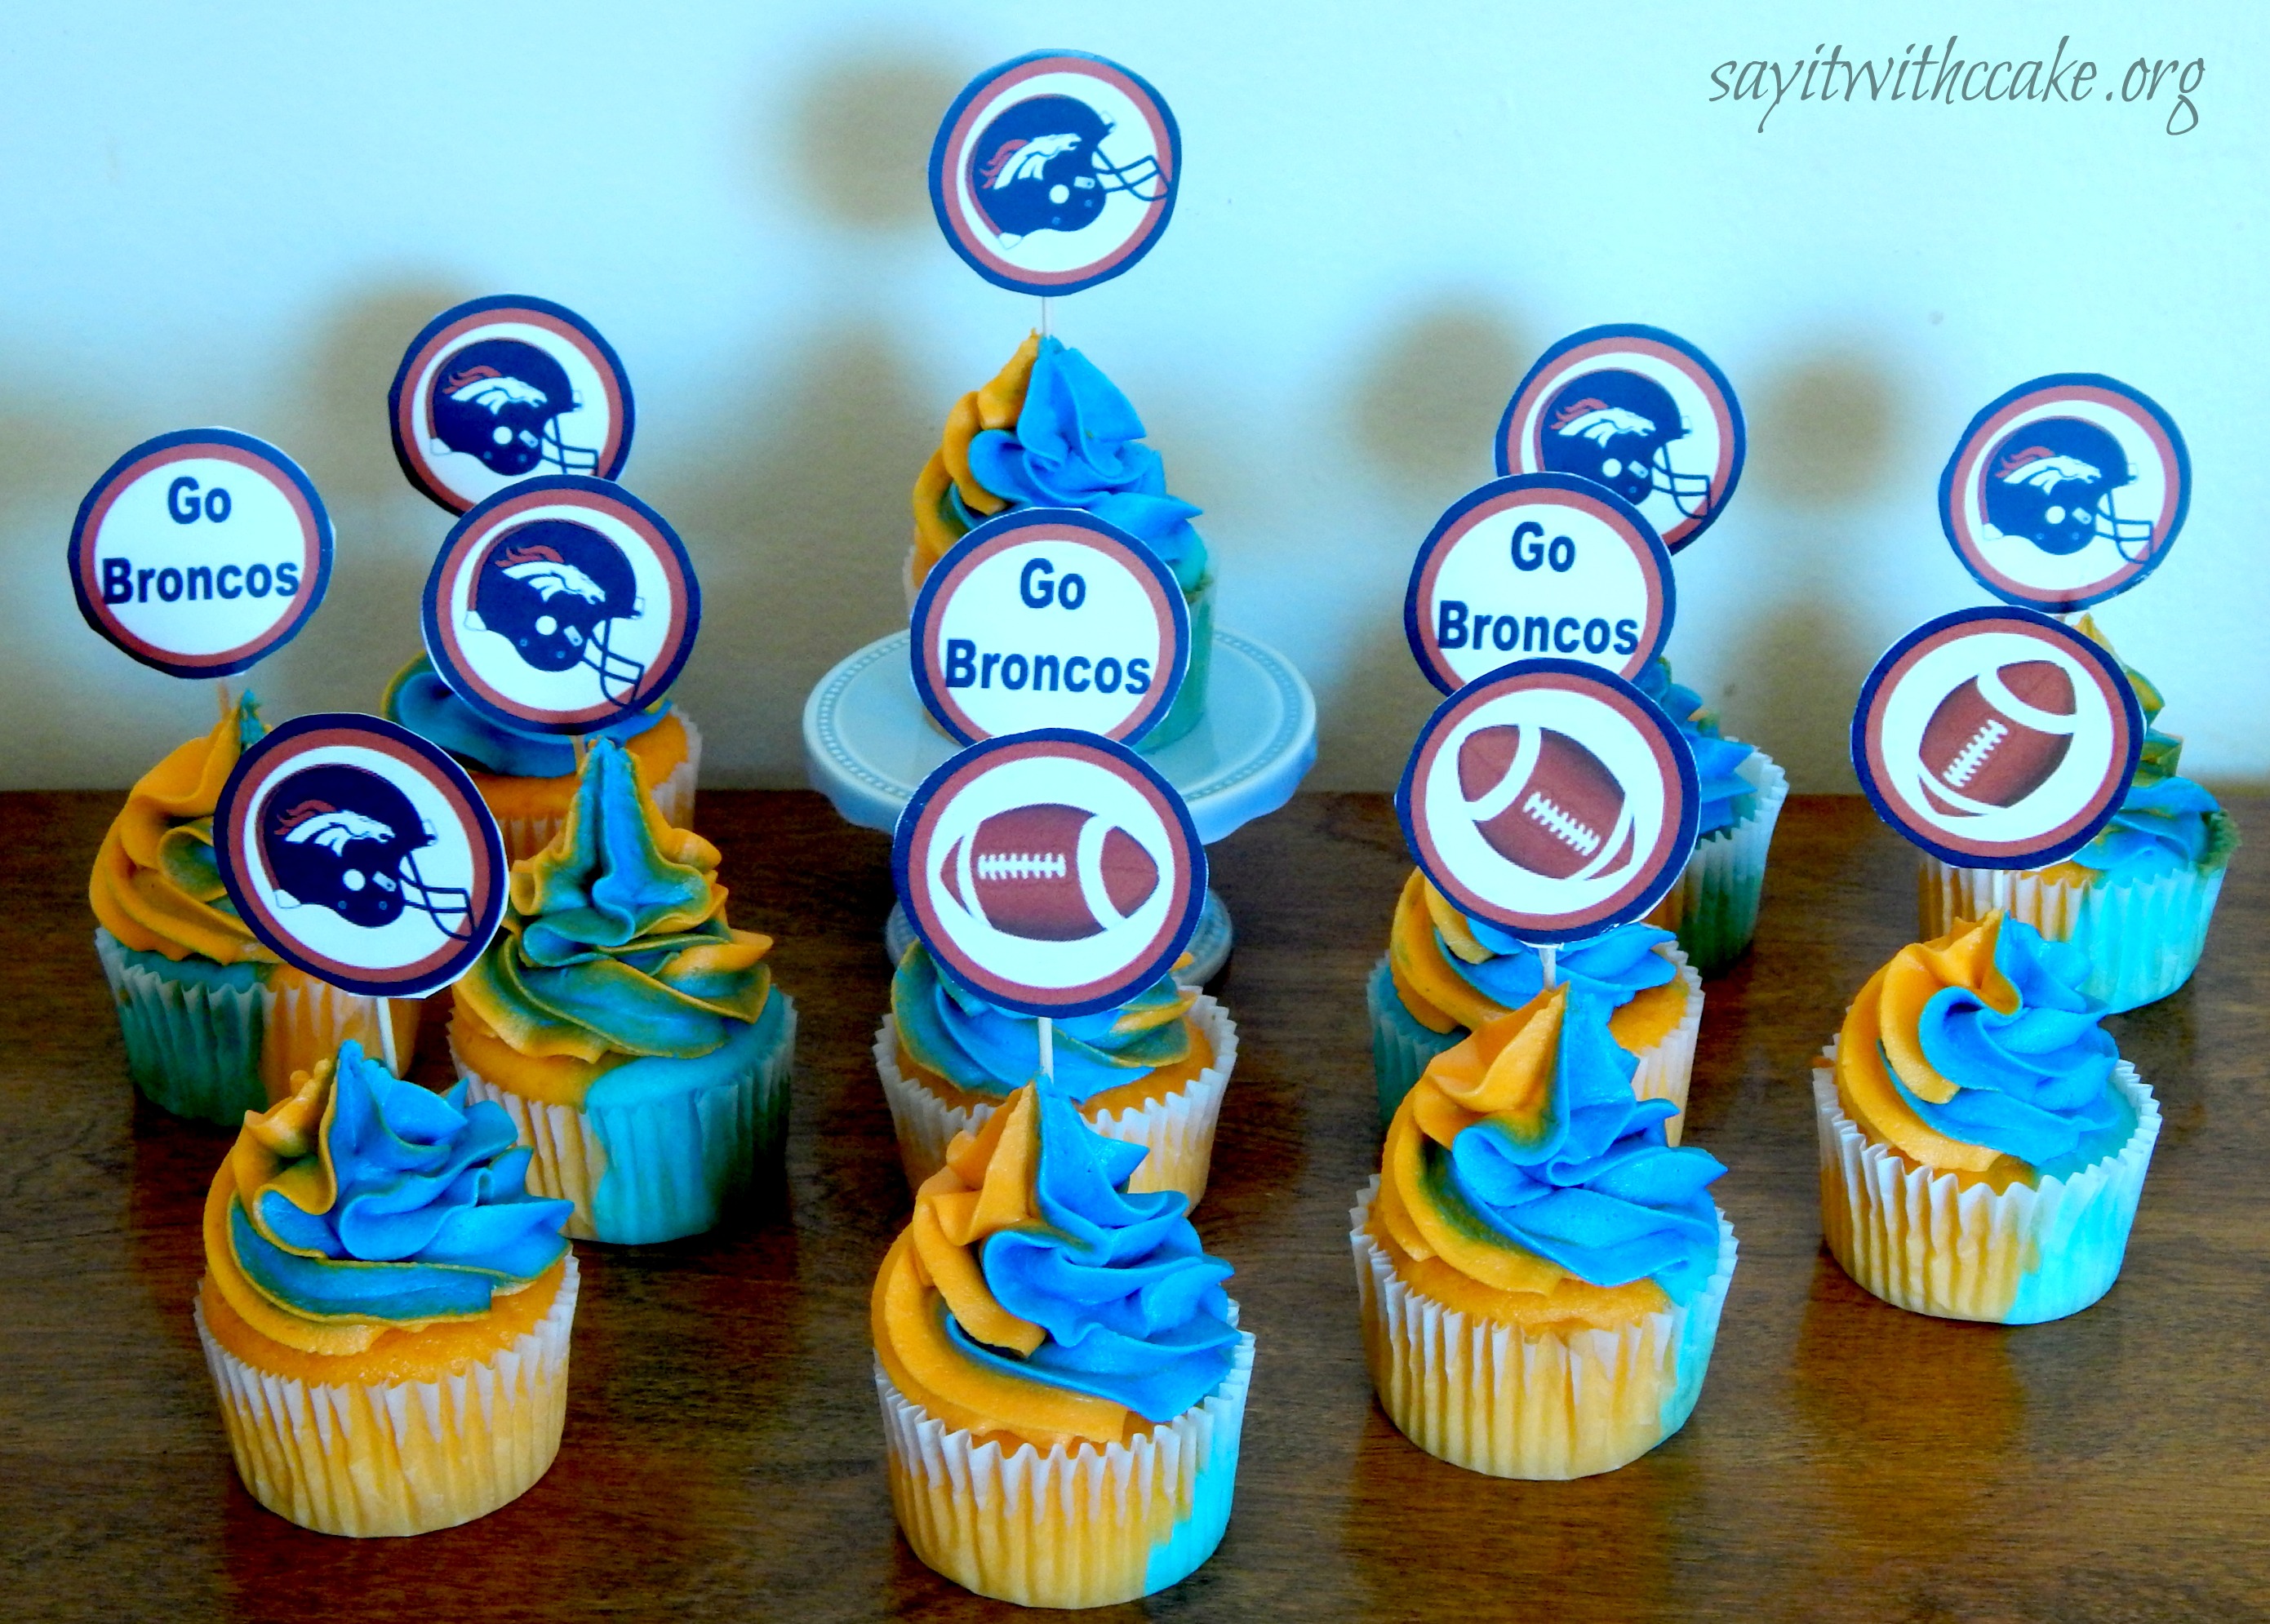
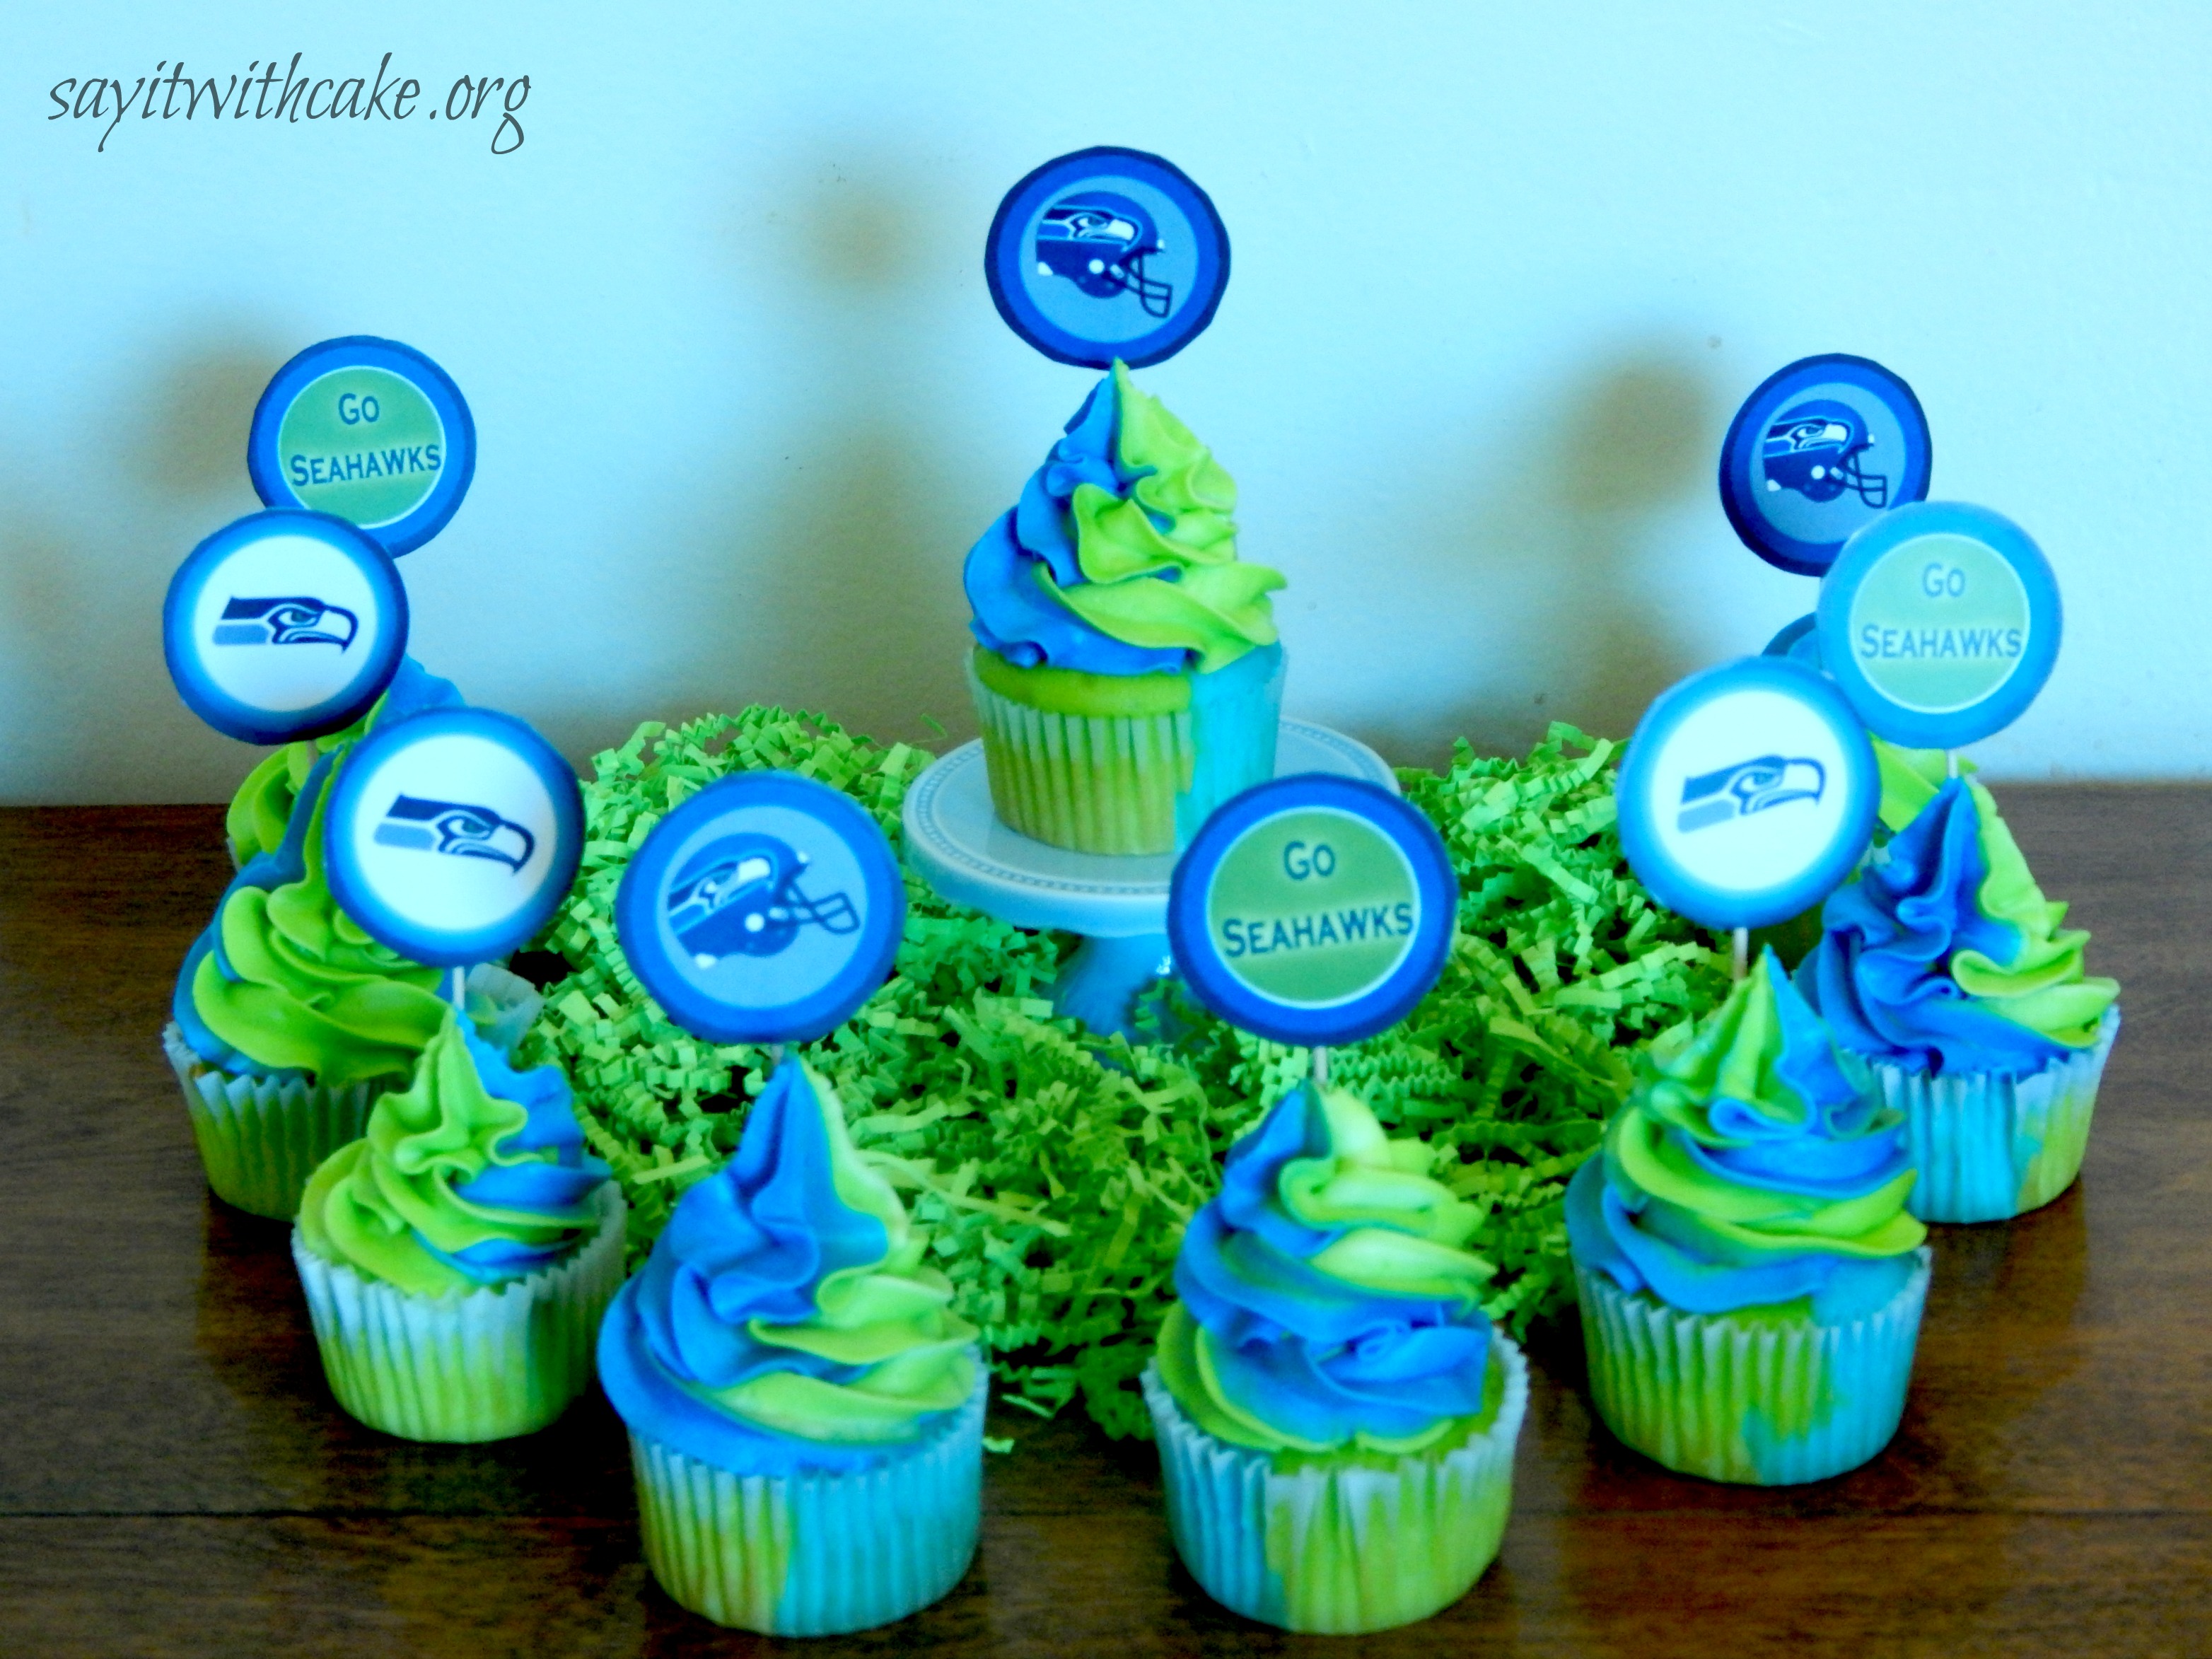
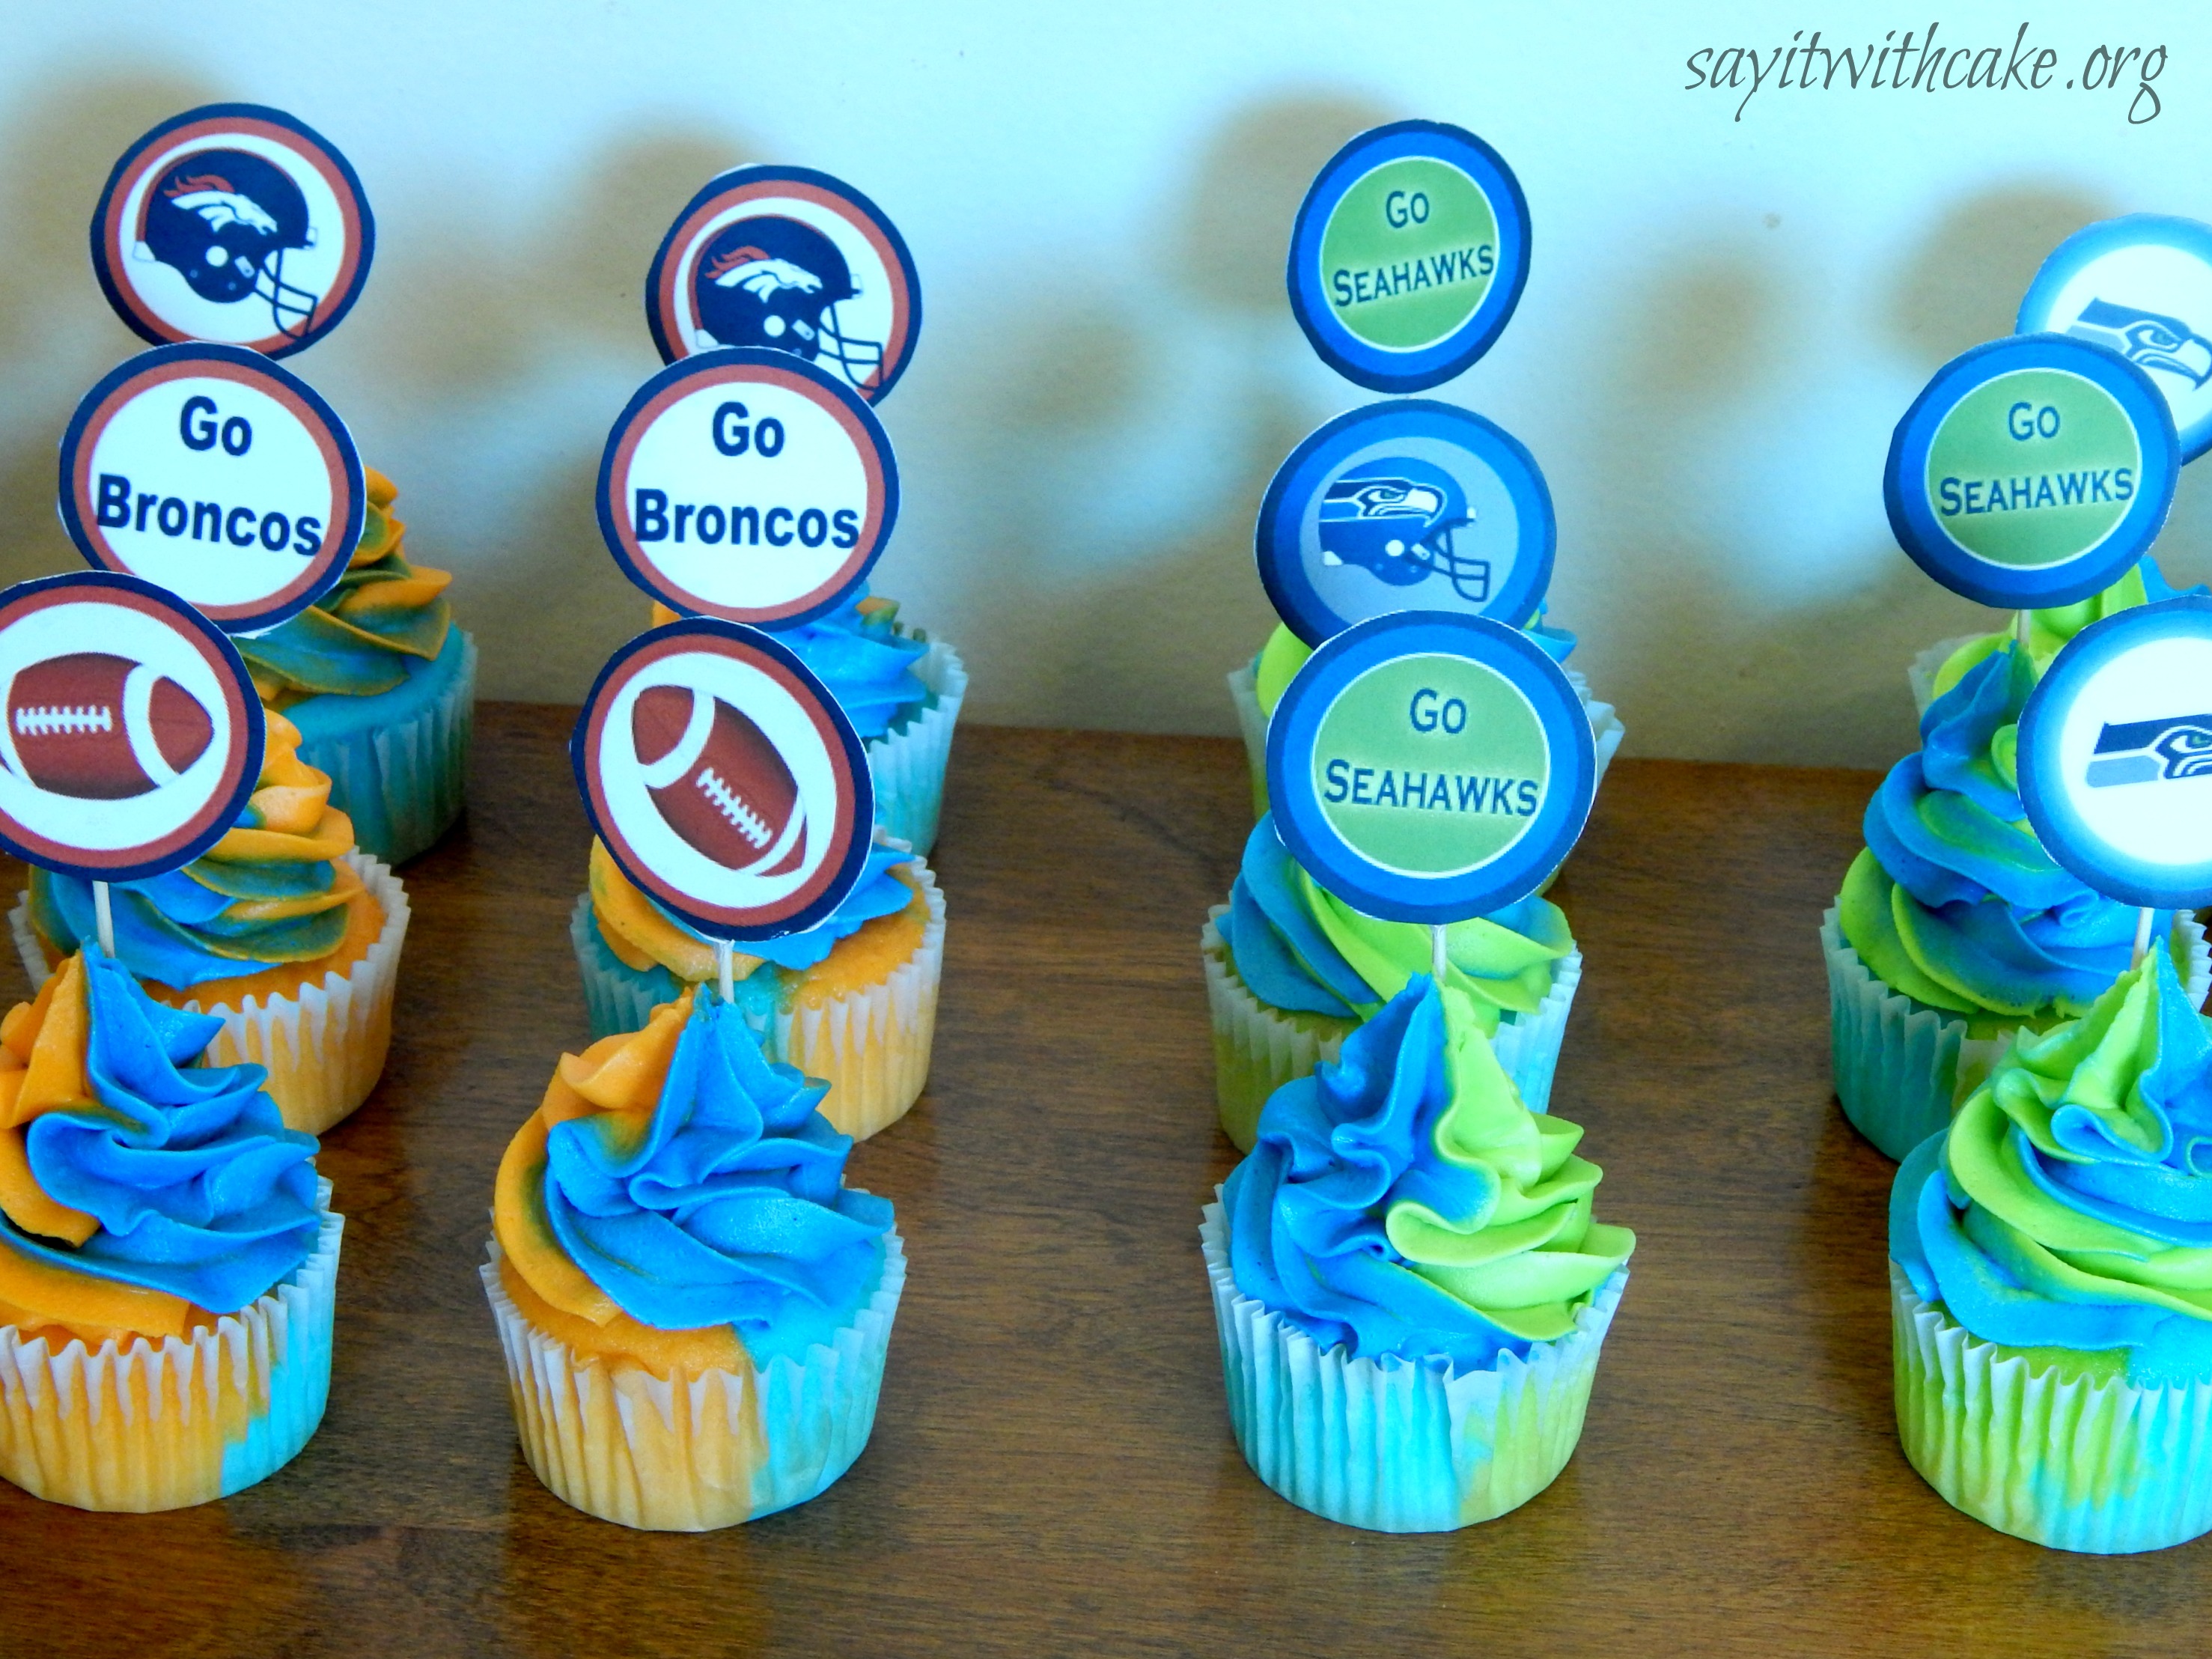
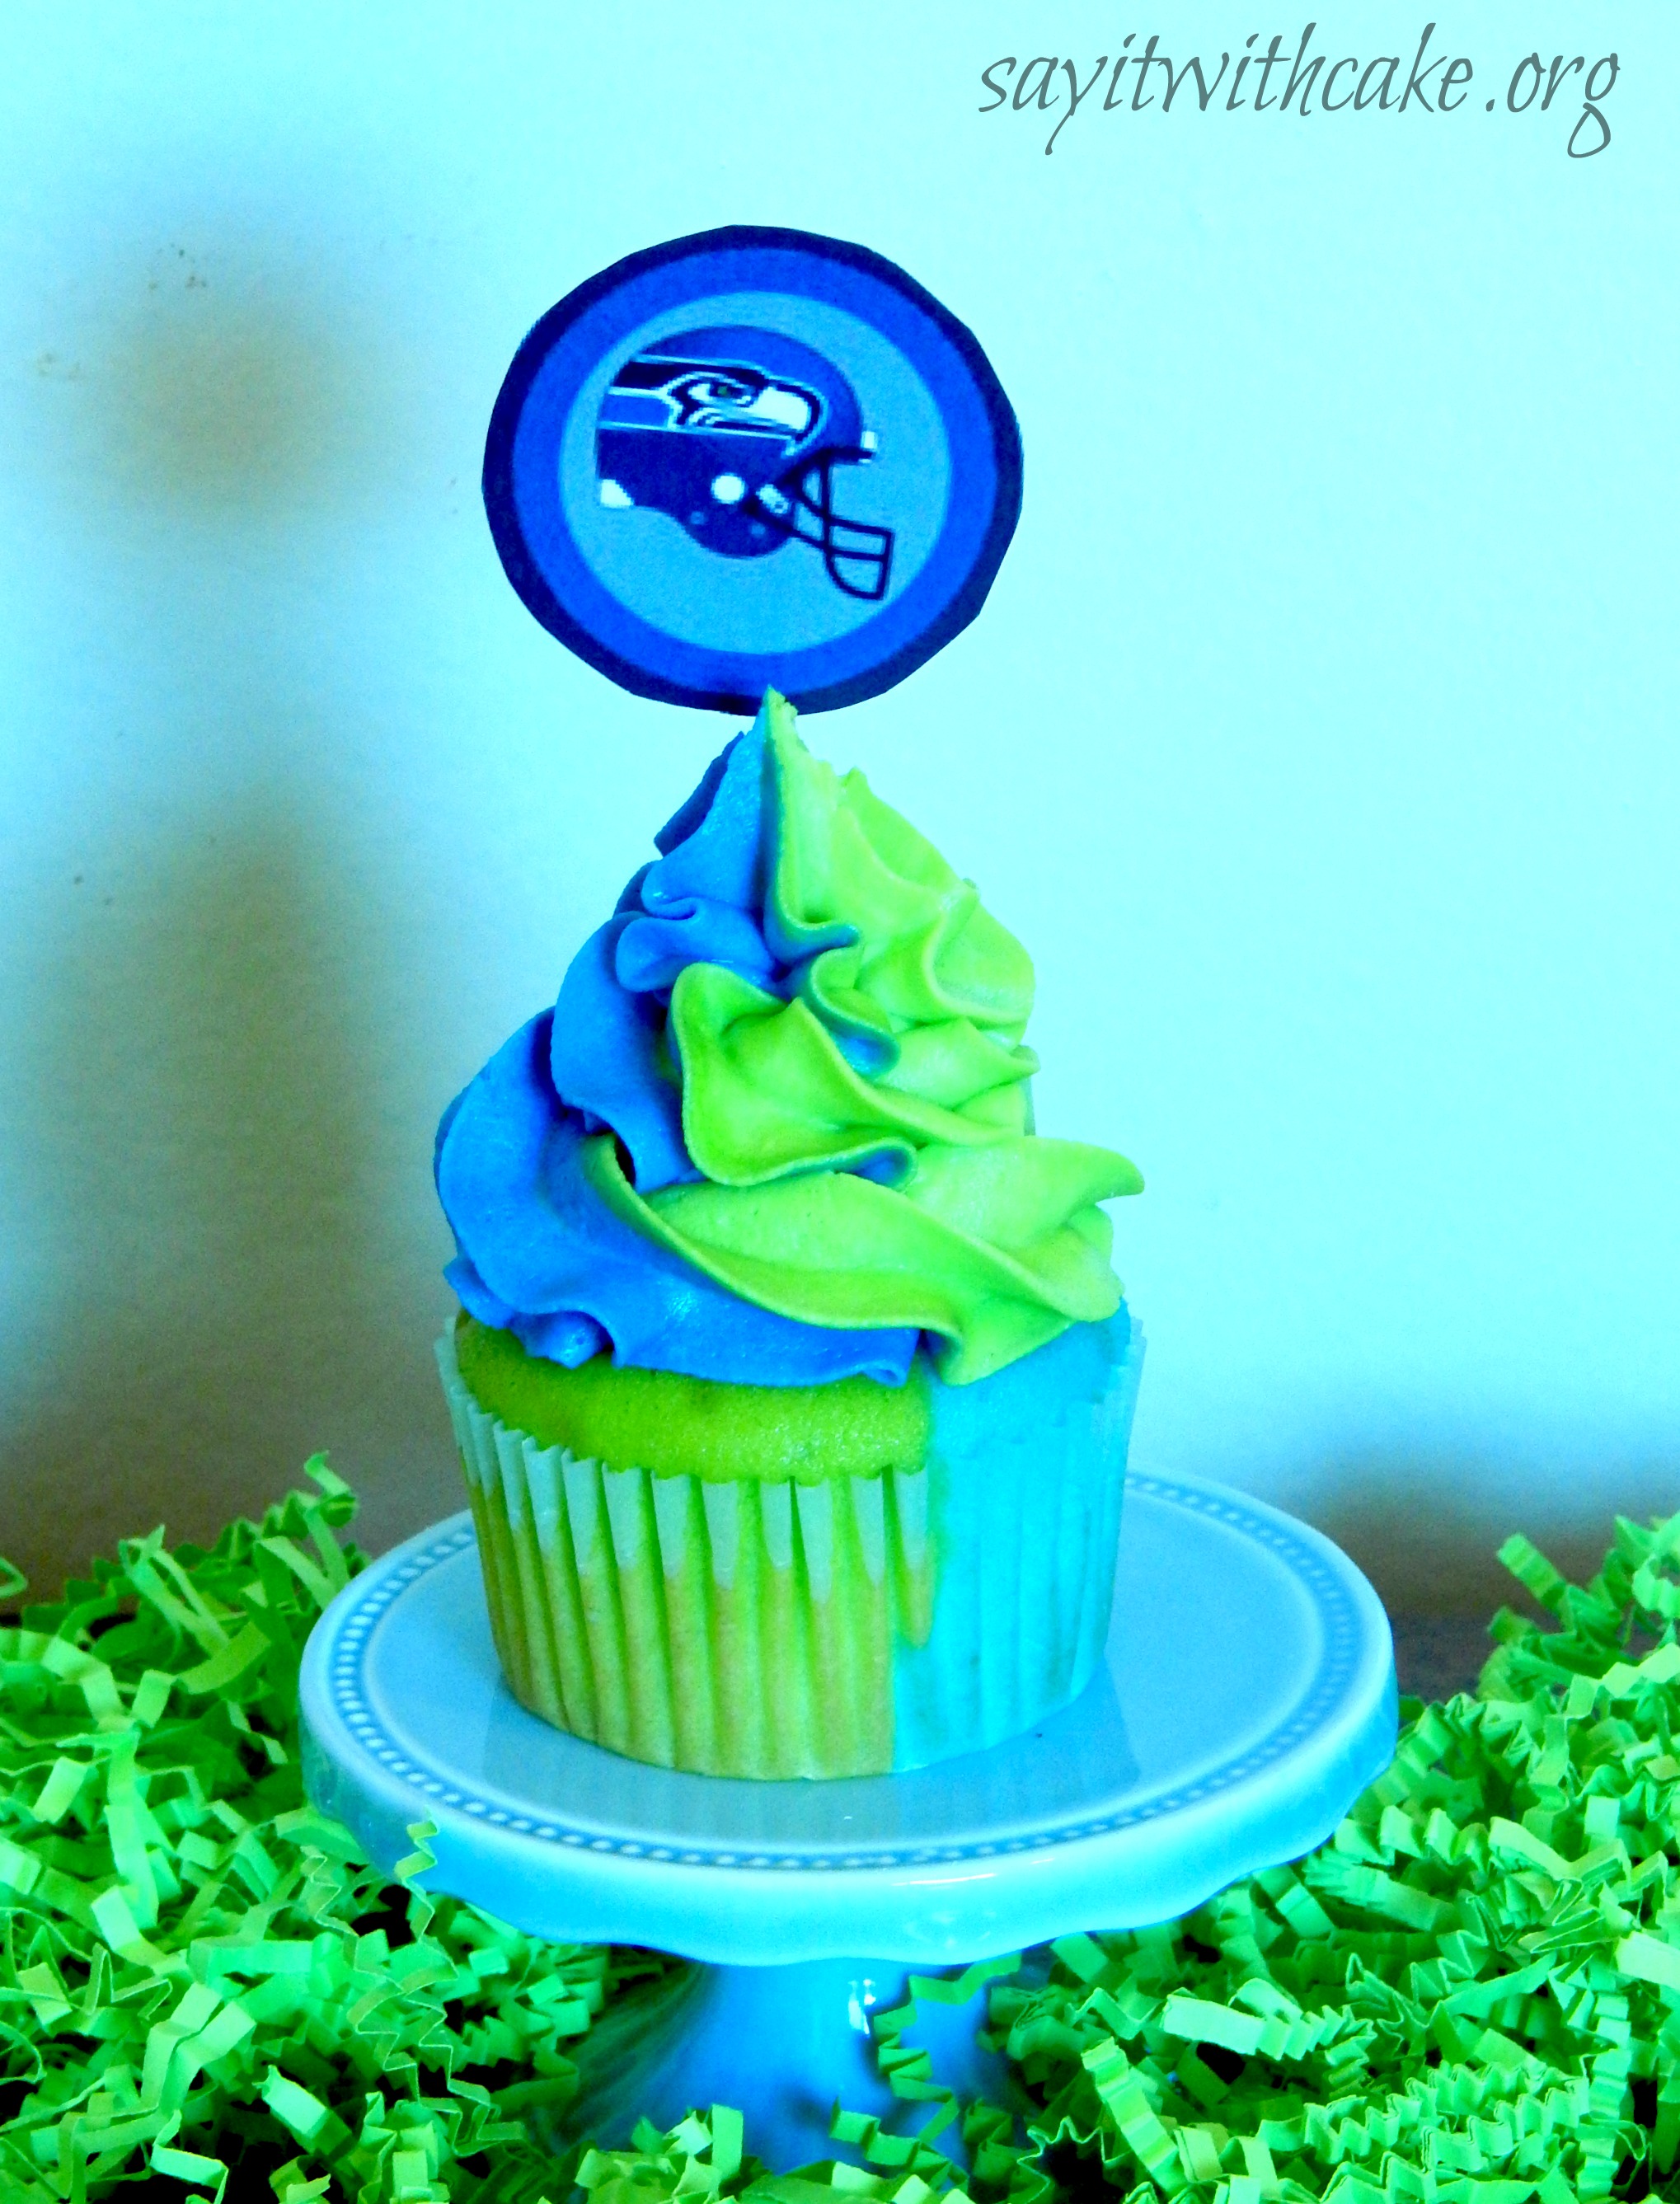 Go Seahawks! The 2014 Super Bowl features the Seattle Seahawks vs. the Denver Broncos! Who are you going for? I made cupcakes for both teams for the Super Bowl party so everyone can enjoy a cupcake no matter who they are going for!
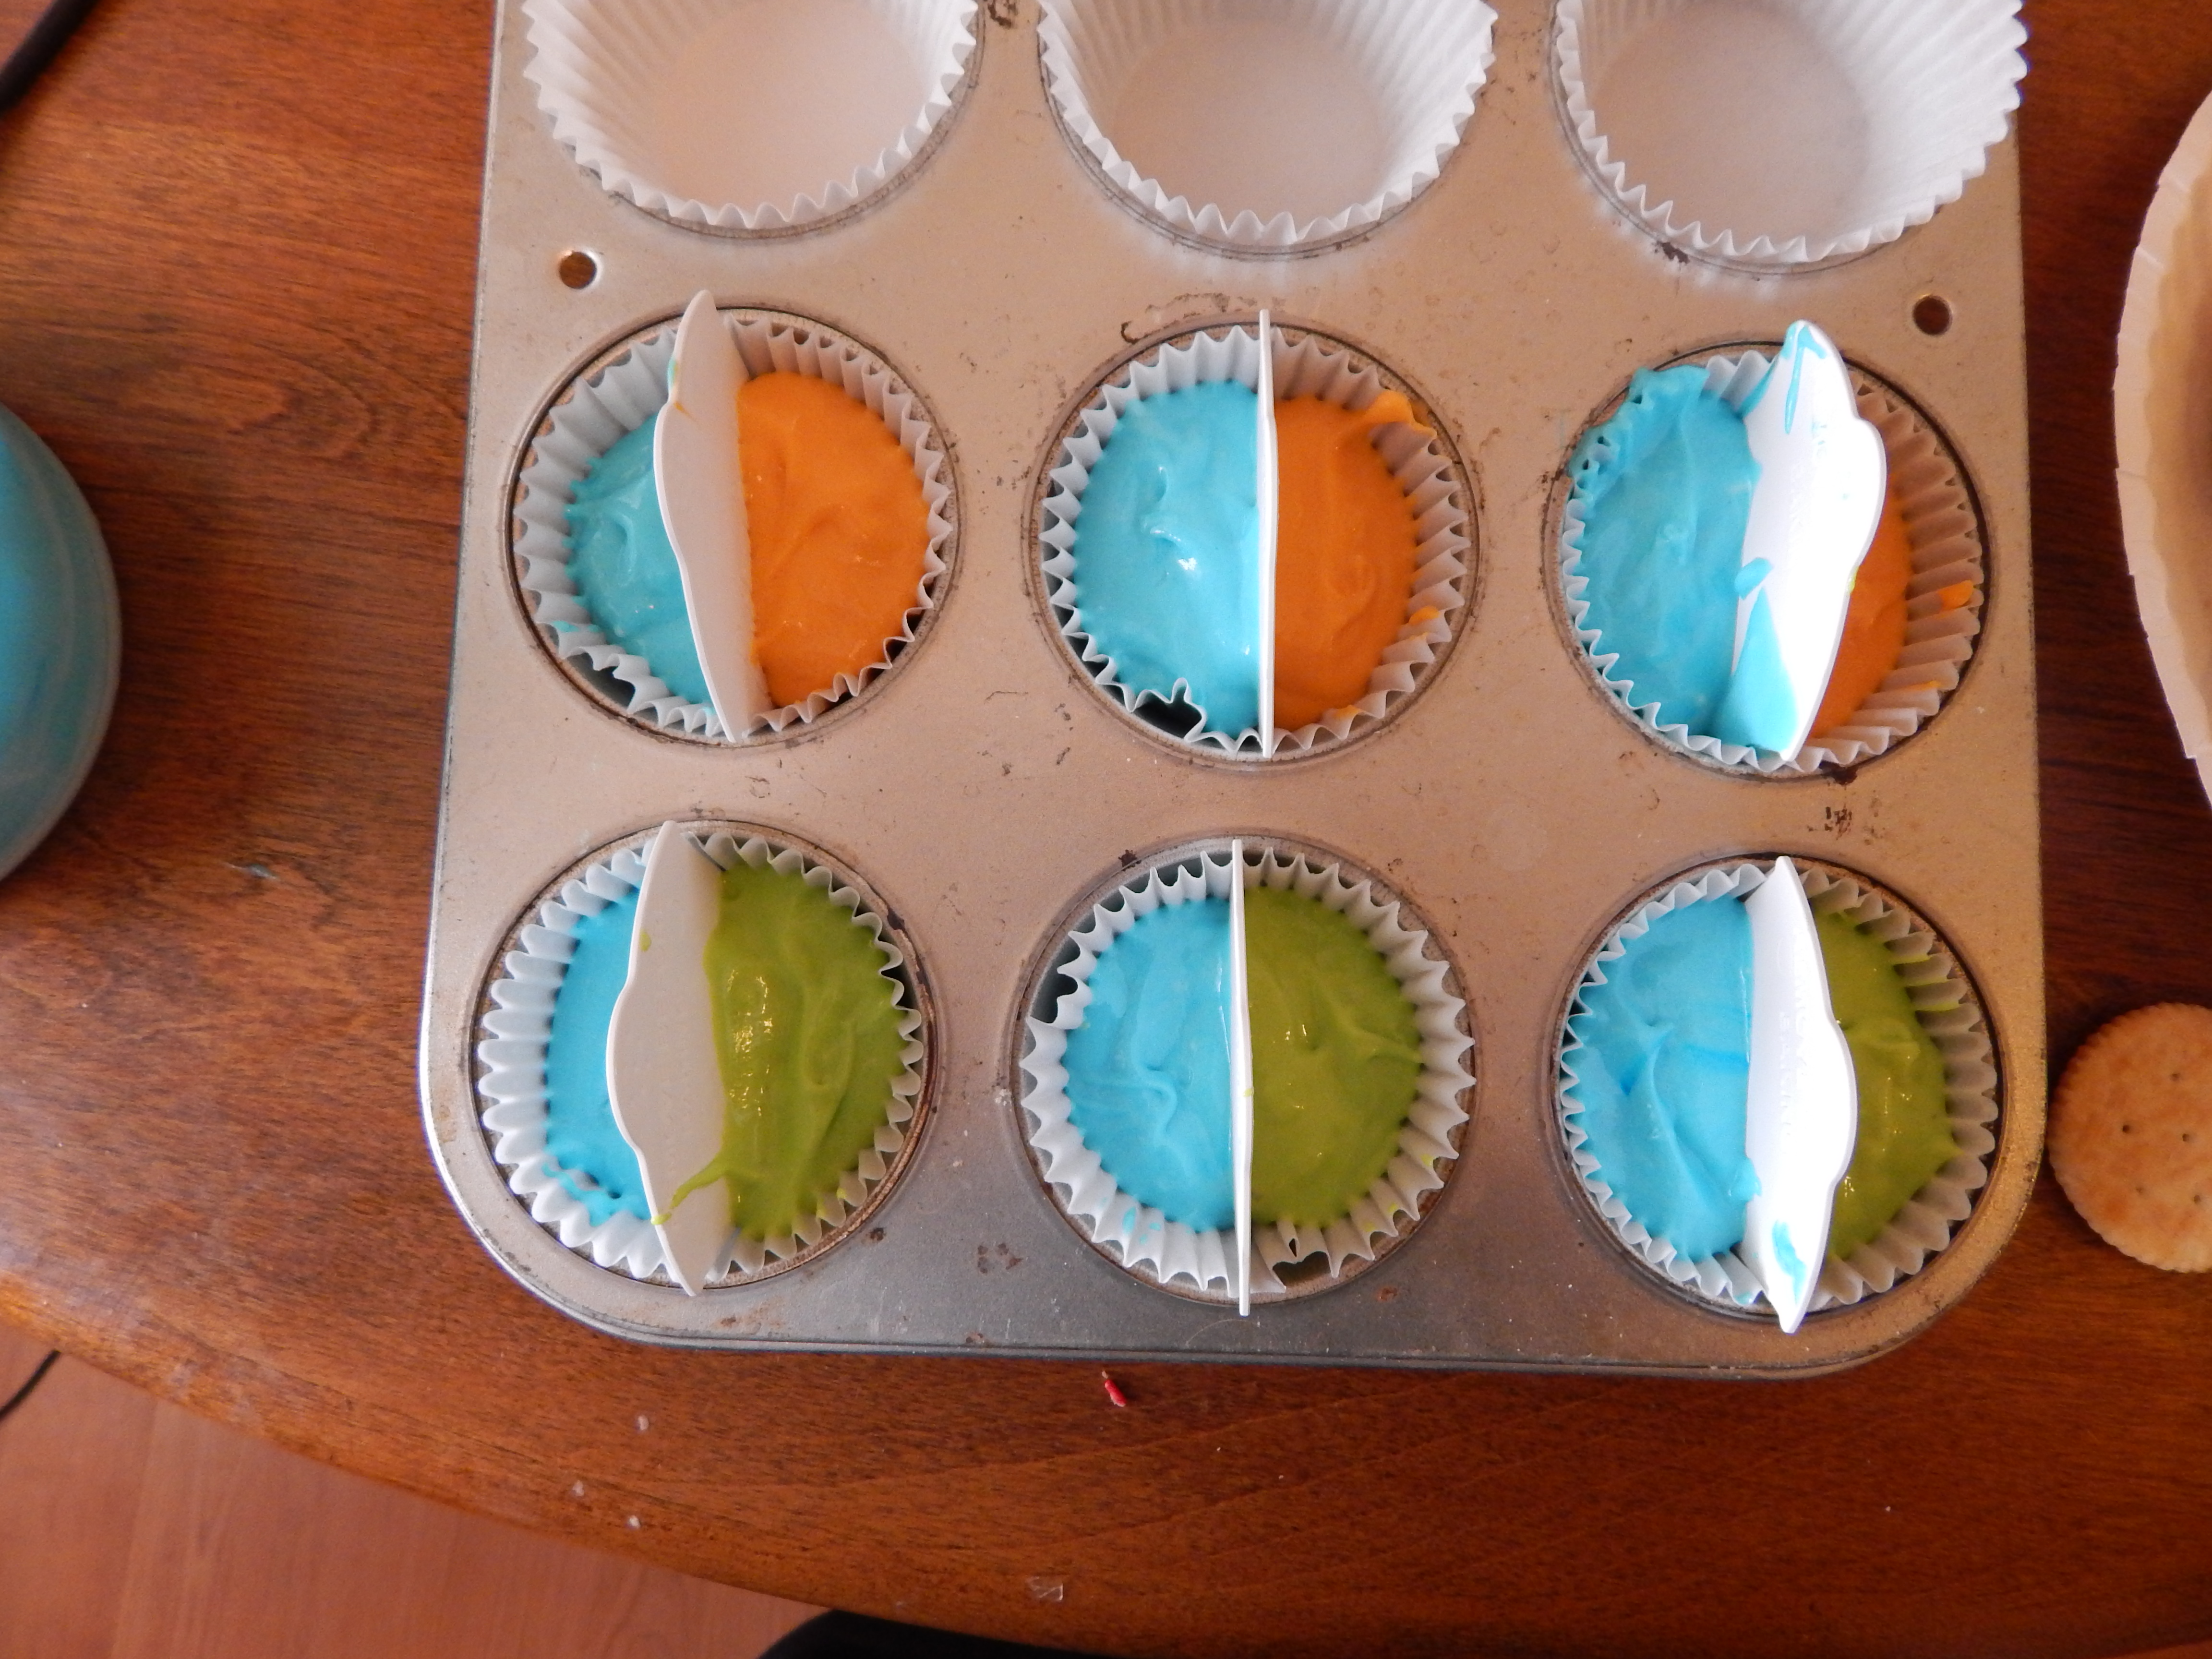
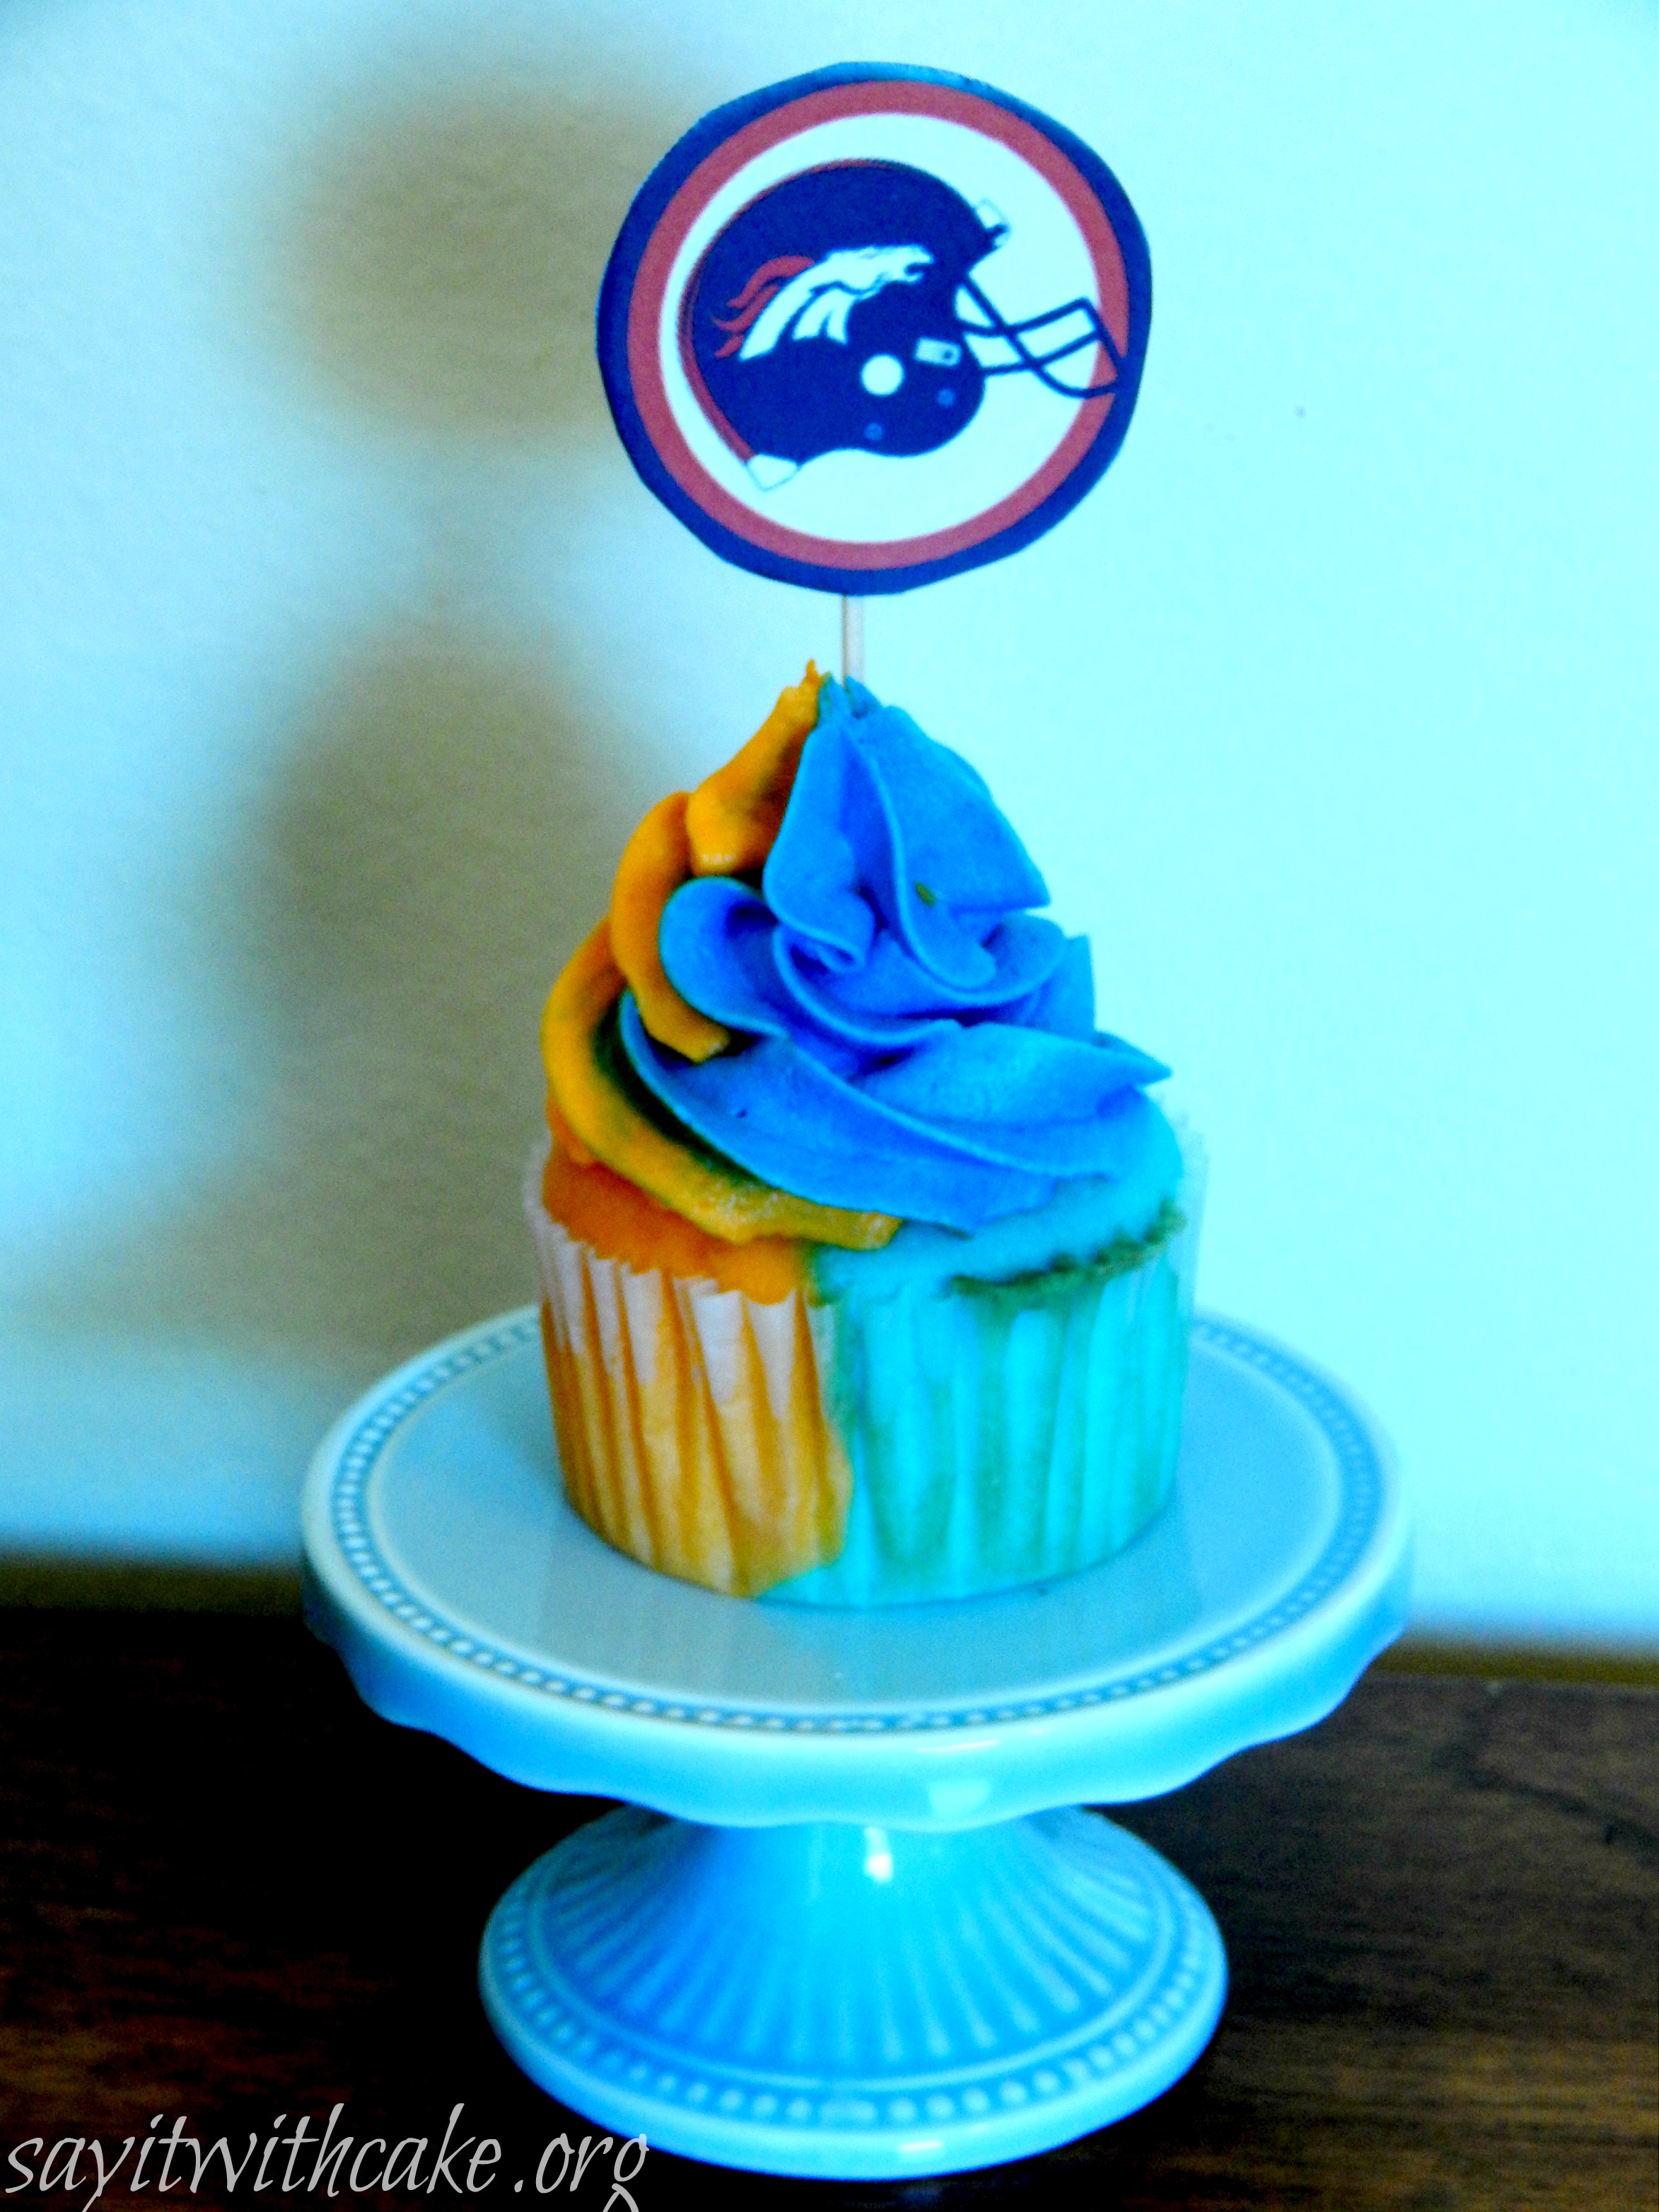 Denver Broncos cupcakes. Half orange, half blue inside and orange and blue swirl buttercream frosting on top!
Seattle Seahawks cupcakes! Half blue, half green on the inside and also swirled buttercream on top.
These cupcakes are perfect for a last minute idea to bring to the game. They are cute and easy to make!
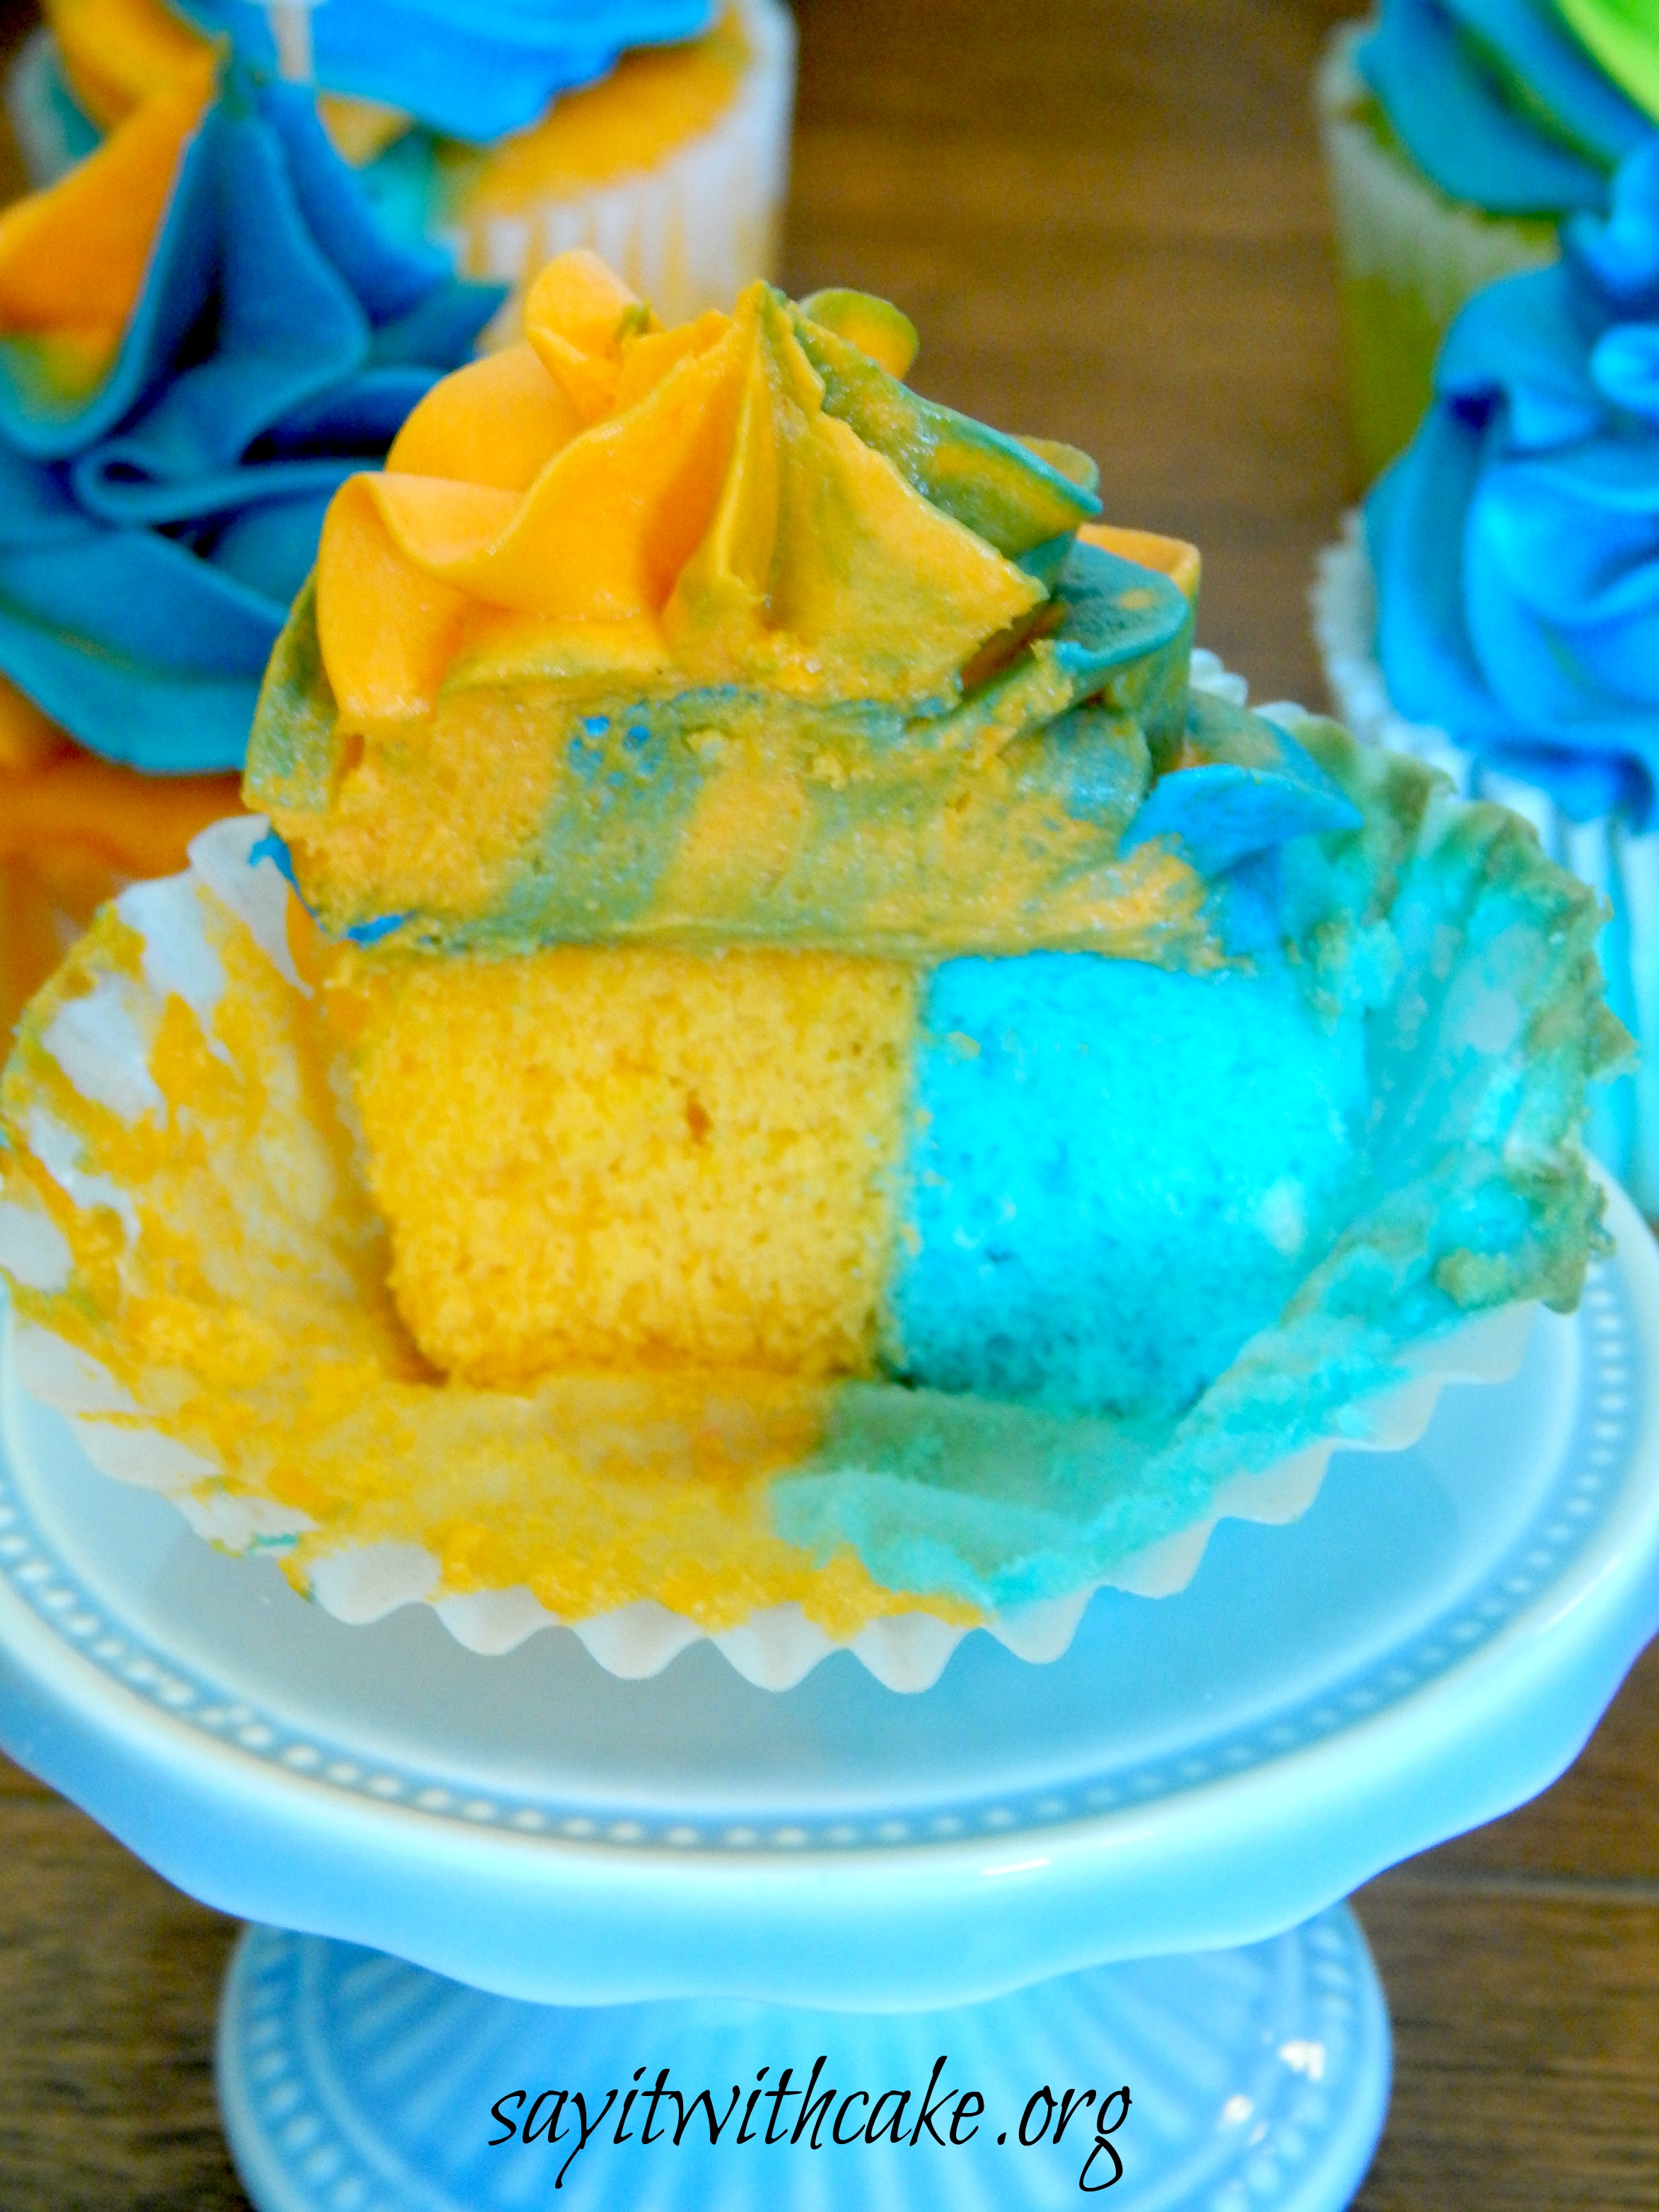
To make these cupcakes, I made a simple white cake mix. I divided the batter into three different bowls and dyed them blue, green and orange. I put a cupcake divider called “batter babies” in each white cupcake paper. I got the batter babies at my local cake decorating store.
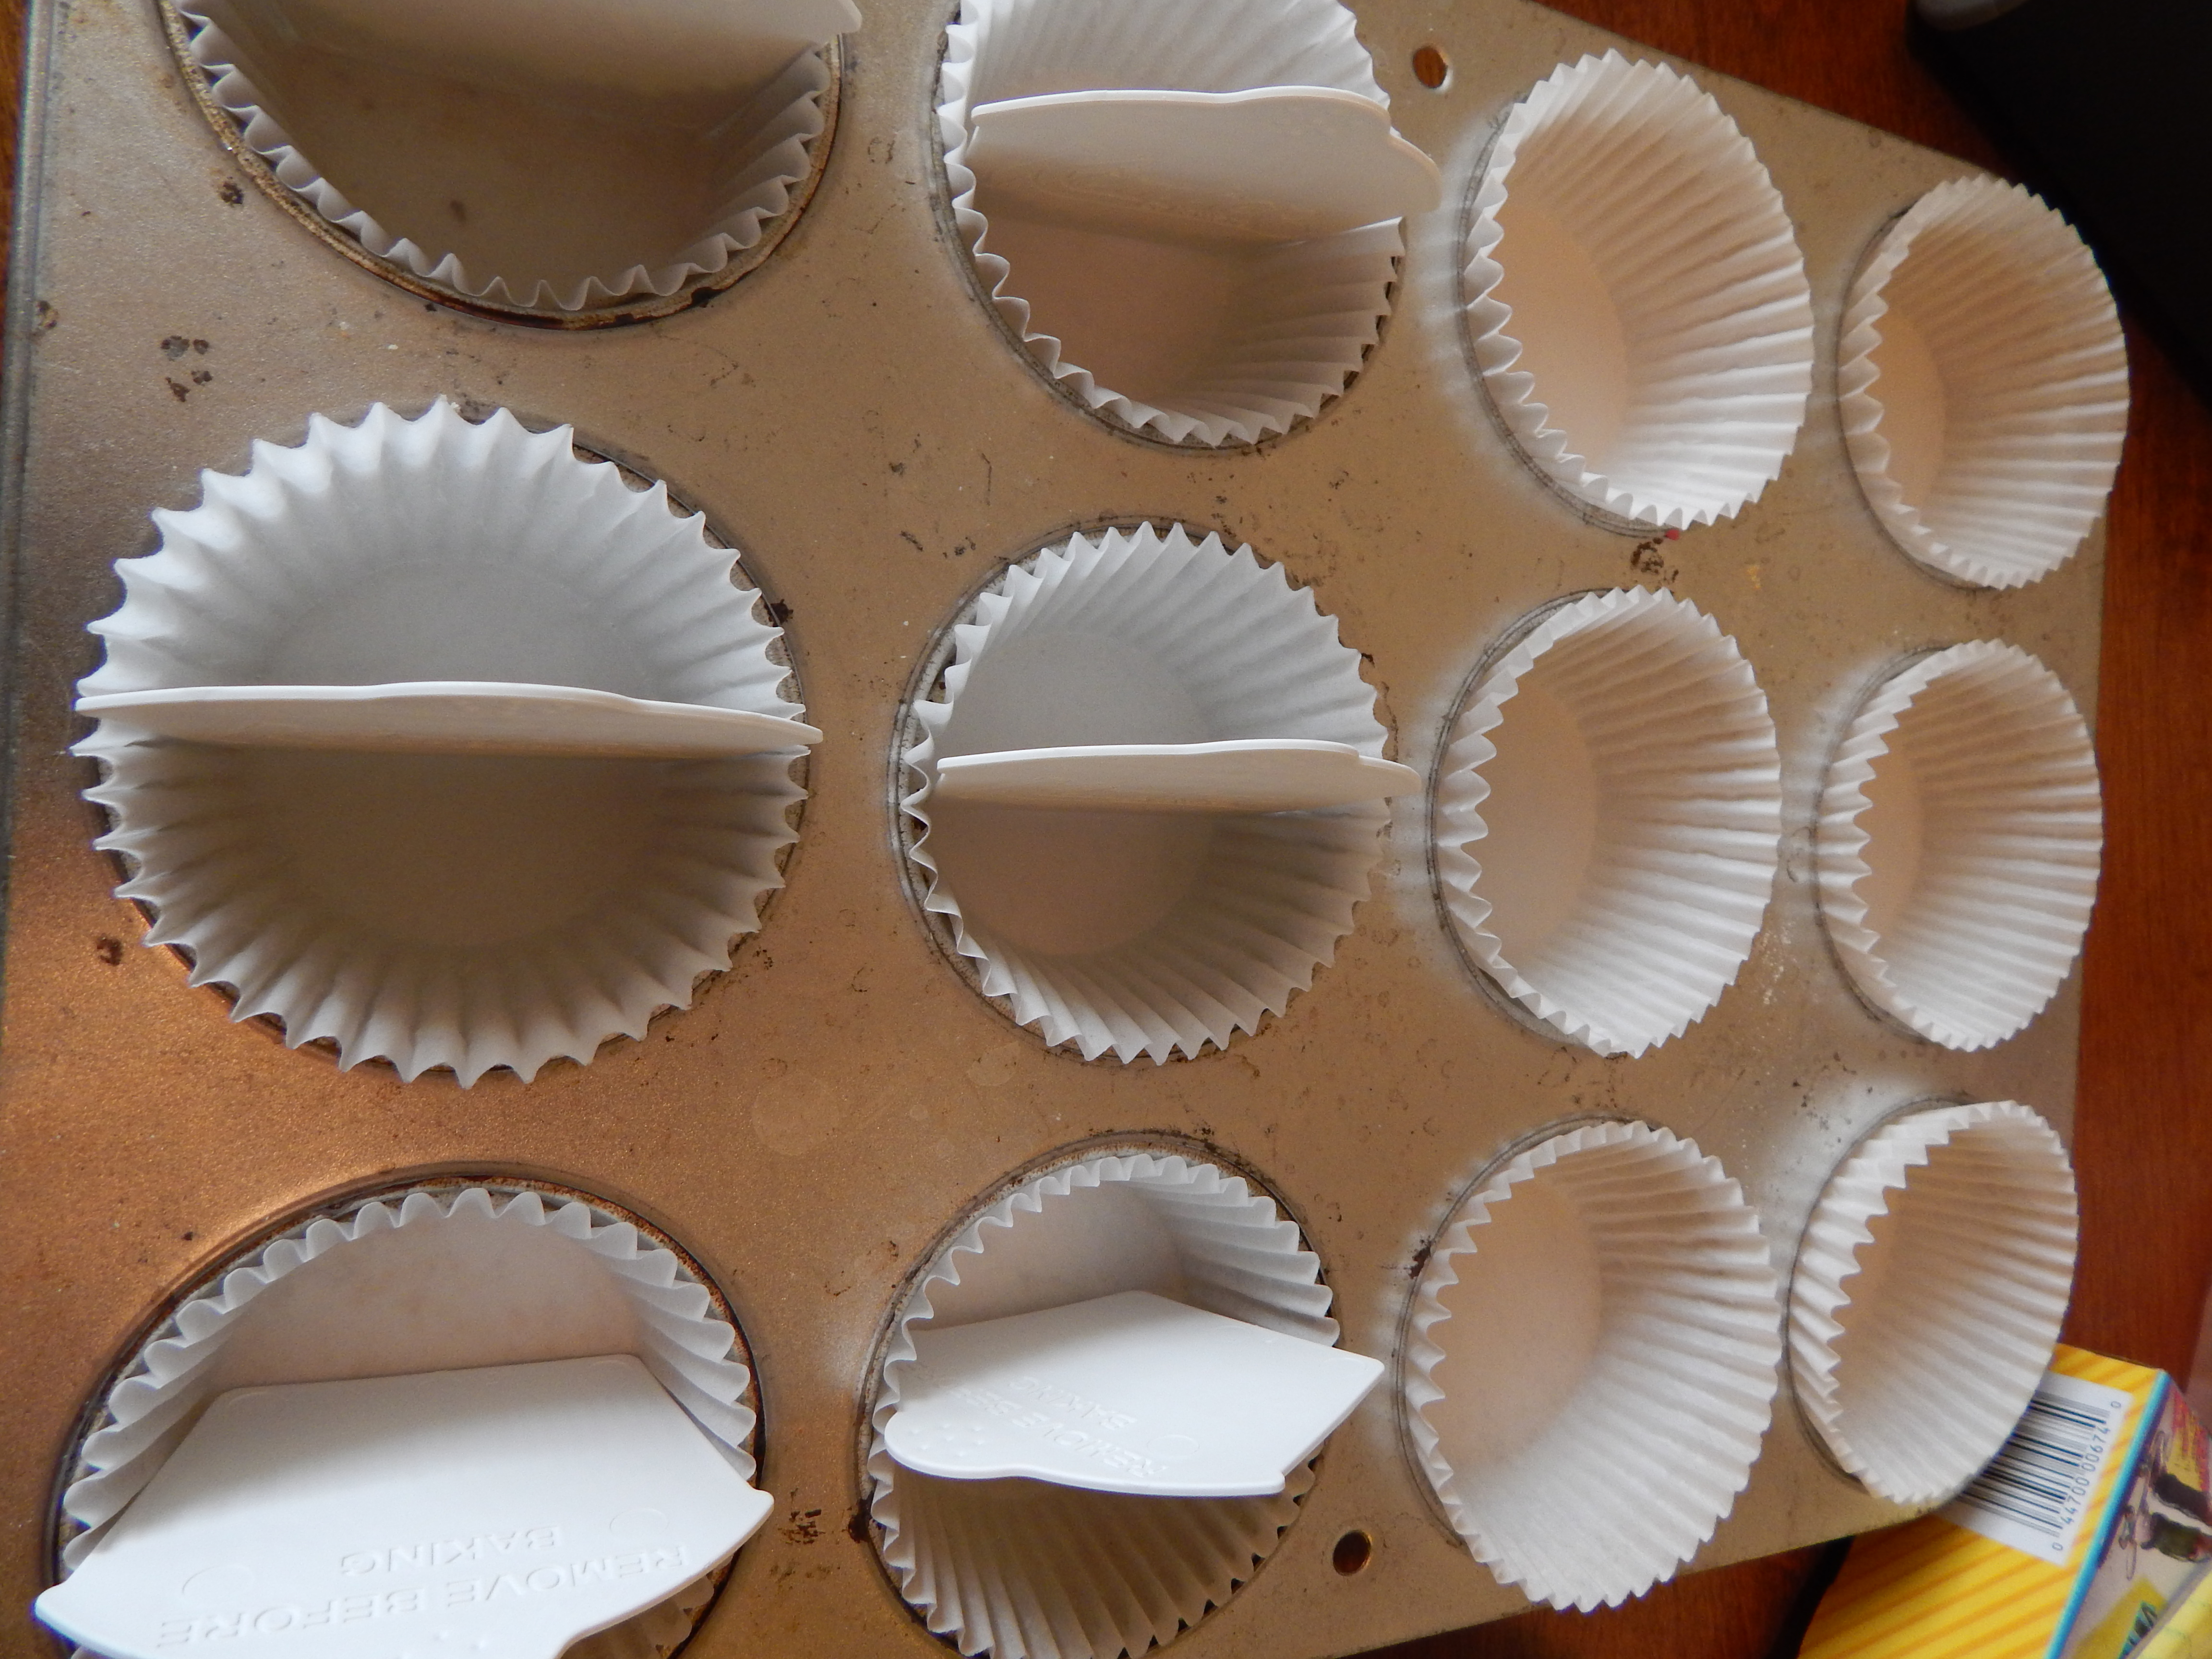
Then I simply poured half of each color into the paper cups and followed the baking instructions on the back of the box. So easy!! Please note that I removed the “batter babies” before baking.
For the frosting, I used my buttercream frosting recipe found Here. I divided the frosting into three bowls and colored them orange, blue and green. I put both colors into a piping bag, side by side and used a large star tip. I started from the center and made a swirl and ended on the outside to make the swirl on top of the cupcake. I printed out little team logos and cut them out on card stock. I hot glued them to a toothpick, and stuck them in the cupcake! So easy and cute! Happy Super Bowl and may the best team win!!
]]>