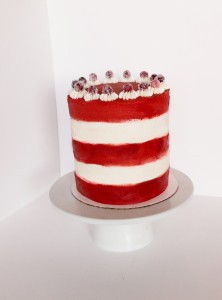
This red velvet cheesecake is the ultimate layer cake! It has three layers of red velvet cake, two layers of cheesecake, buttercream frosting, and candied cranberries on top! This cake is tall, dramatic, and vibrant. The red velvet cake is moist, melt in your mouth soft, with that light chocolatey buttermilk flavor. The cheesecake layers are smooth, rich, and creamy. Together, the layers make the perfect combination.


photography by Wendycoxphotography
Recipe by myrecipes
Ingredients
- Cheesecake Layers:
- 2 (8-in.) round aluminum foil cake pans
- 1 (12-oz.) package white chocolate morsels
- 5 (8-oz.) packages cream cheese, softened
- 1 cup granulated sugar
- 2 large eggs
- 1 tablespoon vanilla extract
- Red Velvet Layers:
- 1 cup butter, softened
- 2 1/2 cups granulated sugar
- 6 large eggs
- 3 cups all-purpose flour
- 3 tablespoons unsweetened cocoa
- 1/4 teaspoon baking soda
- 1 (8-oz.) container sour cream
- 2 teaspoons vanilla extract
- 2 (1-oz.) bottles red liquid food coloring
- 3 (6-in.) round cake pans
- White Chocolate Frosting:
- 2 (4-oz.) white chocolate baking bars, chopped
- 1/2 cup boiling water
- 1 cup butter, softened
- 1 (32-oz.) package powdered sugar, sifted
- 1/8 teaspoon table salt
Directions
Cheesecake layers:
- Prepare cheesecake layers. Preheat oven to 300 F. Line bottom and the sides of two 6 inch cake pans with aluminum foil, allowing 2-3 inches of the foil to extend over the sides. Lightly grease the foil.
- Microwave the white chocolate in a microwave safe bowl in spurts of 10 seconds, until melted.
- Beat the cream cheese and melted chocolate at medium speed with a kitchen aid or hand mixer until creamy.
- Gradually add 1 cup of sugar, beating well.
- Add 2 eggs, 1 at a time, beating until yellow disappears after each addition.
- Stir in 1 Tbsp. of vanilla.
- Pour into prepared pans.
- Bake for 30 minutes or until almost set. Turn off oven. Let cheesecakes stand in oven, with door closed, for 30 minutes.
- Remove from oven to wire racks and cool completely for about 1 1/2 hours. Cover and chill 8 hours.
Red Velvet Layers:
Preheat oven to 350°. Beat 1 cup butter at medium speed with a heavy-duty electric stand mixer until creamy. Gradually add 2 1/2 cups sugar, beating until light and fluffy. Add 6 eggs, 1 at a time, beating just until blended after each addition.
Stir together flour and next 2 ingredients; add to butter mixture alternately with sour cream, beginning and ending with flour mixture. Beat at low speed just until blended after each addition. Stir in 2 tsp. vanilla; stir in food coloring. Spoon batter into 3 greased and floured 6-inch cake pans.
Bake at 350° for 20 to 24 minutes or until a wooden pick inserted in center comes out clean. Cool in pans on wire racks 10 minutes. Remove from pans to wire racks; cool completely (about 1 hour).
Frosting:
Whisk together chocolate and 1/2 cup boiling water until chocolate melts. Cool 20 minutes; chill 30 minutes.
Beat 1 cup butter and chilled chocolate mixture at low speed until blended. Beat at medium speed 1 minute. Increase speed to high; beat 2 to 3 minutes or until fluffy. Gradually add powdered sugar and salt, beating at low speed until blended. Increase speed to high; beat 1 to 2 minutes or until smooth and fluffy.
For the Candied Cranberries Recipe from Carrie Sellman @The Cake Blog
3 3/4 cups sugar, divided
1 3/4 cups water
1 teaspoon vanilla extract
zest of 1 orange
12 ounces fresh cranberries
- In a sauce pan over medium heat, combine 2 1/2 cups sugar, water, vanilla and orange zest. Cook, stirring occasionally, until sugar has dissolved.
- Add cranberries and stir. Remove from heat and let rest until pan is cool enough to handle.
- Cover cranberries with a small plate to push berries down into the syrup. Once pan is completely cool, cover and refrigerate overnight.
- Fill a rimmed dish with remaining 1 1/4 cup sugar. Strain cranberries and reserve the syrup.
- Add strained cranberries into the sugar dish and shake until well coated. Remove from sugar and let dry on a baking tray for at least one hour.
TIP: Start candied cranberries at least one day in advance. Make extra to share as a gift or enjoy later. They are delicious on their own or as a garnish for holiday appetizers and cocktails. They can be stored for about one week.


