
Emoji Cookies
Decorating sugar cookies is so fun and once you get the hang of it, it can be so easy! I realized I didn’t have a tutorial when my good friend Elsa asked me if I had a recipe for royal icing. I hope this tutorial can help teach you how to decorate cookies and be sure to watch the video at the end!
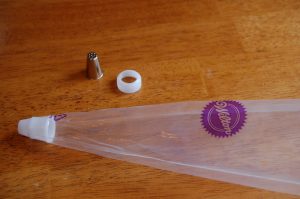
The things you will need to start decorating your sugar cookie are:
- piping bag
- a decorating tip with a small hole
- a coupler
- toothpicks
- food coloring

Sugar Cookie Recipe
Yield: 35-40 3″ cookies
This Classic Sugar Cookie Recipe is perfect for holiday or everyday sugar cookies. It’s simple to make and the cookies hold their shape when baked.
Ingredients:
2 sticks (8 ounces) of unsalted butter, softened
1 1/2 cups of granulated sugar
2 eggs
2 tsp of Pure Vanilla Extract
1/2 tsp baking powder
1/2 tsp salt
4 cups (17 ounces) of All-Purpose Flour
Directions:
Preheat the oven to 375 degrees.
Begin by placing the flour in a bowl and set it aside.
Place butter in a bowl and beat until smooth.
Add the sugar and mix until combined.
Add eggs one at a time mixing well in between each addition.
Add the vanilla, salt and baking powder and mix
Mix in the flour one cup at a time and mix just until the ingredients are combined.
Divide the dough into 3 discs and roll each one out on a mat. Freeze for 10-15 minutes and cut out your cookie shapes and bake 6-9 minutes.
How to Make Royal Icing Tips:
1. Weigh your powdered sugar ever time you make a batch. My results have been nothing but positive since I started weighing.
2. Keep air away because the icing dries fast. Air will dry the icing and make it form a crust that will stop up your icing tips.
3. Food Color Gels like AmeriColor or Wilton work best for adding color because they don’t add a lot of liquid.
4. If you don’t use a sifter, at least mix the powdered sugar with a whisk to help break down the lumps. I use a whisk.
5. Use a spray bottle to add water when thinning your icing. Gail at One Tough Cookie taught us this and it is a brilliant tip!
6. When flavoring your royal icing, add pure flavors and not imitations. I know the imitation is much cheaper but so is the flavor.
7. Make sure anything that touches your royal icing is “oil free!” Oil will cause your icing to separate and do really weird things. For example, if you make butter cream icing in your KitchenAid, you might want to clean the bowl with lemon juice after you wash it with hot soapy water.
8. Once you decorate you cookies, do not cover them in an airtight container until the icing is completely dry. The icing needs air to dry and if you cover them, they will not dry. Do not rush royal icing. Give it time to dry.
9. You can re-mix and refresh your icing if you need to. Sometimes my color will separate in the bag overnight or when placed in the refrigerator. So I place it into a bow, mix it and re-bag it. It will be good as new.
10. I store my icing in the refrigerator when I am not using it. Since meringue powder is dry egg whites, I feel it is safer than leaving it on the counter. I remove it about 30 minutes before decorating to let it get room temperature. Then I mix it well and add it to my piping bags or bottles.
11. Remember, what works for me, may not work for you. There are many amazing decorators out there that do things different than I do and it works. These are just guideline and tips that may help you find your way.
Royal Icing recipe
Ingredients:
(4 1/4 cups) powdered sugar
6 tablespoons of water
½ teaspoons cream of tartar
2.5 tablespoons of Meringue Powder
1 teaspoon of Pure Vanilla Extra
Directions:
Place the powdered sugar in your KitchenAid mixing bowl and set aside.
In a measuring cup whisk the water, cream of tartar, Meringue powder, and vanilla extract.
With the mixer on low and the paddle attachment, add the wet ingredients with the powdered sugar.
Once the ingredients are combined, turn the mixer on high for about a minute.
Place icing in a bowl and cover with plastic wrap
How to Outline a Cookie with Royal Icing:
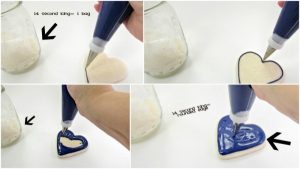
Begin by outlining and flooding the cookies. Each cookie is outlined and flooded the same way so I wanted to take a few minutes to share with new cookie decorators how easy it is.
When outlining a cookie with royal icing, place the tip close to the cookie and squeeze the piping bag gently until the icing comes out of the tip.
Then, let the icing touch the cookie and begin to lift the tip away from the cookie while continuing to add gentle pressure.
As you outline the edge of the cookie, hold the tip away from the cookie and let the icing fall as you guide it. If you try to outline with the tip close to the cookie, you will probably end up wiggly outline. Holding the tip away will allow you to pipe with control even if your hand shakes a little.
How to Flood a Cookie with Royal Icing:
Flooding a cookie can be accomplished with or without piping an outline. If you use an outline, it will help the icing stay on the cookie without oozing off the edge of the cookie. Flooding without an outline will give you a seamless edge.
To flood a cookie with an outline, begin by starting at the edge of the outline and squeeze the piping bag until the icing coms out. Keep applying pressure to the piping bag as you slowly apply icing around the edge of the cookie. Keep flooding the cookie by going around the cookie until you reach the center.
Once your cookie is completely flooded, gently shake and tap it on the cookie on the table to help the icing flatten out. Use a toothpick to pop any air bubbles.
Once you have a learn how to outline and flood a cookie with royal icing, you will have a nice base coat for decorating. There are millions of way you can decorate cookies. You can leave them simple and cute, add sprinkles, add royal icing embellishments, stencil or you can pipe a few details. Seriously can do anything you can imagine.
Here is a great video from the bearfoot baker