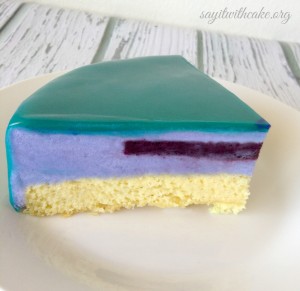
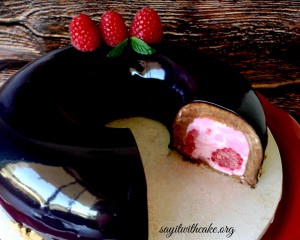
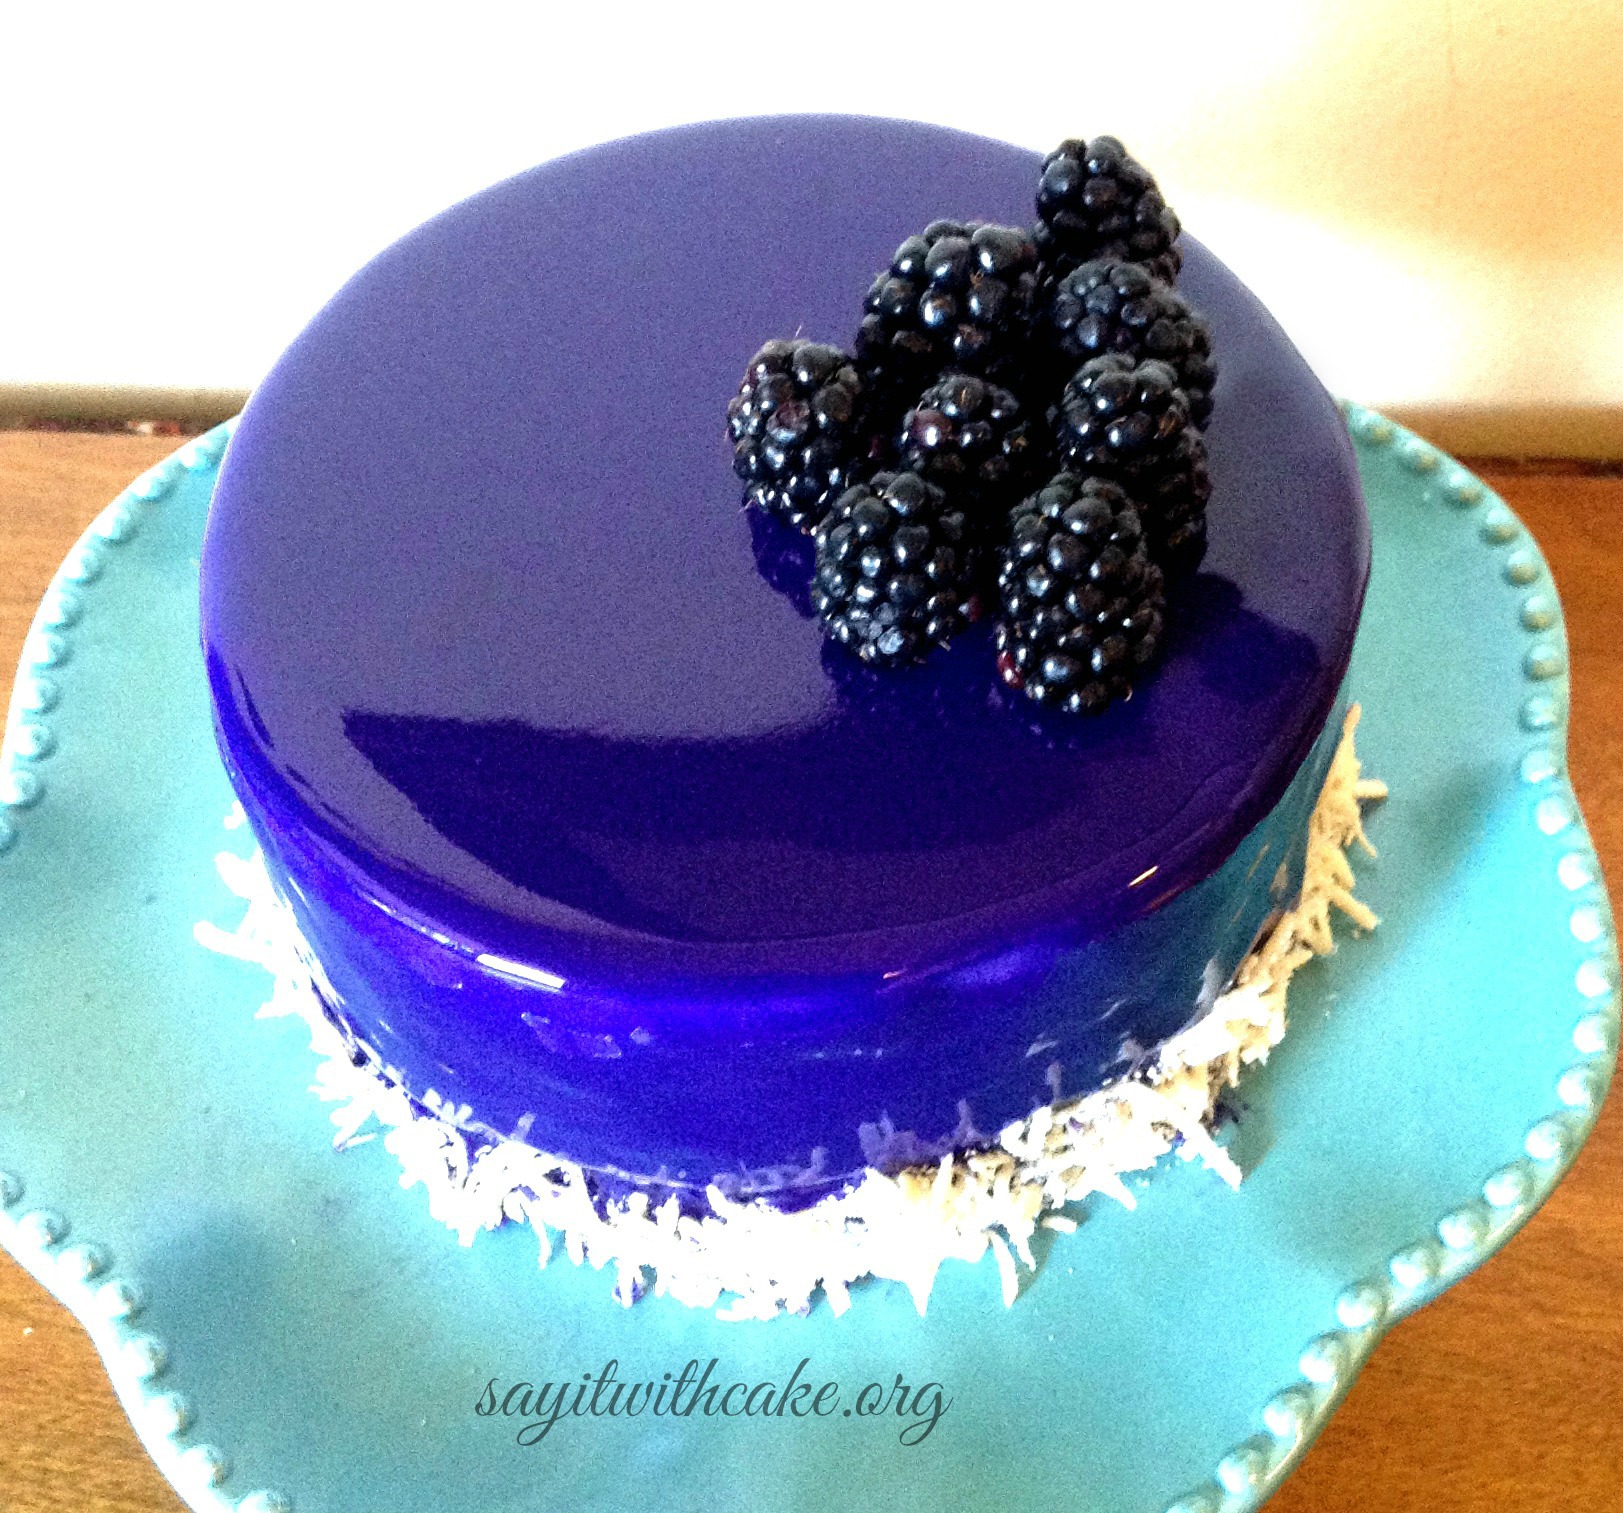 This Blackberry mousse cake has everything it needs to be a great dessert. The base is a chocolate Italian sponge cake. It’s dark and moist, sweet, and has the distinctive flavor of chocolate. The delicate white chocolate mousse is light, and soft in both sweetness and flavor. However, the mousse suspends a blackberry purée that’s been set with a touch of gelatin. This fruit layer is intense in both its color and its tart flavor. The final touch is a glaze of melted white chocolate colored purple on top of the cake; it provides a startling white chocolate flavor, and vibrant blackberry purple color that stands out in contrast to the white chocolate mousse. **REMEMBER THE MIRROR GLAZE WILL ONLY WORK ON A MOUSSE CAKE *** An airy texture is key to the mousse’s role in the dessert, so be careful when whipping the heavy cream. When using an electric mixer, there’s very little time difference between whipped cream that’s just shy of stiff peaks and cream that’s on the verge of becoming butter. The mousse with the white chocolate is light and creamy and so yummy! The blackberry puree inside the mousse is just the right amount of tanginess. I wish I had put the blackberry puree higher in the cake, because it blends in with the chocolate sponge cake at the bottom. I think next time I would also make a thicker layer of blackberry.
 *To make the blackberry purée “float,” begin by spooning half of the white chocolate mousse over the cake layer in the spring form pan. Set the circle of blackberry purée in the pan’s center and push it into the mousse until the purée is at the middle of the pan. The mousse will rise around the purée and up the pan’s sides. *To complete the illusion of the floating blackberry, add the remaining mousse to the spring form pan; it will exceed the top of the pan. Then use the pan’s edges to guide a large metal spatula across the top of the cake to smooth it.

Ingredients
- 120 grams (1/2 cup+1½ tablespoon) granulated sugar
- 4 extra large eggs, at room temperature
- 100 grams (1 cup minus 1 tablespoon) cake flour, sifted (if you use all-purpose flour 100 grams = 1 cup minus 2 tablespoons)
- 20 grams (3 tablespoons) unsweetened cocoa powder
- YOU WILL HAVE A LOT OF BATTER LEFT OVER
- 12-oz. package frozen blackberries
- 2 tsp. un flavored powdered gelatin
- 1/4 cup sugar
- 8 oz. good-quality white chocolate, chopped fine
- 1/4 cup water
- 1 envelope unflavored powdered gelatin
- 2 1/2 cups heavy cream
Instructions
- Take the eggs out from the fridge ahead of time or soak them for a few minutes in a bowl of warm water.
- Preheat the oven to 170 degrees C (338 degrees F).
- Butter and flour (or spray with baking spray) a 20 cm (8 inch) pan.
- Put the eggs and sugar in the bowl of your stand mixer.
- Beat the eggs until very fluffy and pale yellow (about 15 minutes on medium/high speed). To test that it has been beaten enough, let some of the mixture fall into the bowl, if it remains "sitting" on top it means that it's ready.
- Sift the flour and cocoa powder on top of the egg mixture, a little at a time, and fold it gently with a wooden spoon, from bottom to top.
- Pour the batter into the prepared pan. Don't smooth the top or bang the pan on the counter, leave it as it is!
- Bake for 40 minutes or until a toothpick inserted into the center comes out clean. (Don't open the oven for the first 20 minutes!)
- Turn off the oven but leave the chocolate Italian sponge cake inside (put a wooden spoon to keep the oven door slightly open) for at least 10 minutes so it can cool down slowly. After that, remove it from the oven, let it cool 10 more minutes, loosen around the edges with a knife, then flip the cake on a wire rack upside down (without the pan) to cool completely.
- This part of the recipe calls for an 8-in. cake pan because that’s the round pan most people have. However, since you’ll only need a 51/2-in. circle of purée, you won’t use all the purée. Use a smaller round pan if you have one; just fill it to a depth of 3/4 in.
- Line an 8-in. cake pan with plastic wrap, leaving about 4in. of excess plastic hanging over the pan’s sides.
- Defrost the berries until soft. Purée them in a food processor for about 30seconds, or until smooth. Set a fine sieve over a small, nonreactive saucepan.
- Pour a small amount of the blackberry sauce in the sieve and force it through with a spatula. Repeat the process until you have strained all the blackberry purée.
- Sprinkle the gelatin over the purée.
- Allow the gelatin to soak and soften, about 5min., and then stir.
- Heat the purée over medium heat and continue stirring until the gelatin melts completely.
- Add the sugar and stir until dissolved.
- Cool the blackberry mixture slightly and pour it into the plastic-lined cake pan.
- Freeze for an hour or until just set, and then drape the excess plastic over the top of the purée. Continue freezing for at least 12 hours. If you won’t be using the purée within 24hours, prevent freezer burn by popping it out of the pan and completely wrapping it in plastic or putting it in a plastic bag.
- Put the chocolate in a metal bowl (1 qt. or larger) that will fit snugly over a saucepan. (You also can use a double boiler.)
- Fill the saucepan with 1 in. of water and heat it until it’s on the verge of simmering.
- Remove the pan from the heat and set the bowl of chocolate on top of the saucepan.
- Stir the chocolate with a rubber spatula to encourage melting; however, don’t be concerned if the chocolate doesn’t melt entirely.
- Pour 1/4 cup water in another saucepan and sprinkle in the gelatin.
- Let the gelatin soak for 5 min., and then set the saucepan over medium heat and stir until the gelatin dissolves.
- Pour 1/2 cup of the cream in another small saucepan and bring it to a boil.
- Remove the saucepan from the heat immediately.
- Add the gelatin to the hot cream and stir until well mixed.
- Add this mixture to the melted chocolate and stir well with a spatula until the mixture is very smooth.
- Remove the bowl from the pan and allow the chocolate mixture to cool until it’s just warm.
- Use an electric mixer to whip 2 cups cream until it just holds stiff peaks.
- Use a rubber spatula to gently fold half of the whipped cream into the slightly warm chocolate mixture.
- Add the remaining whipped cream and fold gently until smooth.
- Don’t over fold the mixture; it should still have a few distinct streaks of white chocolate and whipped cream.
Remove the blackberry purée from the freezer and unwrap it. Use a 51⁄2-inch flan ring to cut a smaller circle from the purée. (You also can use a small plate as a template, or merely “eyeball” it, and cut a circle with the tip of a sharp knife.) Lay the purée circle in the center of the springform pan and push it into the mousse until it “floats” approximately in the middle of the pan. The mousse should begin to rise around the purée and up the pan’s sides. Add the remaining mousse; it should slightly exceed the top of the pan. Using the pan’s edges as a guide, scrape a large metal spatula across the top to remove the excess and to smooth the top of the mousse.
Put the cake, uncovered, in the refrigerator for about an hour to let the mousse set, and then cover the top with plastic wrap. The cake must be frozen for at least 8 hours before glazing. At this point, you can also freeze the cake for up to a week.
Remove the cake, still in the pan, from the freezer. Take the cake out of the pan and place on top of a cup or bowl. If you need to, loosen the pan by heating it gently with a hair dryer on medium heat, directing the hot air around the sides of the springform pan. Use a back-and-forth motion and be careful not to overheat. It should take no more than 10 to 15 seconds for the pan to sufficiently loosen. Carefully slide the long, narrow spatula between the cake and the pan’s sides to make sure the cake is ready to be removed from the pan.
Unsnap the springform pan, remove the cake, and put it on a cup, bowl, or can. Make sure you have something under the cake to catch the excess glaze like a cookie sheet. Pour the glaze on top. Rotate the cake so that the glaze covers the entire surface. If any bubbles appear on the glaze’s surface, quickly and gently pierce them with the tip of a small, sharp knife. To cut the cake, heat a thin, sharp knife with a hair dryer or the flame of a gas stove. Slice the cake gently using single downward motions, one piece at a time, and arrange the slices on individual plates. If you like, decorate with fresh blackberries.

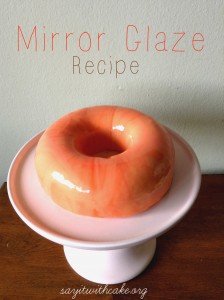
This mirror glaze recipe is my own creation. I took many different recipes and translated them to English. I tried many times and came up with this recipe! I used grams because it is more precise. Just use a food scale to measure grams if you are used to using cups.
Mirror Glaze Recipe
Ingredients
20 g gelatin powder
120 g water
300 g light corn syrup
300 g sugar
150 g water
200 g sweetened condensed milk
300 g white chocolate good quality chopped fine
food coloring ( I use Americolor purple)
Directions
Bloom 20 g gelatin in 120 g water
boil 300 g corn syrup, 300 g sugar, and 150 g water
remove from heat and add gelatin
add condensed milk
pour over chocolate and mix until chocolate is melted completely (make sure you chop the chocolate really small before hand)
stir and make sure glaze reaches 95 degrees F
separate into multiple bowls if you want multiple colors
add food color
Let it cool for many hours until the glaze reaches 89.6 degrees F and is semi thick.
Pour glaze over cake
 Recipe adapted from Fine Cooking
Enjoy!

other Mousse cakes you might enjoy!
Magnificent
thank you Anne!
Hi.
Regarding the glazing instructions—[Remove the cake, still in the pan, from the refrigerator. Pour the hot glaze on top. (If the glaze isn’t fluid enough to run easily over the top of the cake, add a little more hot cream.) Rotate the cake so that the glaze covers the entire surface. Some of the glaze may drip over the pan; that’s fine.]—How do you glaze the sides of the cake if you don’t remove the cake from the pan before glazing?
oh these directions were for just having the glaze on the top of the cake only. I will update the directions. If you want the glaze to run all the way over the cake, then remove it from the pan first.
If you make the cake, I would love to see a pic!
When you boil the sugar, water, and corn syrup; what temp do you boil it to? Thank you.
I didn’t actually look at the temp, I just cooked it until it started to boil.
Hallo dear.
If we dont have any light corn syrup. Can we change it with glucose syrup or maybe u have any advice? I saw on another website that the glucose and corn syrup has a little bit difference of contents. Thanks before
yes you can use glucose syrup if you don’t have any corn syrup. There is very little difference. Hope this helps!
I followed the instructions for the cake & blackberry filling so far, but found the cake batter way, way too much for my 8″X3″ springform pan. I used a 9″ pan instead, but the finished cake seems much thicker than shown in the pictures posted and there is little room to add the mouse to the pan. Am I missing a step?
you will have a lot of batter left over, or it you make one thick cake, you can take it out and torte it, cut it in half, That way you will have more room for the mousse. Or, you can put in acetate paper around the edge of the inside of the pan and your cake will be taller. You will fill up the pan over the top, but the acetate paper will hold it in. Does this help?
How many grams is there in an envelope of powdered gelatine?
about 7 grams
How much of the cake batter are you supposed to use? Do you pour it into the pan to a depth of 3/4″?
(And why not use a 2 or 3 egg recipe instead?)
you can use whatever cake mix you would like. Just torte the cake to the depth you want.
Thanks! Can you tell me what depth of batter corresponds to the 40 minute baking time you provided?
Sure! If you want to use the Italian sponge cake recipe, it will make a lot of cake. More then you will need for one entremets. So for this recipe, I would fill up the cake a little less then half way and cook for 40 minutes or until the toothpick comes out clean. A trick I learned is that when you start to smell the cake throughout the house, that is when the cake is almost done. So check the cake with a toothpick and see if it comes out clean. If you have multiple pans, you can probably cook a few other cakes with this recipe. You can freeze the cakes to use for later, or you can make cake pops with them, or just eat them!
Thanks! Can you tell me what depth of batter corresponds to the 40 minute baking time you provided in the recipe?
you will have a lot of batter left over, or it you make one thick cake, you can take it out and torte it, cut it in half, That way you will have more room for the mousse. Or, you can put in acetate paper around the edge of the inside of the pan and your cake will be taller. You will fill up the pan over the top, but the acetate paper will hold it in. Does this help?
Also, when I made my cake I filled it up about 1/4 of the way of an 8 inch pan. It took a lot less time then 40 minutes with a very thin cake.
Great work.
thank you!
Hi, I was wondering if I can pour the glass directly over a sponge cake, without the mousse? Also, do I wait for the glaze to cool before pouring it over the cake?
Thanks!
Hi Amanda, no you can not pour it over a sponge cake, it won’t work. It needs the frozen mousse to stick to. Yes, you need to wait for the glaze to cool before pouring it over the cake. In the directions, I tell you what temperature the glaze has to be at before you can pour it. Thanks for your questions, hope I helped! Thanks for stopping by!
Hey, I tried this recipe and it worked wonderful , I made a few changes to the recipe as to the colour and sponge cake but the end result was very good and the family is super happy with it thanks a lot for posting such a nice cake to all of us , I will try to post a pic but don’t know if that’s possible 😊😊😊
thank you so much! I would love to see a pic! I am glad it turned out!!
I have just made the blackberry jel & it is setting overnight in the fridge. Do I have to freeze it? If so can I just put in the freezer in the morning & let it sit all day there then use it?
yes you do need to freeze it until it is frozen so you can place the disc into the cake. It might be frozen enough if you let it freeze all day. Good luck! I would love to see the finished cake!!
Hi ! Thanks for the tip if freezing the gel. Made it much easier to handle. I’m confused about wether the cake needs to be frozen or just refrigerated to pour the glaze over ?
Thanks !!
the cake needs to be frozen!!
These directions are confusingly written.
Assembly—one week to nine hours before serving. If you’re going to assemble the cake more than 48 hours before serving it, wrap the assembled cake and freeze it. Defrost it in the refrigerator overnight before you glaze it. Chocolate glaze—at least an hour before serving, but you must pour it on the cake immediately. The glazed cake may wait in the refrigerator for one day to an hour before serving, or you may wrap it and freeze it for a week. The cake should be frozen only once, however, so if you’ve frozen it during an earlier stage, don’t freeze it again.
You say to defrost overnight before glazing then in your comments you state it should be frozen when you glaze it. Which is it? Also can you freeze it after glazing or not?
I am very frustrated with this recipe overall to the point where I just want to scrap it but after putting so much money into purchasing supplies for it I want to finish it.
so sorry, I will fix this right away. the cake needs to be frozen before glazing.
yes I am sorry I read it back and it is very confusing. for my cakes, I always freeze them. then after I glaze them, I do not freeze them again.
yes I am sorry I read it back and it is very confusing. for my cakes, I always freeze them. then after I glaze them, I do not freeze them again. so sorry, I will fix this right away. the cake needs to be frozen before glazing.
I wanted to know what size springfrom pan you assembled the cake in – I’m using an 8 inch sponge round and two 7 inch filling disks BUT I’m afraid I won’t have enough mousse, especially if I move it to a 9 inch pan.
This is my first mirror glaze so I’m apprehensive, your cake is beautiful and if I can get mine half as decent I’ll be happy.
you should use your same pan but maybe double the mousse so you have enough
how far ahead can you make this? Can you freeze the entire dessert, with the mirror glaze on? Will the mirror glaze still be shiny? I am wanting to do this for a dinner party, where i am going to be too busy to glaze it on the day. Thanks
I have not tried to freeze it. I think it would be hard because in order to freeze it you would have to wrap it in saran wrap and foil. When you take off the saran wrap it would most likely take the glaze off with it. Instead, I would keep it in the refrigerator for a day or two. It will keep its shine for a few days this way. Hope this helps!
Once you’ve glazed the cake, are you meant to eat it with the mousse still frozen or would you thaw it before serving? I want to make this to take to work, but I would need to make it the day before. Do I keep it in the fridge or the freezer to store it? And if i take it to work, will it just melt if it’s out of the freezer all day?? Thank you x
hi Naomi, the cake can be kept in the fridge and it will be just fine. It does not need to be kept frozen. It can be at room temperature for a little while, but not all day or it will melt. Keeping it in the fridge is best. good luck and I would love to see the cake when you make it!!
Can i use normal chocolate for the white chocolate mousse?
yes if you want to make just a chocolate mousse not a white chocolate mousse you can use chocolate. Or I also have some great chocolate mousse recipes on my blog.
Hi,
I love your cake and planning to do one recipe. Am wonderibg after pouring the glaze what shall i do with the cake? Can i put it back in the fridge, will it thaw perfectly.. and how long can i leave it in the fridge before presenting it. I have a lunch oarty and i was wondering if i can do it one night ahead
Thanks
Yes, after you pour on the glaze, put it back in the fridge. You can leave it in the fridge all night and it will be fine! Just don’t leave the cake out at room temperature for too long. I would love to see a picture!!
What kind of gel food coloring are you using when I try to use the white soft tell it curdled the chocolate in it do you have a suggestion so I can get that white color or that nice blue color you have
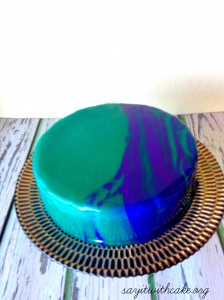
Hi Gabby, I always use Americolor food coloring. However, for my white chocolate mousse I didn’t use any food coloring. For the blue color, it is actually Americolor purple. It looks kinda blue in the photo though